Installing orcharhino Proxy
|
We refer to orcharhino Server and orcharhino Proxies throughout the documentation.
These terms describe the machines running your orcharhino, for example An orcharhino Proxy allows you to manage hosts in additional networks. You can configure your orcharhino Proxy to deliver content to managed hosts by either mirroring synchronized content from your orcharhino Server or by streaming content from orcharhino Server as requested by content hosts. Your orcharhino Proxy can also function as DNS, DHCP, and TFTP server and provide CA capabilities. The term smart proxy is used throughout the management UI. It describes the smart proxy functionality present on both your orcharhino Server and orcharhino Proxies. When looking at the upstream documentation for Foreman and Katello, you might come across the terms smart proxy, Foreman proxy, and Katello proxy. These terms are used ambiguously to describe the software component or the attached host with smart proxy functionality in different variations. By contrast, Red Hat named their Foreman downstream product Satellite and any attached smart proxies Capsules. Additionally, there are HTTP proxies as a way of relaying network traffic from one machine to another. They are often part of more advanced internal network architectures. |
This guide describes the installation of an external orcharhino Proxy to go along with your orcharhino. If you want to use orcharhino to manage hosts in additional networks, you need an orcharhino Proxy installed in each network you want to manage. This allows you to orchestrate the process of managing hosts in different networks, that is networks spanning across different data centres and regions.
|
The orcharhino installation will always come bundled with internal smart proxy functionality. It is sufficient for managing hosts in the same network the orcharhino is in. |
Usage Scenario
There are different reasons on why to use an orcharhino Proxy:
-
To manage infrastructure that is not part of the same network as the orcharhino.
-
To manage traffic across firewalls so as to deploy hosts into isolated networks. This helps you simplifying firewall rules and therefore making it more robust, as only the orcharhino Proxy needs to be accessible from outside its network.
-
To centrally manage infrastructure differentiated by location.
-
To reduce traffic and latency.
There are two ways on how to deliver content to managed hosts from orcharhino Proxies. An orcharhino Proxy can either mirror the synchronized content from orcharhino Server or relay requested content. This results in a trade-off between storage space and network traffic:
-
By default, orcharhino Proxies mirror the synchronized content from your orcharhino Server. Synchronized content implies that your orcharhino Proxy has a mirrored version of the content from orcharhino Server stored locally. This results in the need for additional storage capacity analogue to the orcharhino system requirements. On the other hand, there is significantly less traffic between orcharhino Proxies and your orcharhino Server.
-
Optionally, you can enable the streamed download policy for your orcharhino Proxy. orcharhino Proxies download content as requested from managed hosts without storing it locally. Instead, all content comes directly from your orcharhino Server and is purely relayed to the managed hosts in its network. This results in additional traffic between your orcharhino Server and orcharhino Proxy, but orcharhino Proxies do not need to cache the content locally using up additional disk space. For more information, see Changing the Download Policy for orcharhino Proxies.
Optionally, your orcharhino Proxy can also handle DHCP and DNS for its network.
System and Network Requirements
The orcharhino Proxy installation depends on a working orcharhino installation. It is recommended using the same operating system for orcharhino as well as for the orcharhino Proxy itself. The subscription manager needs to be installed on both machines and an activation key needs to be available.
This guide presumes a working orcharhino installation as well as a suitable host for the orcharhino Proxy. Regardless of whether it will run on virtualised hardware or on bare metal, the orcharhino Proxy machine must meet the following requirements:
| Minimum | Recommended | |
|---|---|---|
OS |
CentOS 7, Oracle Linux 7, or Red Hat Enterprise Linux 7 Refer to the OS requirements for more information. |
|
CPU |
4 cores |
8 cores |
RAM |
20 GiB |
32 GiB |
HDD 1 ( |
30 GiB |
50 GiB |
HDD 2 ( |
~ 40 GiB for each Enterprise Linux distribution ~ 80 GiB for each Debian or Ubuntu distribution |
~ 500 GiB (or as appropriate) if you plan to maintain additional repositories or keep multiple versions of packages |
If you use streamed as download policy for your orcharhino Proxy, a second disk for /var can be as small as 10 GiB.
|
ATIX does not support using third party repositories on your orcharhino Server or orcharhino Proxies. Resolving package conflicts or other issues due to third party or custom repositories is not part of your orcharhino support subscription. Please contact us if you have any questions. |
In addition to the system requirements, the orcharhino proxy also needs its own domain and subnet, which can be set up through orcharhino’s management UI. The network configuration and firewall rules must allow for communication from the orcharhino to the orcharhino proxy and vice versa.
For communication from the orcharhino to the orcharhino Proxy, the following ports must be open:
| Port | Protocol | SSL | Required for |
|---|---|---|---|
80 |
TCP |
yes |
bootdisk |
443 |
TCP |
yes |
Pulp |
9090 |
TCP |
yes |
Querying the orcharhino proxy feature set |
For communication from the orcharhino Proxy to the orcharhino, the following ports must be open:
| Port | Protocol | SSL | Required for |
|---|---|---|---|
80 |
TCP |
no |
Anaconda, yum, Katello certificates |
443 |
TCP |
yes |
yum, Katello, API, Pulp |
5000 |
TCP |
yes |
Katello for Docker registry |
5646 |
TCP |
yes |
Pulp mirror (Qpid dispatcher) |
5647 |
TCP |
yes |
Deprecated (has been used by Qpid for Katello agent) |
For communication from the clients to the orcharhino Proxy, the following ports must be open:
| Port | Protocol | SSL | Required for |
|---|---|---|---|
53 |
TCP & UDP |
no |
DNS Services |
67 |
UDP |
no |
DHCP Service |
69 |
UDP |
no |
PXE boot |
80 |
TCP |
no |
Anaconda, yum, templates, iPXE |
443 |
TCP |
yes |
yum, Katello |
5000 |
TCP |
yes |
Katello for Docker registry |
5647 |
TCP |
yes |
Deprecated (has been used by Qpid for Katello agent) |
8000 |
TCP |
yes |
Anaconda for downloading Kickstart templates, iPXE |
8140 |
TCP |
yes |
Puppet agent to Puppet master |
8443 |
TCP |
yes |
Subscription Management |
9090 |
TCP |
yes |
OpenSCAP reports |
The orcharhino and the orcharhino Proxy need to be reachable by name.
If they are not yet resolvable through DNS, ensure to add them to each others /etc/hosts file as follows.
If you are using an HTTP proxy, ensure it is properly configured as well.
|
This guide uses the network1 (192.168.50.0) for the orcharhino (called orcharhino), and network2 (192.168.60.0) for the orcharhino Proxy (called orcharhino-proxy).
The orcharhino is the |
To do so, edit the etc/hosts file on both the orcharhino and the orcharhino Proxy and add the following lines:
192.168.50.10 orcharhino.network1.example.com
192.168.60.10 orcharhino-proxy.network2.example.com orcharhino-proxy
In case the orcharhino uses an HTTP proxy itself, it is necessary to add the orcharhino Proxy to the no_proxy entries.
-
Edit the last line in
/etc/sysconfig/httpd:no_proxy='localhost,127.0.0.1,orcharhino.network1.example.com,orcharhino,*.network1.example.com,orcharhino-proxy.network2.example.com,*.network2.example.com' -
Edit the last line in
/etc/sysconfig/foreman-proxy:no_proxy='localhost,127.0.0.1,orcharhino.network1.example.com,orcharhino,*.network1.example.com,orcharhino-proxy.network2.example.com,*.network2.example.com' -
Edit the settings in orcharhino:
To do so, click on Administer > Settings and edit HTTP(S) proxy except hosts:
[ localhost, 127.0.0.1, orcharhino.network1.example.com, orcharhino, *.network1.example.com, orcharhino-proxy.network2.example.com, *.network2.example.com ]
|
If there are persisting problems, check your networking and firewall settings. |
Preparing Content for orcharhino Proxy
|
There are two ways to configure the orcharhino Proxy:
Either by editing the |
An orcharhino Proxy requires the same packages as the orcharhino itself.
You can get a list of repositories be running subscription-manager repos --list-enabled on your orcharhino Server.
Add these repositories to products and publish them as a composite content view.
This content must be available on the host you are installing the orcharhino Proxy on.
Alternatively, you can run the orcharhino Proxy Content job template.
This job template runs an Ansible role on your orcharhino to automatically create the necessary content view.
It bundles the required repositories and content credentials to a product specifically made for an orcharhino Proxy and creates an activation key.
Run this job template on your orcharhino Server where it picks up any repositories in /etc/yum.repos.d/redhat.repo and possible HTTP proxy settings.
You can synchronize the new content view by setting a variable.
For more information on how to run remote execution jobs targeting orcharhino Server, see securing orcharhino.
|
This job template is only available if the Ansible plugin is installed. |
The job template needs to be run after every orcharhino upgrade and looks as follows:
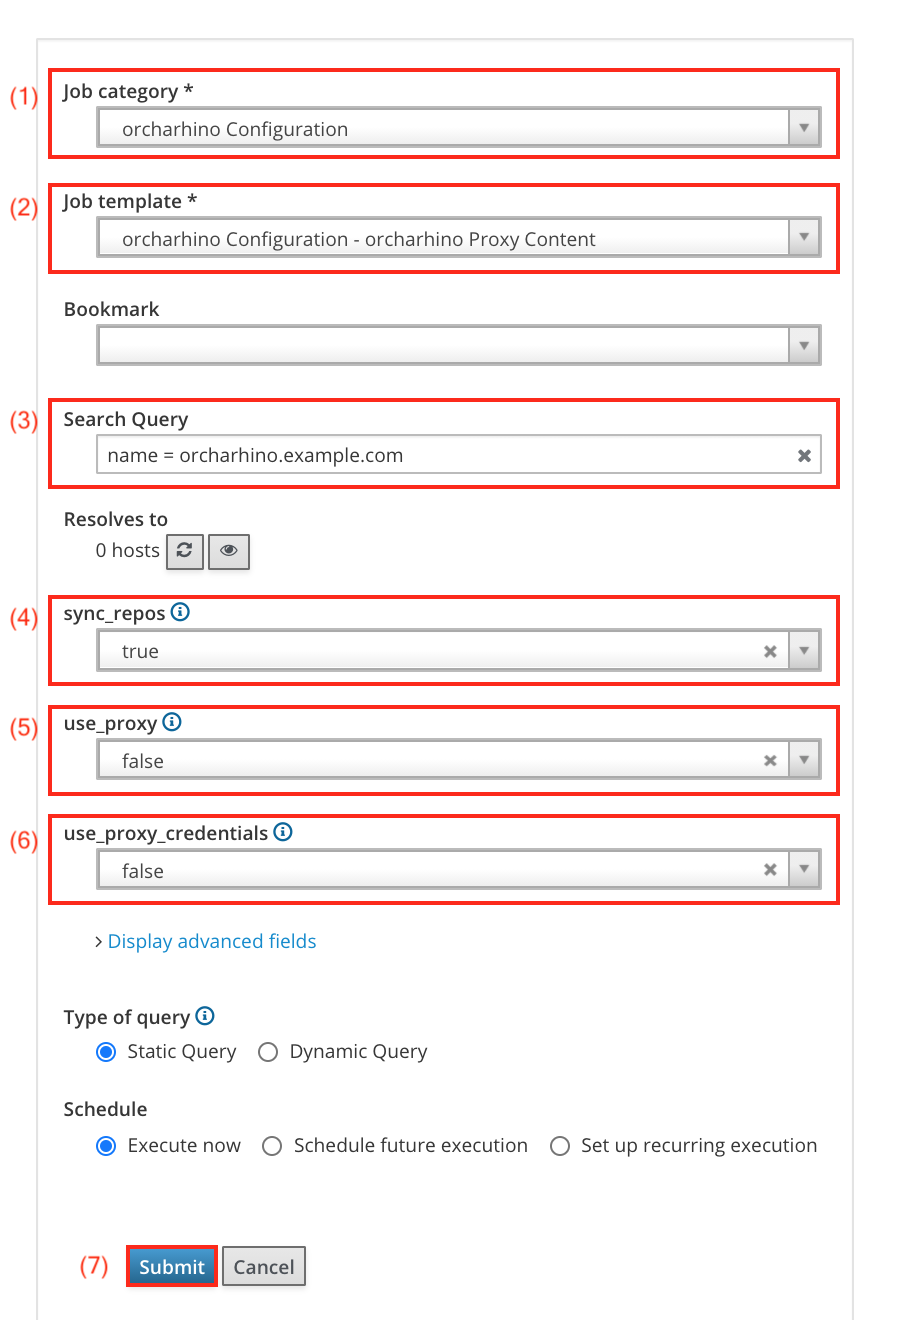
-
Select
orcharhino Configurationin the Job category drop down menu (1). -
The Job template drop down menu (2) contains the
orcharhino Proxy Contentjob template. -
Use the Search Query field (3) to search for your orcharhino host with the
namefilter. -
The sync_repos drop down menu (4) allows you to automatically sync the required repositories after bundling them to the
orcharhino Proxy Contentcontent view. -
The use_proxy drop down menu (5) allows you to use an HTTP proxy to connect to the repositories.
-
The use_proxy_credentials drop down menu (6) allows you to use the HTTP proxy credentials that are read from your orcharhino.
-
Click the Submit button (7) to start the execution of the job template.
|
Since this job template needs to be run against the orcharhino Server itself, you need to provide SSH access as described in Securing orcharhino. |
This section describes the steps necessary to attach an orcharhino Proxy to your orcharhino.
It consists of five steps: installing Katello, creating a .tar file containing certificates, copying the certificates to the orcharhino Proxy, installing the orcharhino Proxy, and setting the appropriate organization and location context.
Installing the orcharhino Proxy Packages
-
Install Katello on the orcharhino Proxy:
# yum -y install -t foreman-installer-katello -
Create a
tarfile with certificates. In case your organization already has certificates in place, you will need the following four files on your orcharhino:-
A private key:
proxy.key -
A certificate:
proxy.cert -
A certificate signing request:
proxy.csr -
The authority’s certificate:
proxy.caIn case you have no certificate signing request, you may create one with the private key and certificate by running the following command:
# openssl x509 -x509toreq -in orcharhino-proxy.cert -out orcharhino-proxy.csr -signkey orcharhino.keyRun the following command to compile the
tarfile:# foreman-proxy-certs-generate \ --foreman-proxy-fqdn "orcharhino-proxy.network2.example.com" \ --certs-tar "/root/orcharhino-proxy.network2.example.com-certs.tar" \ --server-cert /root/certs/orcharhino-proxy.cert \ --server-cert-req /root/certs/orcharhino-proxy.csr \ --server-key /root/certs/orcharhino-proxy.key \ --server-ca-cert /root/certs/orcharhino-proxy.caIn case there are no existing certificates, you can create them by running the following command on your orcharhino:
# foreman-proxy-certs-generate \
    --foreman-proxy-fqdn "orcharhino-proxy.network2.example.com" \
    --certs-tar "orcharhino-proxy.network2.example.com-certs.tar"
Save the standard output describing how to import certificates. This helps later on when installing the orcharhino Proxy.
-
-
Copy the generated certificates from your orcharhino Server to your orcharhino Proxy. This allows for a secure certificate based connection:
# scp /root/orcharhino-proxy.network2.example.com-certs.tar root@orcharhino-proxy.network2.example.com:/root/orcharhino-proxy.network2.example.com-certs.tar -
Install orcharhino Proxy with the proper certificates:
# foreman-installer \ --scenario foreman-proxy-content \ --certs-tar-file "/root/orcharhino-proxy.network2.example.com-certs.tar" \ --foreman-proxy-content-parent-fqdn "orcharhino.network1.example.com" \ --foreman-proxy-register-in-foreman "true" \ --foreman-proxy-foreman-base-url "https://orcharhino.network1.example.com" \ --foreman-proxy-trusted-hosts "orcharhino.network1.example.com" \ --foreman-proxy-trusted-hosts "orcharhino-proxy.network2.example.com" \ --foreman-proxy-oauth-consumer-key "mGZxEukJVvdL89ySA6Ymk3bAuGSF7jJj" \ --foreman-proxy-oauth-consumer-secret "g2tNnBR7qNHg9Gptt4XMcsFnh9c3kDSg" \ --puppet-server-foreman-url "https://orcharhino.network1.example.com" -
Set the organization and location context.
To add the organization and location to the orcharhino Proxy, go to Infrastructure > Smart Proxies and select orcharhino-proxy.network2.example.com.
-
Add Organization: your organization
-
Add Location: your location
-
Add Lifecycle Environment: Production
-
Download Policy: Immediate
One way to distinguish between orcharhino administrators and regular users is to place the orcharhino server as well as any attached orcharhino proxies into a separate location and/or organization context.
Alternatively, you can achieve a fine grained permissions concept using roles and filters.
-
By now, you have a fully functional orcharhino Proxy. Optionally, you can now activate DHCP and DNS services on your orcharhino Proxy.
Changing the Download Policy for orcharhino Proxies
There are four ways on how orcharhino Proxies handle the download of content from the orcharhino Server.
-
Immediate: Synchronize content immediately from orcharhino Server onto orcharhino Proxies.
-
On Demand: Download content at time of request by a managed host onto orcharhino Proxies.
-
Inherit from Repository: Synchronize content as specified on a per-repository basis onto orcharhino Proxies.
-
Streamed: Relay content requested by content hosts from orcharhino Server without saving it on orcharhino Proxies.
-
Navigate to Infrastructure > Smart Proxies.
-
Select an orcharhino Proxy and click Edit.
-
On the Smart Proxy tab, adjust the Download Policy.
-
Click Submit to save your changes.
Depending on your setting of Sync Smart Proxies after Content View promotion, content is automatically synchronized to orcharhino Proxies after promoting a content view.
Alternatively, you can manually synchronize content from orcharhino Server to orcharhino Proxies:
-
Navigate to Infrastructure > Smart Proxies.
-
Select your orcharhino Proxy.
-
On the Overview tab, click Synchronize.
-
Select Optimized Sync to bypass any unnecessary synchronization steps.
-
Select Complete Sync to synchronize repositories even if the meta data appears to be unchanged.
-
Optional: Activating DHCP, DNS, and TFTP
|
We generally recommend having the orcharhino Proxy provide DHCP, DNS, and TFTP services on its respective network. |
This subsection describes the steps necessary to activate DHCP, DNS, and TFTP on the orcharhino Proxy. First, TFTP capabilities are enabled on the orcharhino Proxy using the following command:
# foreman-installer --foreman-proxy-tftp trueThis activates TFTP capabilities on your orcharhino proxy which is necessary for provisioning hosts using PXE.
To activate DHCP and DNS on your orcharhino Proxy, configure /etc/foreman-installer/scenarios.d/foreman-proxy-content-answers.yaml.
Active DHCP and DNS simultaneously.
This is a sample configuration:
#DHCP:
dhcp: true
dhcp_gateway: 192.168.60.254
dhcp_range: 192.168.60.50 192.168.60.200
dhcp_option_domain: network2.example.com

#DNS:
dns: true
dns_zone: network2.example.com
dns_reverse:
- 60.168.192.in-addr.arpa
dns_forwarder:
- 192.168.50.10
Rerun the foreman-installer to automatically fetch the configuration from the edited yaml file.
After that, the orcharhino Proxy can be set up as DHCP and DNS server in the corresponding subnet and domain.
Navigate to Infrastructure > Domains and select network2.example.com.
Select the new orcharhino Proxy orcharhino-proxy.network2.example.com.
On Infrastructure > Subnets, select vlan60 and change the primary DNS to 192.168.60.10 with IPAM to DHCP and Boot Mode to DHCP.
Under Proxies, set everything but the last to orcharhino-proxy.network2.example.com.
Optional: Activating Remote Execution via SSH
On orcharhino, the remote execution plugin is installed by default. It can be installed on orcharhino proxies as follows:
-
Run the following command on the orcharhino Proxy to install this plugin:
foreman-installer --enable-foreman-proxy-plugin-remote-execution-ssh -
Next, navigate to Infrastructure > Subnets and select the subnet of the orcharhino Proxy.
-
On the Remove Execution tab, activate the orcharhino Proxy and click the Submit button.
-
You can now schedule remote jobs on hosts in the subnet of the orcharhino Proxy.
Additional Debian Configuration Steps
These additional steps are necessary to deploy hosts running Debian or Ubuntu through an orcharhino Proxy.
Without manual intervention, an orcharhino Proxy installation will not sign Debian and Ubuntu repositories.
Therefore, host deployments will fail because apt expects signed repositories by default.
The orcharhino Proxy will be configured manually to use the same signing key as the orcharhino.
-
Your orcharhino must be configured to sign
APTrepositories. -
You need a one time way to transfer files from your orcharhino to the orcharhino Proxy, for example
scp.
-
Check which key is used by Pulp:
# grep 'gpg_key_id' /etc/pulp/server/plugins.conf.d/deb_distributor.json -
Verify the matching key is also present in
/var/lib/pulp/gpg-home/:# su apache -s /bin/bash -c 'gpg --list-secret-keys --homedir /var/lib/pulp/gpg-home/'Ensure it displays the same GPG key id as seen in the first step.
-
Transfer the
gpg-homedirectory from your orcharhino Server to your orcharhino Proxy:# scp -r /var/lib/pulp/gpg-home/ root@orcharhino-proxy.example.com:/var/lib/pulp/gpg-homeYou may verify the correctness once more by running
gpg --list-secret-keys --homedir /var/lib/pulp/gpg-home/on the orcharhino Proxy. -
Transfer the ownership of the copied folder to the apache user on your orcharhino Proxy:
# chown -R apache:apache /var/lib/pulp/gpg-home/ -
Transfer the config file from your orcharhino Server to the orcharhino Proxy:
# scp /etc/pulp/server/plugins.conf.d/deb_distributor.json root@orcharhino-proxy.example.com:/etc/pulp/server/plugins.conf.d/deb_distributor.json -
Transfer
apt_sign.shfrom your orcharhino Server to the orcharhino Proxy:# scp /opt/orcharhino/apt_sign.sh root@orcharhino-proxy.example.com:/opt/orcharhino/apt_sign.sh -
Transfer the public
pulp_deb_signing.keyfile from your orcharhino to the orcharhino Proxy:# scp /var/www/html/pub/pulp_deb_signing.key root@orcharhino-proxy.example.com:/var/www/html/pub/pulp_deb_signing.key