Proxmox
Proxmox is one of the compute resource providers supported by orcharhino. It is open source software and made for virtualization via KVM hypervisor and LXC containers. The following instructions let you attach a running Proxmox installation to orcharhino.
Installing the Proxmox Compute Resource Plugin
Install the Proxmox plugin to manage hosts on and deploy to Proxmox:
# yum install -y tfm-rubygem-fog-proxmox tfm-rubygem-foreman_fog_proxmox
# foreman-maintain service restart
Navigate to Administer > About and select the compute resources tab to verify the installation of the Proxmox compute resource plugin.
Viewing a Proxmox Compute Resource
-
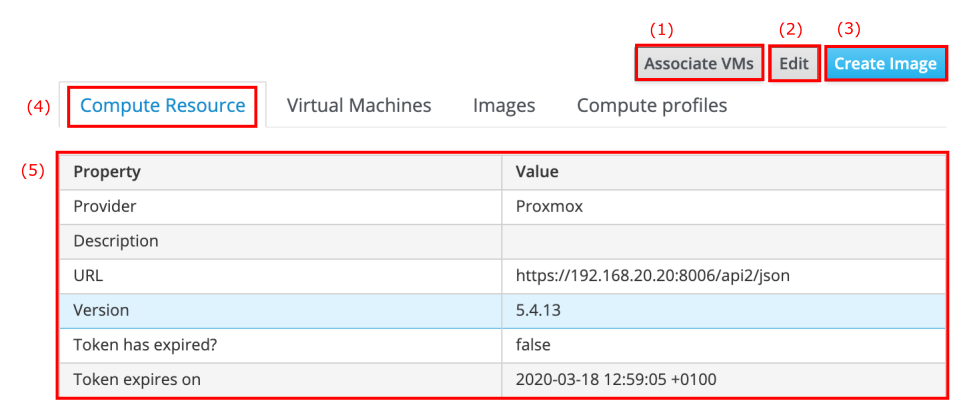
The Associate VMs button (1) will reassociate any hosts that exist in a disassociated state. This mostly happens when hosts are manually disassociated via the all hosts page.
-
The Edit button (2) will take you to the edit compute resource page for the compute resource being viewed.
-
The Create Image button (3) will take you to the create compute resource image page.
-
The Compute Resource tab (4) shows some basic information about the compute resource in question.
-
You can view general details of the selected compute resource in a table (5).
-
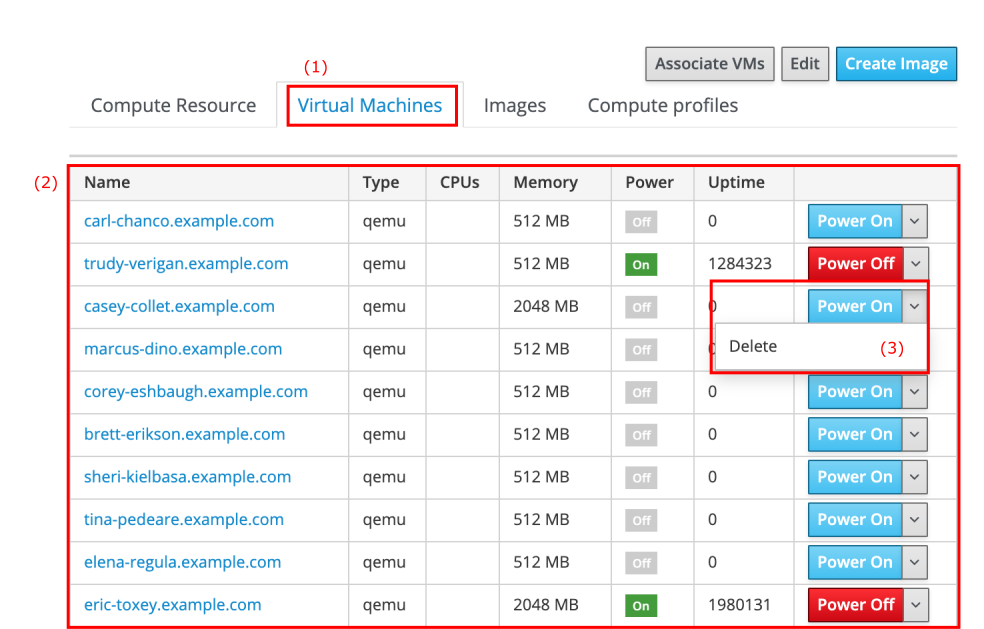
Selecting the Virtual Machines tab (1) displays all virtual machines running on the selected Proxmox compute resource provider, irrespective of whether they are associated with an orcharhino host or not.
-
The Name column (2) will list all machines with additional information such as type, memory, and whether they are currently powered on or not.
-
Selecting Power On or Power Off in the Actions column (3) will change the power state of the virtual machine in question. Additionally, you may delete a virtual machine by clicking the drop down menu in the column on the right side.
-
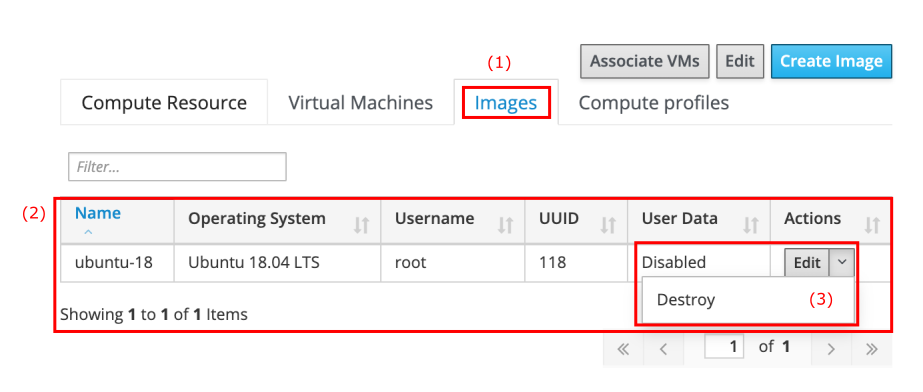
Navigating to the Images tab (1) will take you to the list of Proxmox images.
-
The list of images contains the Name (2) and operating system amongst other information.
-
The Action menu (3) lets you edit and destroy images from orcharhino, but not the underlying hypervisor.
-
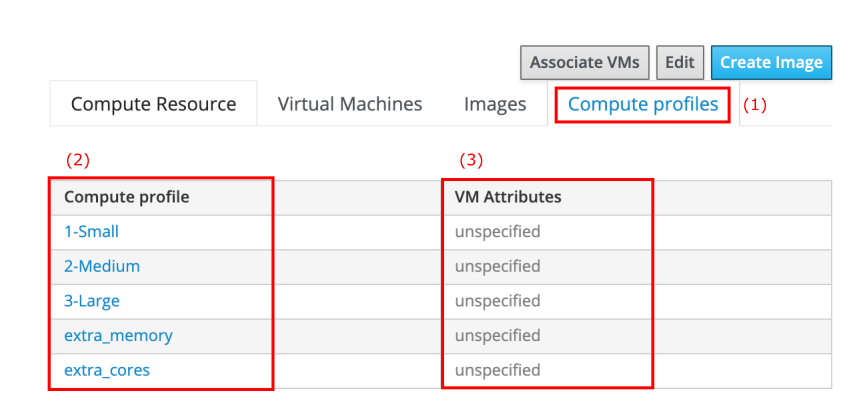
Selecting the Compute profiles tab (1) displays a list of compute profiles available on Proxmox.
-
The left column Compute Profiles (2) lists the names of existing compute profiles for Proxmox.
-
The right column VM Attributes (3) lists attributes such as number of CPUs and assigned memory, which are unspecified in the screenshot above.
Viewing a Proxmox Virtual Machine
The virtual machine overview page can be accessed via the Virtual Machines tab on the compute resource overview page running the virtual machine:
Infrastructure > Compute resources >> list of compute resources > name of a compute resource > Virtual Machines tab > name of a virtual machine
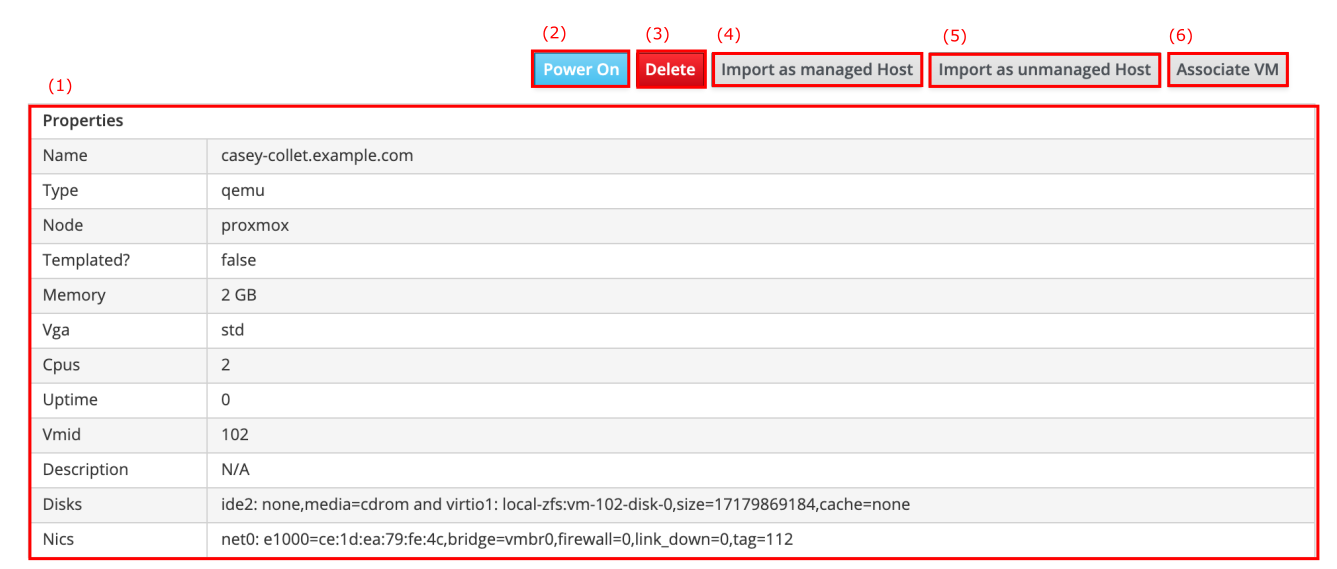
The virtual machine overview page displays information about the relevant virtual machine and includes a number of buttons to perform actions relating to it:
-
The list of Properties (1) displays various properties of the Proxmox virtual machine.
-
The Power On button (2), or, for that matter, Power Off button, will change the power state of the virtual machine in question.
-
The Delete button (3) will delete the virtual machine from the Proxmox compute resource while retaining any associated orcharhino hosts. If you want to delete the orphaned host, navigate to Hosts > All Hosts and delete the host manually.
-
The Import as managed Host button (4) lets you import a virtual machine to orcharhino. Managed indicates that hosts will receive provisioning and configuration management as well as return reports to orcharhino.
-
The Import as unmanaged Host button (5) lets you import a virtual machine to orcharhino. Unmanaged indicates that orcharhino will only handle configuration management and receive reports from hosts.
-
The Associate VM button (6) will solely add the host to orcharhino’s list of hosts.
Creating a Proxmox Compute Resource
The create compute resource page can be accessed via the Create Compute Resource button:
Infrastructure > Compute resources >> Create Compute Resource
|
Clicking the Create Compute Resource button does not actually create a new compute resource, rather it serves to attach a preexisting compute resource to the list of known compute resources to orcharhino. |
When adding a compute resource provider to orcharhino, you must provide a name, select the relevant provider, and enter any provider specific connection information:
Enter the following information to add Proxmox as a compute resource:

-
Choose a meaningful Name (1), for example
proxmox.example.com. -
Select Proxmox from the Provider (2) drop down menu. Now, Proxmox specific additional provider fields appear.
-
You may also add an arbitrary Description (3) to your compute resource.
-
Check the Renew expired token? box (4) to ensure the token does not expire.
-
The Url (5) is the location under which Proxmox can be accessed. Remember to add the appropriate port and
/api2/jsonpath. -
The Test Connection button (6) allows you to verify the URL and its corresponding credentials.
-
The Username (7) refers to the Proxmox user account to be attached to orcharhino.
-
The Password (8) is necessary to authenticate the Proxmox user.
-
SSL Verify Peer (9) lets you verify the certificate used for the encrypted connection from orcharhino to the compute resource.
-
X509 Certificate Authorities (10) lets you input a certificate authority or a correctly ordered chain of certificate authorities.
-
Click the Submit (11) button to save the Proxmox configuration to orcharhino.
-
Assign a Location and Organization (12) context on the corresponding tab.
Editing a Proxmox Compute Resource
The edit compute resource page can be accessed via the list of compute resources:
Infrastructure > Compute resources >> list of compute resources > Actions column > Edit
The edit compute resource page is essentially the same as the create compute resource page, with the difference that fields will be prefilled with the settings of the compute resource being edited.
Creating a Proxmox Image
The create image page can be accessed via the compute resource overview page:
Infrastructure > Compute resources >> list of compute resources > name of a compute resource > Create Image button
|
What is referred to as a image within orcharhino is referred to as a template within Proxmox. This difference in terminology is necessary since the term template is already widely used with a definite meaning within orcharhino. The two terms may be used interchangeably within this section. |
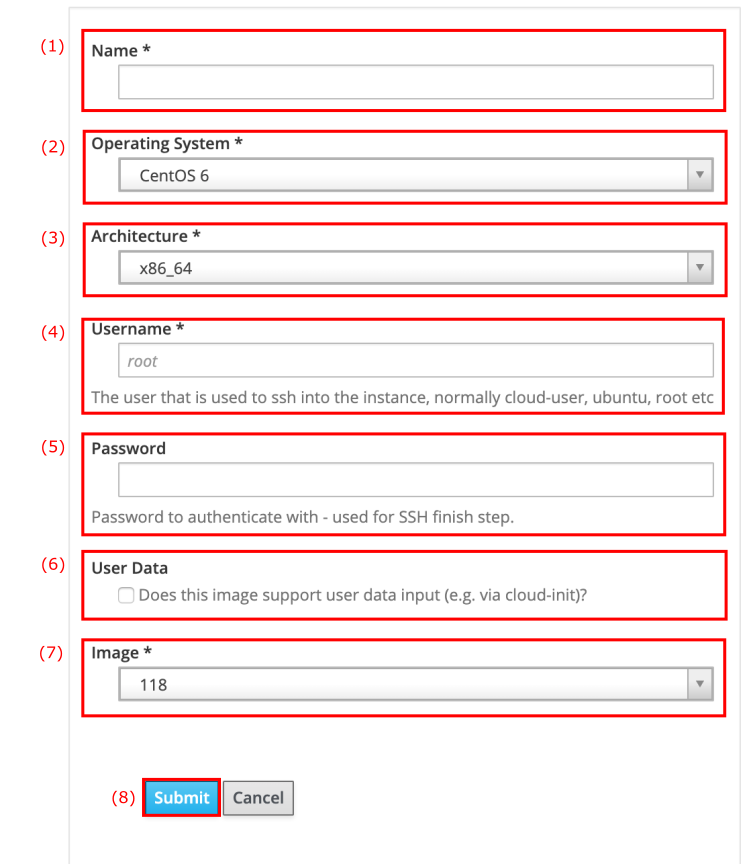
The create image page looks as follows:
-
In the Name (1) field you can assign the new Proxmox image a meaningful and unique name, that is describing the kind of host that is to be provisioned from the image. We recommend adding the term template to clarify that the image references a template within Proxmox.
-
The Operating System drop down menu (2) lets you associate the image to an orcharhino operating system.
-
Associate the image to the correct Architecture (3).
-
The Username field (4) refers to the user needed to SSH to the machine. The default user name is
root. This is only necessary if the image has an inbuilt user account. -
With the User Data checkbox (5) you may enable support for user data input.
-
The Password (6) is necessary to authenticate the above mentioned user via SSH. This is only necessary if the image has an inbuilt user account.
-
Select the Image (7) from the drop down menu to tell orcharhino the relative path of the template on the Proxmox machine. This path can be found within Proxmox.
-
Click the Submit (8) button to save the changes.
Ensure the operating system and architecture fields match the operating system and architecture found in the template being created.
Editing a Proxmox Image
The edit image page can be accessed via the Images tab on the compute resource overview page:
Infrastructure > Compute resources >> list of compute resources > name of a compute resource > Images tab > Actions column > Edit
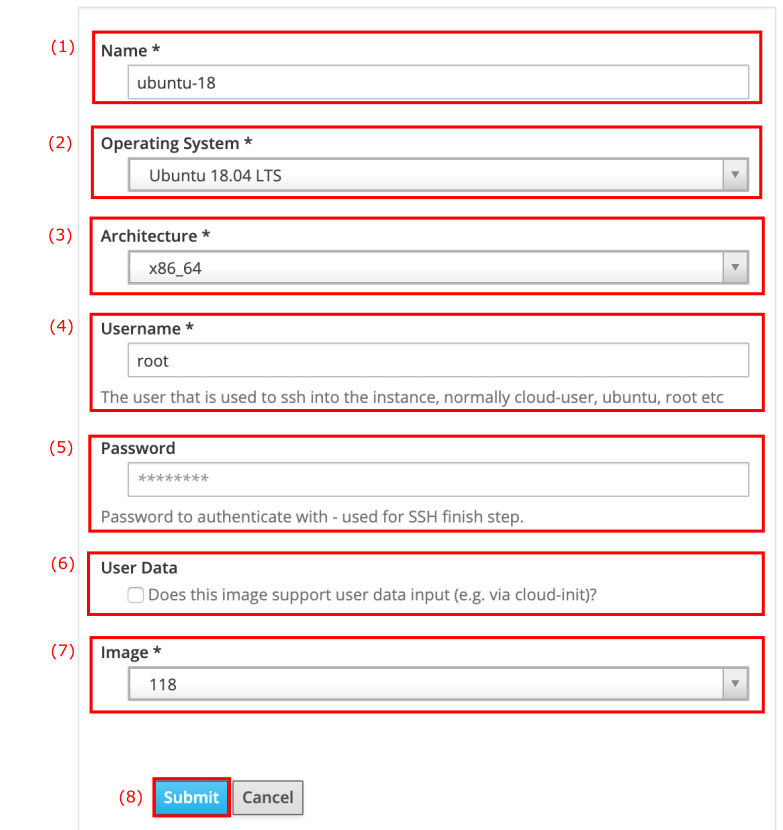
The edit image page is essentially the same as the creating an image page, with the difference that fields will be prefilled with the settings of the image being edited.
-
Remember to click Submit (8) to save your changes.
Editing a Proxmox Compute Profile
The edit compute profile page can be accessed via the list of compute profiles:
Infrastructure > Compute profiles >> list of compute profiles > name of a compute profile
This page displays a list of compute attribute sets (one for each compute resource known to orcharhino):

-
The Compute Resource column (1) lists all available compute resource providers.
-
The VM Attributes column (2) will read unspecified for a new compute profile.
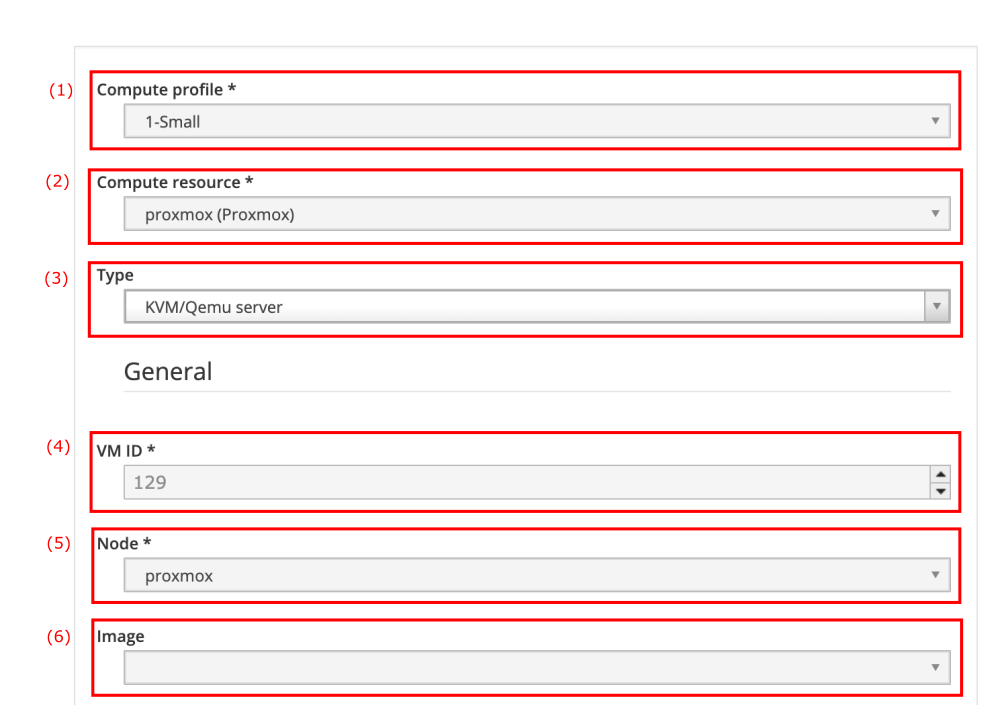
Clicking on the name of a compute resource in the left column of the list will open the edit compute attributes page for that compute resource:
-
The Compute Profile drop down menu (1) displays the name of the selected compute profile. This cannot be changed. To edit another compute profile, go back to the list of compute profiles.
-
The Compute Resource drop down menu (2) cannot be changed either. It displays the compute resource of the selected compute profile.
-
The Type drop down menu (3) lets you select the kind of virtualization solution hosts will run on when created using this compute profile. In Proxmox, you may choose between LXC (Linux containers) and KVM/QEMU (kernel-based virtual machines). LXC focuses more on isolating applications and reusing the host kernel, whereas KVM lets you boot various guest operating systems and therefor runs its own kernel.
-
The VM ID (4) is a preset unique number by Proxmox to identify its guest machines.
-
The Node drop down menu (5) lets you choose on which node the compute profile runs on. This mostly makes sense if you run a Proxmox cluster.
-
The Image drop down menu (6) lists available images on the Proxmox hypervisor. Select one to choose on which the compute profile is to be run on.
-
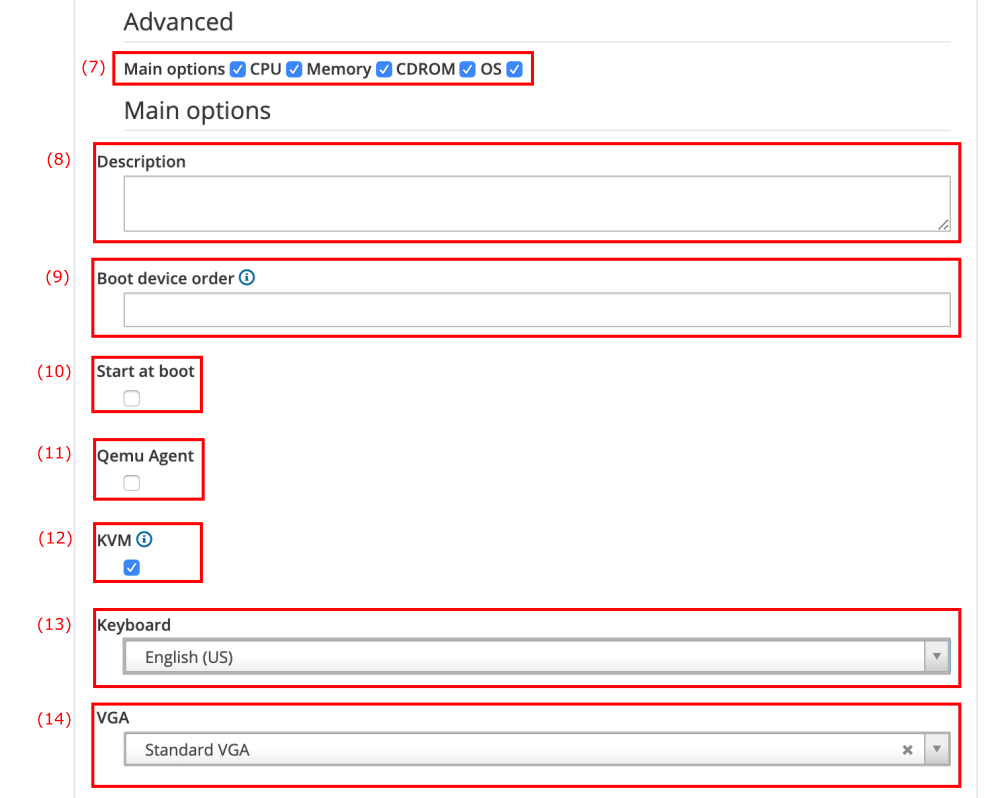
The Main options, CPU, Memory, CDROM, and OS checkboxes (7) can be optionally ticked to gain visual access to configure the compute profile in more detail. Configuring the network interfaces and storage is mandatory.
-
You may give the compute profile an arbitrary Description (8).
-
In the Boot Device Order field (9) you may choose a custom root device order. The default is trying to boot from hard disk first, CDROM second, and network third.
-
Checking the Start at Boot (10) checkbox lets you automatically boot up your newly created host running the selected compute profile. This can be overwritten for individual hosts on the create new host page.
-
Checking the Qemu Agent checkbox (11) automatically installs a QEMU agent on the guest system. This is useful to properly shutdown guest machines using ACPI commands.
-
The KVM (12) lets you enable or disable KVM based hardware virtualization.
-
You may choose a specific keyboard layout in the Keyboard drop down menu (13).
-
The VGA checkbox (14) allows you to select the default output type.
-
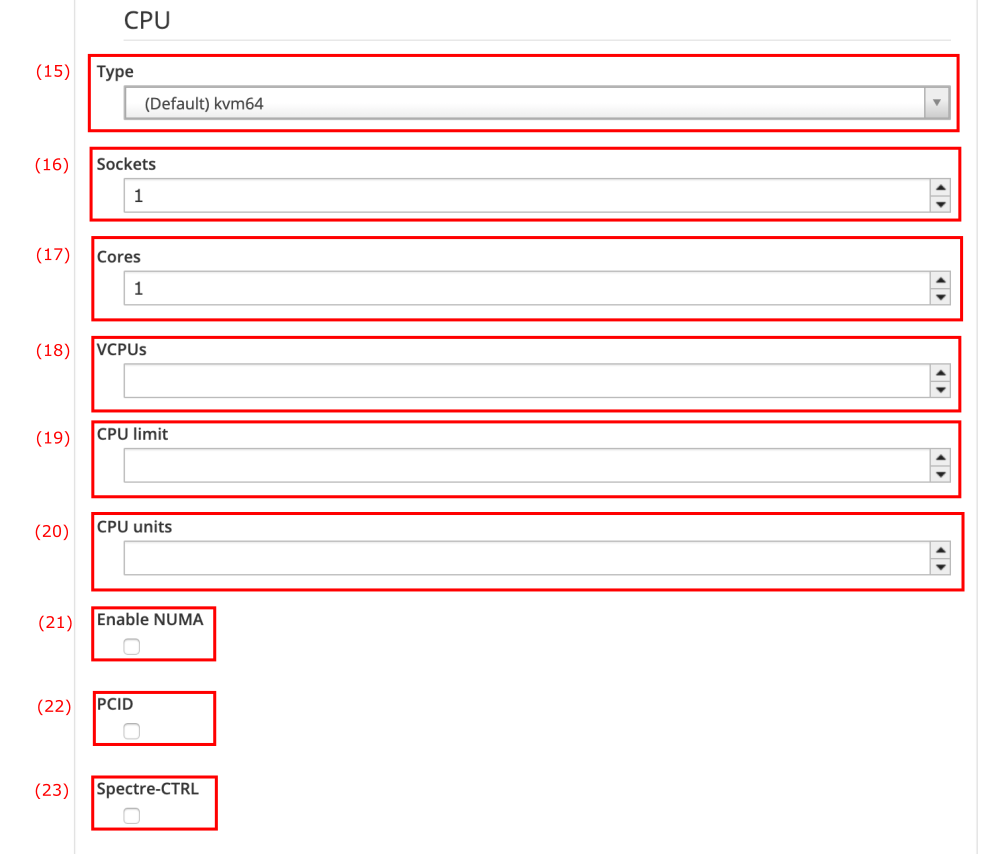
The Type drop down menu (15) allows you to select an architecture different than the architecture Proxmox is running on. This is based on QEMU’s hardware emulation capabilities.
-
The Sockets field (16) allows you to set the number of CPU sockets the compute profile will run on. This is mostly done for software licensing reasons, that is assign 16 cores to a virtual machines which consists of four quad core CPUs.
-
The Cores field (17) lets you assign multiple cores to hosts based on the selected compute profile.
-
The VCPUs field (18) allows you to assign virtual CPUs (that is simultaneous multithreading) to the host. The default value is the product of sockets and cores.
-
The CPU limit field (19) allows you to set the maximum number of CPU cores the guest system is allowed to use. Using virtual CPUs instead of cores lets you hide information from the guest system. This limits the guest system to a specified maximum CPU time.
-
The CPU units field lets you specify the relative CPU time managed by the kernel fair scheduler. The default value is 1000 and it only accepts positive numbers larger than 8.
-
You may choose to enable non uniform memory access with checking the Enable NUMA checkbox (21). This lets you optimize access time to memory of CPUs.
-
The PCID checkbox (22) lets you mitigate performance impacts of meltdown patches to secure kernel page table isolation.
-
Ticking the Spectre-CTRL checkbox (23) enables Spectre v1 and v2 mitigations on Intel CPUs.
-
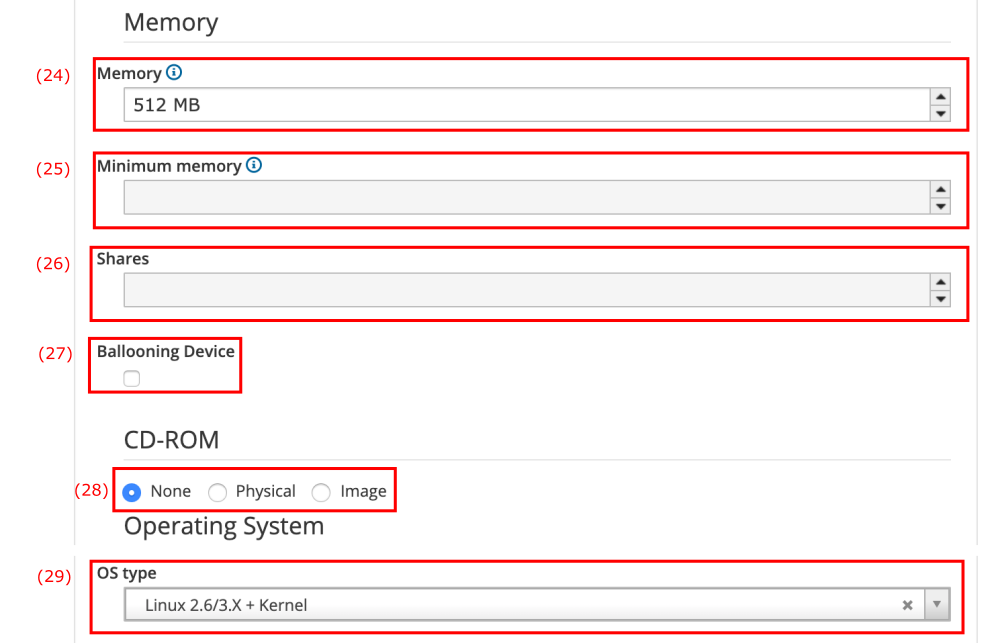
The Memory field (24) lets you specify a maximum amount of memory available to the Proxmox guest.
-
The Minimum memory field (25) lets you specify a minimum amount of memory available to the Proxmox guest.
-
The Shares field (26) specifies the weight of the host using this compute profile. Proxmox uses the shares number to adjust resources accordingly.
-
Activating the Ballooning Device checkbox (27) lets you optionally add more memory after creating a host.
-
By default, there is no CDROM (28) selected. Optionally, you may select Image and specify a storage path and image ISO name as CDROM.
-
On the OS Type drop down menu (29) you may select the appropriate operating system type for the host to be created with the selected compute profile.
-
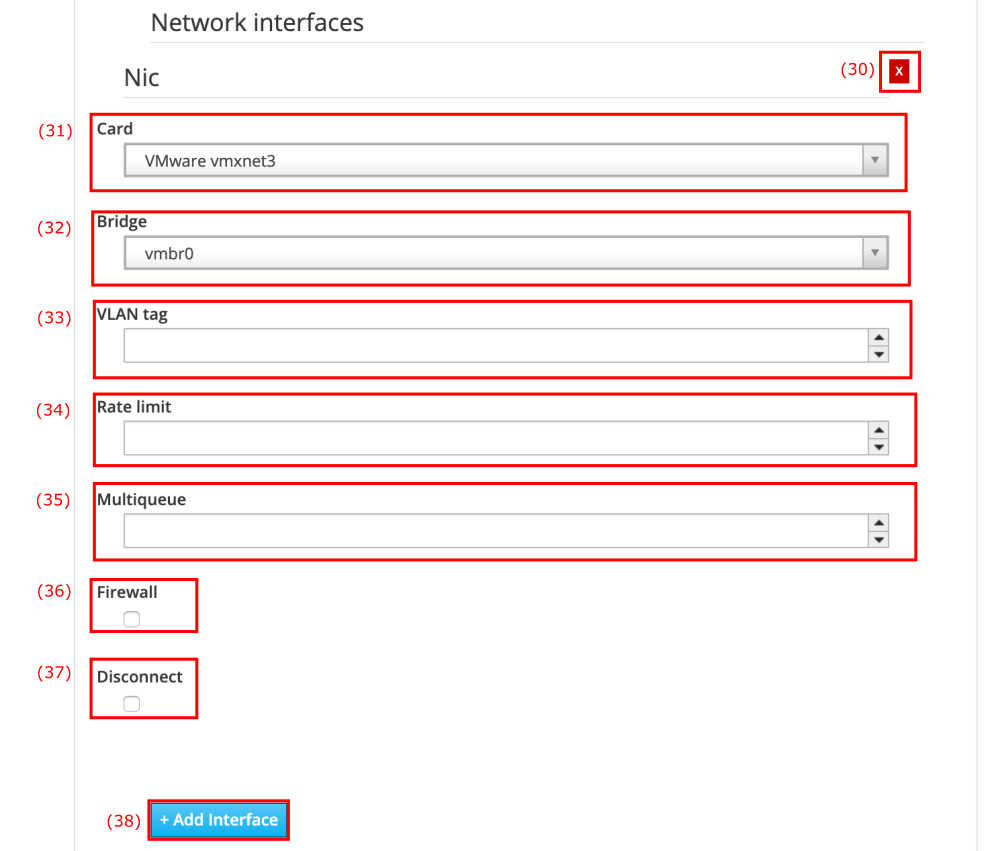
If there are no network capabilities required, you could choose to remove the default NIC by clicking the red cross (30). This is not recommended.
-
The Card drop down menu (31) lets you select a network interface card present on the Proxmox machine.
-
The Bridge drop down menu (32) lets you select which bridge the to be created host will be assigned to.
-
The VLAN tag field (33) lets you input the corresponding VLAN tag which your Proxmox machine is part of.
-
The Rate Limit (34) lets you limit networking traffic.
-
The Multiqueue (35) options allow hosts to use multiple virtual CPUs to process network packets.
-
The Firewall checkbox (36) allows you to protect the interface with a firewall.
-
The Disconnect checkbox (37) lets you disable the network interface card by default when starting the machine.
-
Optionally, you may add another network interface by clicking the Add Interface button (38). This presents the same options as shown above (that is option 30 to 37).
-
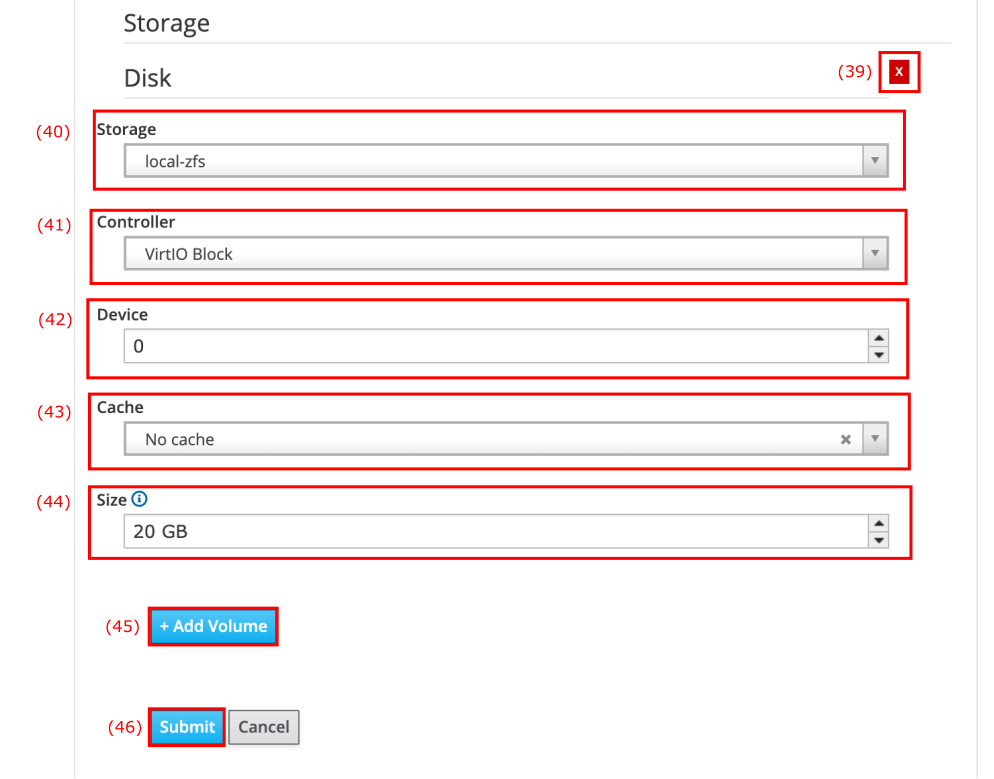
You may delete the default disk by clicking the red cross (39). This is not recommended.
-
The Storage drop down menu (40) lets you select the storage pool available to the Proxmox compute resource.
-
The Controller drop down menu (41) lets you select an appropriate storage controller. It is recommended to use either SCSI or VirtIO Block.
-
The Device field (42) needs to be manually iterated starting with zero. If you choose to add a second storage device, it would get 1 as its device number.
-
The Cache drop down menu (43) lets you optionally activate caching for the selected disk. The use of caching is not recommended.
-
The Size field (44) lets you specify the size of the hard disk available to hosts using this compute profile.
-
Optionally, you may choose to add more storage devices by clicking the Add Volume button (45).
-
Click Submit (46) to save your changes.
Most fields will come prefilled with reasonable default values, even for new compute profiles.