Installing orcharhino Server
This guide describes how to install orcharhino Server using one of two methods. If you want to install orcharhino in a disconnected environment, see Installing orcharhino Server Offline.
|
orcharhino is available through a subscription model. Please contact us about getting access. |
|
ATIX supports orcharhino installations on CentOS 7, Oracle Linux 7, and Red Hat Enterprise Linux 7. However, the orcharhino OVA image is CentOS 7 specific. ATIX provides Kickstart files for CentOS 7 and Oracle Linux 7. For orcharhino installations on Red Hat Enterprise Linux, go straight to the prerequisites and system requirements section. |
For orcharhino installations on CentOS 7 or Oracle Linux 7, perform a Kickstart installation. ATIX provides Kickstart files to install CentOS 7 or Oracle Linux 7 on the machine where orcharhino will run on. This works in virtually any scenario including bare metal installations.
If you want to install orcharhino in a VMware vSphere (version 6.0 or greater) environment, perform an orcharhino appliance installation. This uses an open virtual appliance image (short: OVA) to create the orcharhino host in your VMware vSphere and automatically start the installation process.
Both installation methods converge in the main installation steps. Either way, start by carefully reading the prerequisites and system requirements.
Prerequisites and System Requirements
Regardless of the installation method, read all of the general requirements, the system requirements, the OS requirements, and the network requirements.
If you are performing an orcharhino appliance installation, read the appliance requirements. If you are performing a Kickstart installation, read the Kickstart requirements.
|
If you want to deploy hosts into networks other than the one your orcharhino is in, you also need an orcharhino proxy installed in each target network. |
General Requirements
|
We recommend installing orcharhino on a virtual server. This allows for snapshot creation for backups among other advantages. Optionally, you can install orcharhino on a bare metal system. |
Regardless of your chosen installation method, you need the following:
-
A host as outlined in the system requirements.
-
A network infrastructure as outlined in the network requirements.
-
An orcharhino activation key used to register your orcharhino instance with ATIX.
If you have an ATIX subscription, you will receive your activation key and the required download links in your initial welcome email. If you have not received your welcome email, please contact us.
-
A browser on a secondary device that is able to resolve a route to the orcharhino host.
-
A working internet connection, either directly or by using an HTTP/HTTPS proxy.
Installing orcharhino Server in a disconnected environment is an advanced installation method. We recommend that you contact us if you want to do an offline installation.
|
ATIX does not support using third party repositories on your orcharhino Server or orcharhino Proxies. Resolving package conflicts or other issues due to third party or custom repositories is not part of your orcharhino support subscription. Please contact us if you have any questions. |
|
To install orcharhino Proxies, have a look at the |
System Requirements
The system must meet the following requirements, regardless of whether it is a virtual machine or a bare-metal server:
| Minimum | Recommended | |
|---|---|---|
OS |
CentOS 7, Oracle Linux 7, or Red Hat Enterprise Linux 7 Refer to the OS requirements for more information. |
|
CPU |
4 cores |
8 cores |
RAM |
20 GiB |
32 GiB |
HDD 1 ( |
30 GiB |
50 GiB |
HDD 2 ( |
~ 40 GiB for each Enterprise Linux distribution ~ 80 GiB for each Debian or Ubuntu distribution |
~ 500 GiB (or as appropriate) if you plan to maintain additional repositories or keep multiple versions of packages |
orcharhino requires two hard drives, one is used for the root partition and the other one for the data repositories. This separation is essential for the creation of snapshots and backups. The Kickstart files provided by ATIX will not work with a single drive system.
The main directories on /var are:
-
/var/cache/pulp/ -
/var/lib/pulp/ -
/var/opt/rh/rh-postgresql12/lib/pgsql/
While it is technically possible to use different partitions for those directories, we do not recommend doing so as it will negatively affect the overall performance of your orcharhino.
Using symbolic links is not an option as they break the foreman-installer and corrupt the SELinux context if introduced at a later stage.
|
Ensure you allocate sufficient hard drive resources at the beginning. Running out of space for your data repositories during regular orcharhino usage leads to significant pain. |
OS Requirements
You can install orcharhino on CentOS 7, Oracle Linux 7, and Red Hat Enterprise Linux 7.
Your orcharhino activation key is specific to your chosen platform. Once your orcharhino host is registered with ATIX, it receives both the package sources for orcharhino as well as packages for your respective platform directly from ATIX. ATIX updates the platform packages regularly.
The orcharhino OVA image only works for orcharhino on CentOS 7.
The orcharhino Kickstart installation works on both CentOS 7 and Oracle Linux 7.
If you want to install orcharhino on Red Hat Enterprise Linux 7, you need to provide a functioning base system that adheres to the system requirements.
Once this base system is available, download the install_orcharhino.sh script and follow the instructions for starting the orcharhino installation manually.
|
If you have an ATIX subscription, you will receive your activation key and the required download links in your initial welcome email. If you have not received your welcome email, please contact us. |
The install_orcharhino.sh script is also used during orcharhino installations on CentOS 7.
For Kickstart installations, it is downloaded automatically and prompts the user for final execution.
For orcharhino appliance installations, it runs entirely automated.
|
Ensure you have the necessary Oracle Linux or Red Hat Enterprise Linux subscription if you want to install orcharhino on Oracle Linux 7 or Red Hat Enterprise Linux 7. Your orcharhino subscription does not include any Oracle Linux or Red Hat Enterprise Linux subscriptions. Please contact us if you need help obtaining the relevant subscriptions or have questions on how to use your existing subscriptions. |
Network Requirements
|
orcharhino works best when it is allowed to manage the networks it deploys hosts to, which means that it acts as DHCP, DNS, and TFTP server for those networks. Allowing orcharhino to manage networks in this way is optional but should be considered when planning an orcharhino installation. Running two DHCP services in the same network causes networking issues. Please contact us if you have any questions. |
In order for orcharhino to manage hosts in one or more networks, it needs to be able to communicate with those hosts, possibly using an orcharhino proxy. As a result, you need to open a set of ports to operate orcharhino on your network if you intend to use the corresponding service.
There are generally three system types that need to connect to each other: the orcharhino, orcharhino proxies, and hosts registered against orcharhino. The following tables list all the ports required for various services to communicate from exactly one of these systems to one another:
Local Machine to orcharhino (only needed during the installation process)
| Port | Protocol | SSL | Required for |
|---|---|---|---|
8015 |
TCP |
no |
orcharhino installer GUI |
You can omit this using the --skip-gui option when running the install_orcharhino.sh script.
Clients to orcharhino
| Port | Protocol | SSL | Required for |
|---|---|---|---|
53 |
TCP & UDP |
no |
DNS Services |
67 |
UDP |
no |
DHCP Service |
69 |
UDP |
no |
PXE boot |
80 |
TCP |
no |
Anaconda, yum, templates, iPXE |
443 |
TCP |
yes |
Subscription Management, yum, Katello |
5000 |
TCP |
yes |
Katello for Docker registry |
5647 |
TCP |
yes |
Deprecated (has been used by Qpid for Katello agent) |
8000 |
TCP |
yes |
Anaconda for downloading Kickstart templates, iPXE |
8140 |
TCP |
yes |
Puppet agent to Puppet master |
9090 |
TCP |
yes |
OpenSCAP reports |
Clients to orcharhino proxy
| Port | Protocol | SSL | Required for |
|---|---|---|---|
53 |
TCP & UDP |
no |
DNS Services |
67 |
UDP |
no |
DHCP Service |
69 |
UDP |
no |
PXE boot |
80 |
TCP |
no |
Anaconda, yum, templates, iPXE |
443 |
TCP |
yes |
yum, Katello |
5000 |
TCP |
yes |
Katello for Docker registry |
5647 |
TCP |
yes |
Deprecated (has been used by Qpid for Katello agent) |
8000 |
TCP |
yes |
Anaconda for downloading Kickstart templates, iPXE |
8140 |
TCP |
yes |
Puppet agent to Puppet master |
8443 |
TCP |
yes |
Subscription Management |
9090 |
TCP |
yes |
OpenSCAP reports |
orcharhino proxy to orcharhino
| Port | Protocol | SSL | Required for |
|---|---|---|---|
80 |
TCP |
no |
Anaconda, yum, Katello certificates |
443 |
TCP |
yes |
yum, Katello, API, Pulp |
5000 |
TCP |
yes |
Katello for Docker registry |
5646 |
TCP |
yes |
Pulp mirror (Qpid dispatcher) |
5647 |
TCP |
yes |
Deprecated (has been used by Qpid for Katello agent) |
orcharhino to orcharhino proxy
| Port | Protocol | SSL | Required for |
|---|---|---|---|
80 |
TCP |
yes |
bootdisk |
443 |
TCP |
yes |
Pulp |
9090 |
TCP |
yes |
Querying the orcharhino proxy feature set |
orcharhino and orcharhino proxy to client
| Port | Protocol | SSL | Required for |
|---|---|---|---|
7 |
TCP & UDP |
no |
DHCP, ECHO, ICMP |
22 |
TCP |
yes |
Ansible, remote execution via SSH |
68 |
UDP |
no |
DHCP service |
8443 |
TCP |
yes |
Provisioning commands when using the host discovery plugin |
Firewall Configuration
orcharhino uses firewalld.
The firewall is automatically set up and configured when installing or upgrading orcharhino.
Run firewall-cmd --state to view the current state of the firewall.
For more information, see Firewall Configuration.
Appliance Requirements
If you are performing an orcharhino appliance installation, you require the following:
-
A VMware vSphere environment in version 6.0 or later.
-
The orcharhino OVA image, which you can request on atix.de/orcharhino-download or find in the ATIX Service Portal. Please contact us if you have any questions.
During the orcharhino appliance installation, you are asked to choose from a range of possible system specifications to instantiate your OVA. For this installation only, HDD 2 comes in a fixed size of 50 GiB. However, this partition is then extended with a third hard drive of arbitrary size, which is dynamically created during the OVA instantiation.
Kickstart Requirements
If you are performing a Kickstart installation, you require the following:
-
A Kickstart file
If you have an ATIX subscription, you will receive your activation key and the required download links in your initial welcome email. If you have not received your welcome email, please contact us.
-
An
.isoimage, for example CentOS 7 from centos.org/download or Oracle Linux 7 from oracle.com.
ATIX maintains four different Kickstart files depending on the operating system and hard drives you are using:
-
orcharhino_centos_sdX.ksto install CentOS 7 on a host with SATA disks (/dev/sdX) -
orcharhino_centos_vdX.ksto install CentOS 7 on a host with VirtIO disks (/dev/vdX) -
orcharhino_oracle_sdX.ksto install Oracle Linux 7 on a host with SATA disks (/dev/sdX) -
orcharhino_oracle_vdX.ksto install Oracle Linux 7 on a host with VirtIO disks (/dev/vdX)
Appliance Installation Steps
Use the orcharhino appliance to install orcharhino in a VMware environment.
These instructions presume prior experience using VMware’s vSphere client. The orcharhino appliance contains a parameterised but otherwise preconfigured CentOS 7 base system that significantly simplifies the deployment and installation process.
-
Download the orcharhino OVA image to your local client machine.
-
Open the VMware vSphere client in a browser on your local client machine.
-
Right-click on your datacenter, cluster, or host and select Deploy OVF Template.
-
On the Select an OVF template screen:
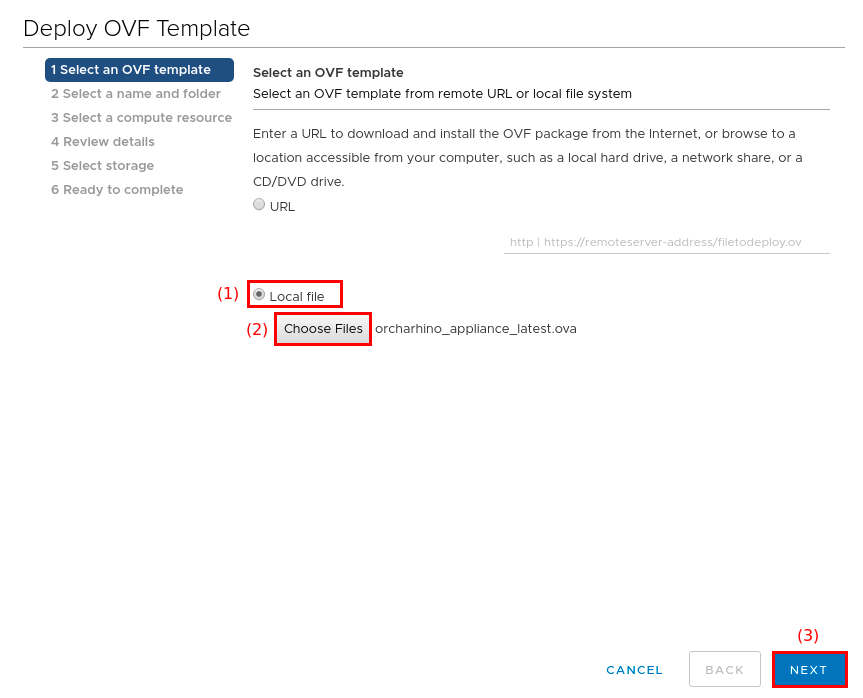
-
Select Local file (1).
You can also enter the OVA download link directly. However, we do not recommended this since it has been prone to download failures caused by random network effects.
-
Click the Choose Files button (2) and select the previously downloaded orcharhino OVA image.
-
Click the Next button (3) to continue.
-
-
On the Select a name and folder screen:
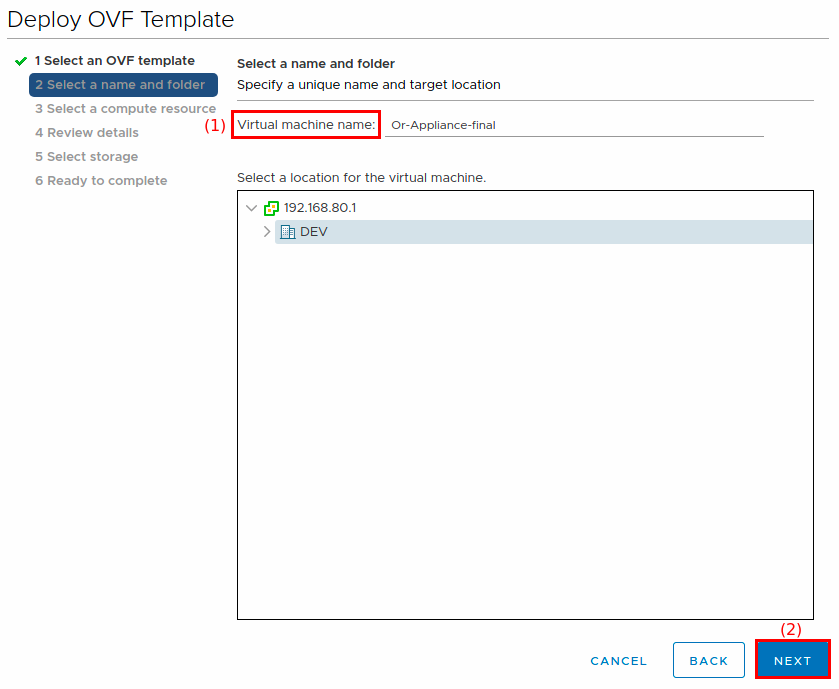
-
Enter the Virtual machine name (1) for your orcharhino. If in doubt, use the FQDN or the host name you want to use for your orcharhino.
-
Select a location for the new virtual machine.
-
Click the Next button (2) to continue.
-
-
On the Select a compute resource screen:
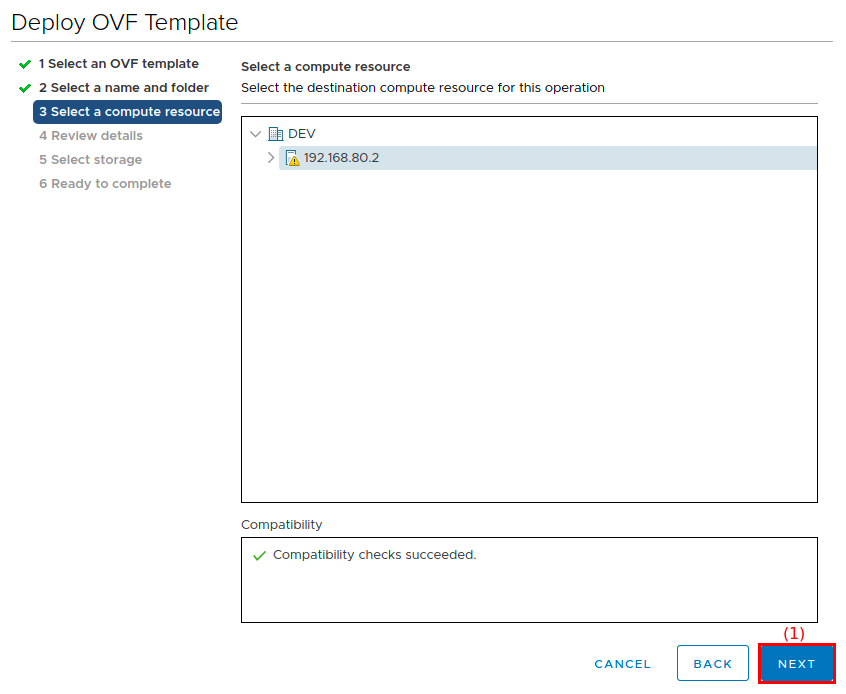
-
Select a host or cluster.
-
Click the Next button (1) to continue.
-
-
On the Review details screen:
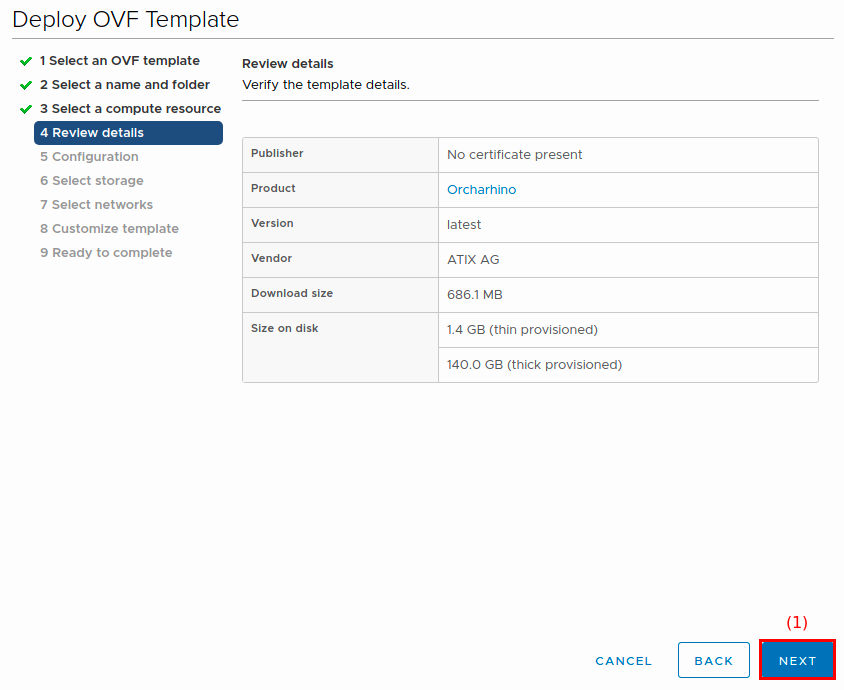
-
Review your settings.
-
Click the Next button (1) to continue.
-
-
On the Configuration screen:
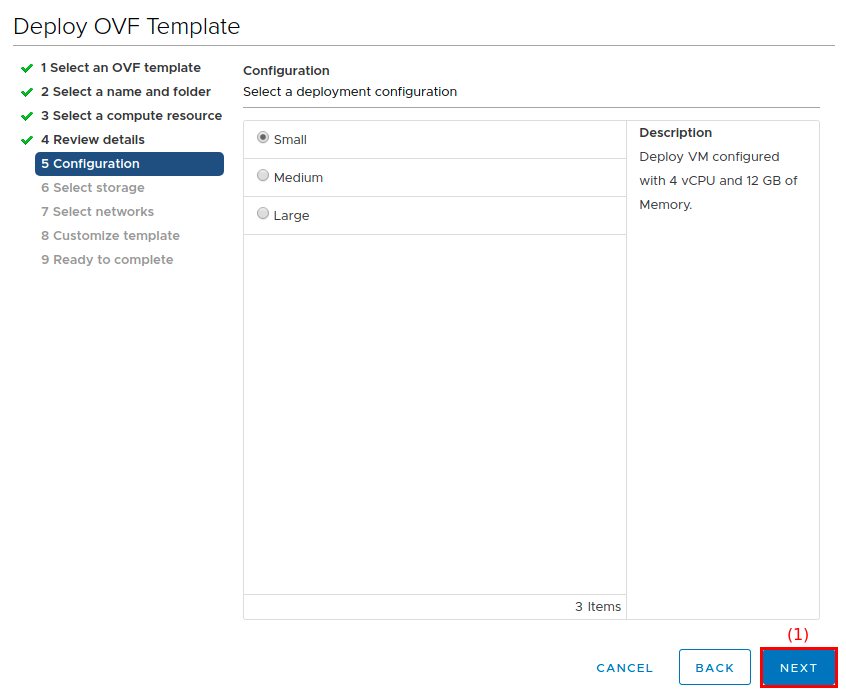
-
Choose the size for your orcharhino instance by looking at the description of each option.
-
Click the Next button (1) to continue.
-
-
On the Select storage screen:
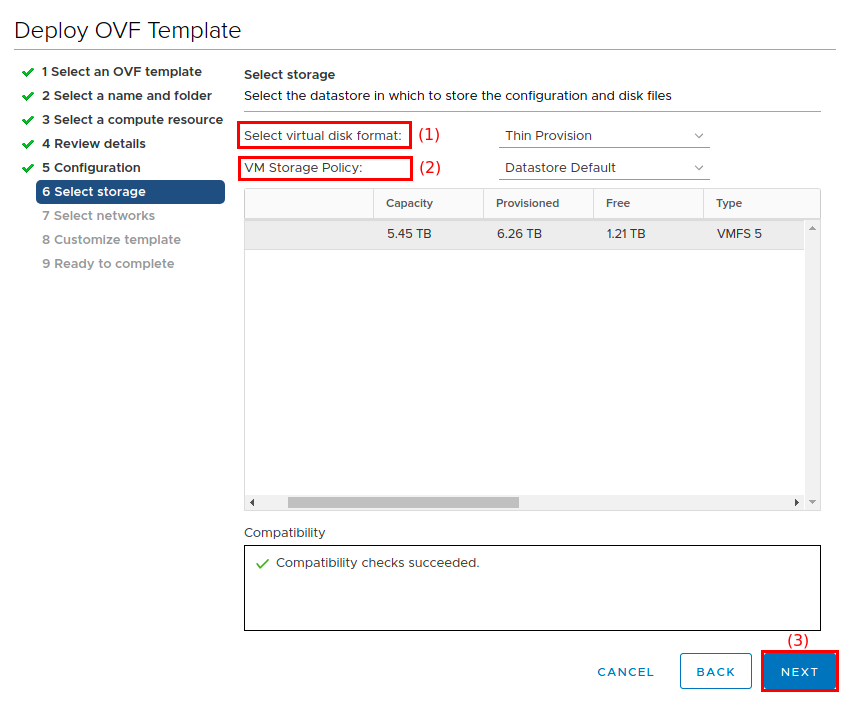
-
Select a hard disk format for the Select virtual disk format field (1).
Choosing thick provision takes considerably longer to allocate storage space.
-
Choose a data store or data store cluster in the VM Storage Policy field (2).
-
Click the Next button (3) to continue.
-
-
On the Select networks screen:
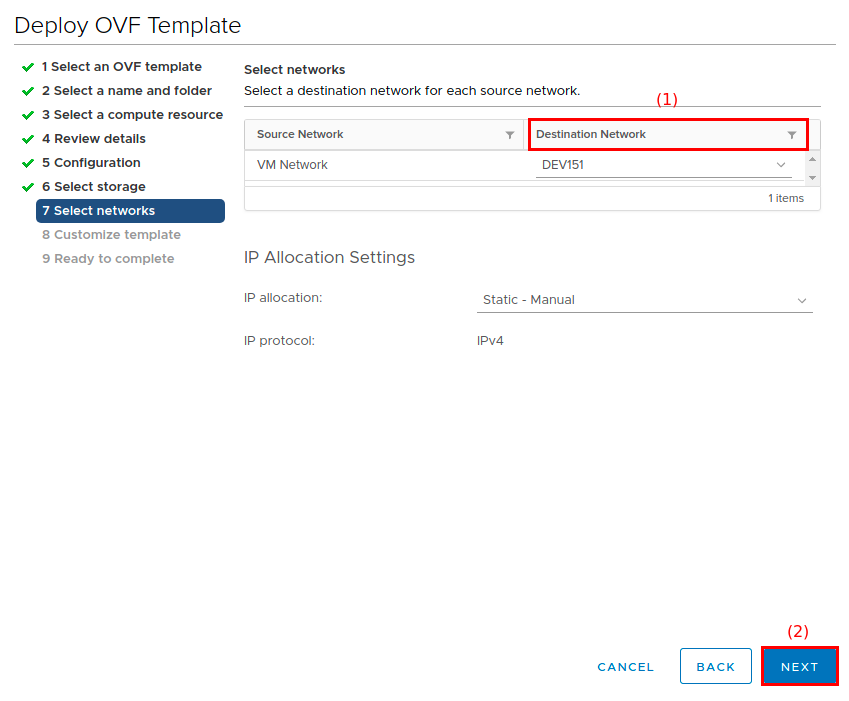
-
Select an available network from the Destination Network field (1).
Do not change the default values under IP Allocation Settings.
For IP allocation, leave the default value of static - manual even if you want to use DHCP. DHCP and IP allocation are configured during the next step.
-
Click the Next button (2) to continue.
-
-
On the Customize template screen:
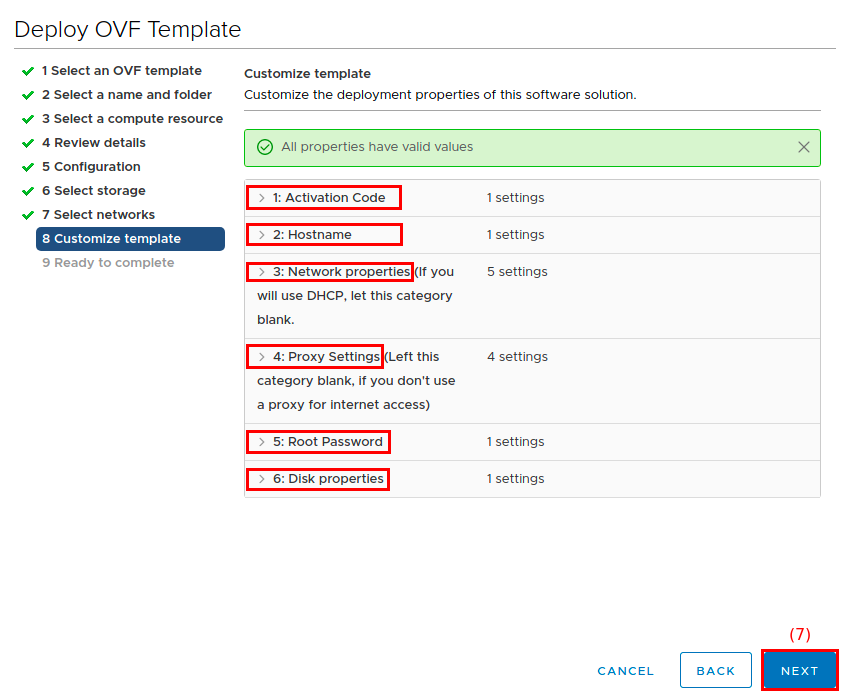
-
Enter your orcharhino activation key in the field provided in the Activation Key foldout menu (1).
-
For the Hostname foldout menu (2), enter the FQDN of your orcharhino.
The provided FQDN must contain both a host name and domain name part. That is, it must contain at least one dot, for example
orcharhino.example.com. -
If you do not already have a DHCP service for this network and allow orcharhino to manage DHCP in the network, complete all fields from the Network Properties foldout menu (3).
-
If your organization uses an HTTP/HTTPS proxy to access the internet, complete all fields from the Proxy Settings foldout menu (4).
-
Set the root password of your orcharhino host in the Root Password foldout menu (5). If you leave this field blank, the root password defaults to
atix. It is highly recommended to set a strong root password. -
Set the size of your dynamic hard drive in the Disk Properties foldout menu (6). This hard drive is added to the logical volume containing the
/varpartition, which houses your content repositories. The default value is set to 50 GiB. For more information, see system requirements. -
Use the Customer CA field to upload a custom CA certificate in
PEMformat. This is necessary if your HTTPS proxy uses a self-signed certificate that is not trusted by a global root CA. -
Click the Next button (9) to continue.
-
-
On the Ready to complete screen:
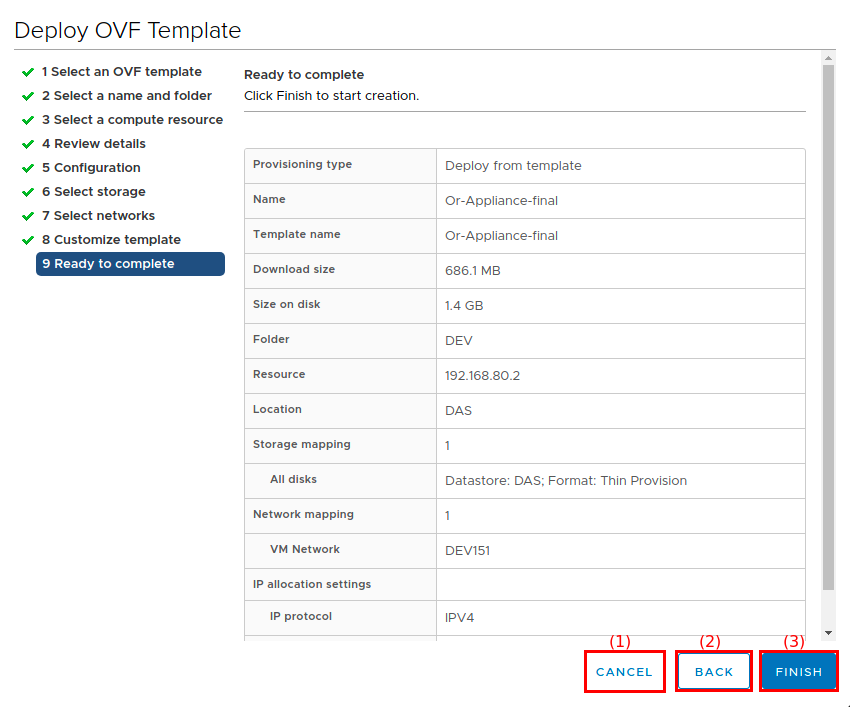
-
Click the Cancel button (1) to cancel the entire installation process.
-
Click the Back button (2) to review your settings.
-
Click the Finish button (3) to start the deployment.
You can track the progress of your deployment under Recent Tasks in your vSphere client:

-
-
Once the deployment is complete, select the new orcharhino VM in your VMware inventory and click on Launch Remote Console or Launch Web Console.
-
Click ACTIONS > Power > Power On to start your new VM. This automatically starts the orcharhino installation in the console you opened in step 13.
Once your orcharhino appliance is successfully registered with ATIX and finished the main orcharhino installer, a link to the web installer is displayed in the console from step 13. The link to the installer interface generally has the following structure:
http://orcharhino.example.com:8015. -
Enter the link in your browser and continue with the main installation steps.
Kickstart Installation Steps
Use the Kickstart files provided by ATIX to install CentOS 7 or Oracle Linux 7 on the host orcharhino will run on.
-
Either virtually mount your installation media or place its physical equivalent in the DVD tray for a bare metal installation.
-
Boot your system from the installation media. Immediately halt the boot process by pressing the tab key and append the following boot option:
ks=http://example.com/path/to/kickstart_file.ks -
Press enter to start the automatic Kickstart installation. The installation process prompts you to press enter from time to time.
-
Once the Kickstart installation has successfully completed, continue with the starting the installation manually.
Starting the Installation Manually
|
If you perform an orcharhino appliance installation, the |
When installing orcharhino with install_orcharhino.sh, the script registers your orcharhino host with ATIX to provide it with the required orcharhino package repositories.
Once successfully registered, the script starts the main orcharhino installer.
The Kickstart installation places the install_orcharhino.sh script in the /root/ directory on your orcharhino host.
Alternatively, download the script directly from ATIX.
|
If you have an ATIX subscription, you will receive your activation key and the required download links in your initial welcome email. If you have not received your welcome email, please contact us. |
|
The |
It is highly recommended to use the --name option to provide your orcharhino with a FQDN at this point.
Start your script as follows:
# /root/install_orcharhino.sh --name='orcharhino.example.com' My_orcharhino_Activation_Key
The install_orcharhino.sh script prompts you to confirm the settings you are using for your registration with ATIX as follows:
install_orcharhino.sh: You are about to register to ACC using the following settings:
install_orcharhino.sh:   orcharhino activation key: 'My_orcharhino_Activation_Key'
install_orcharhino.sh:   orcharhino FQDN: 'orcharhino.example.com'
install_orcharhino.sh:   orcharhino IP address: 'My_orcharhino_Server_IP_Address'
install_orcharhino.sh: Proceed with these settings? [Yes/No]
Entering anything other than Yes, yes, Y, or y causes the script to exit without taking any further actions.
You can always rerun the script with modified options.
You can override the My_orcharhino_Server_IP_Address setting using the -i/--ip-addr=ADDR option.
You can skip the above confirmation prompt using the -y/--yes option.
Once you have confirmed the prompt, the install_orcharhino.sh script starts the main orcharhino installer which displays a link to the web interface.
Note that this process takes time depending on your environment.
The link looks as follows:
http://My_orcharhino_Server_IP_Address:8015/?token=4f27b9328cc0ead7d499c93f34ec9bda5d26e7b50c4420dc0a80dcc04adcf9dd
Access the link with your browser and continue with the main installations steps.
Unattended orcharhino Installation
You can install orcharhino without user interaction using --skip-gui.
This requires a valid /etc/orcharhino-installer/answers.yaml file.
This method is an advanced installation method.
-
Set
use_custom_certstotruein/etc/orcharhino-installer/answers.yaml. -
Place your
custom_certs.ca,custom_certs.crt, andcustom_certs.keyinto/etc/orcharhino-installer/.
Main Installation Steps
Use the web interface of the orcharhino installer to finish the installation process. This is the final step for both the appliance and Kickstart installation.
-
On the Initial Configuration screen:
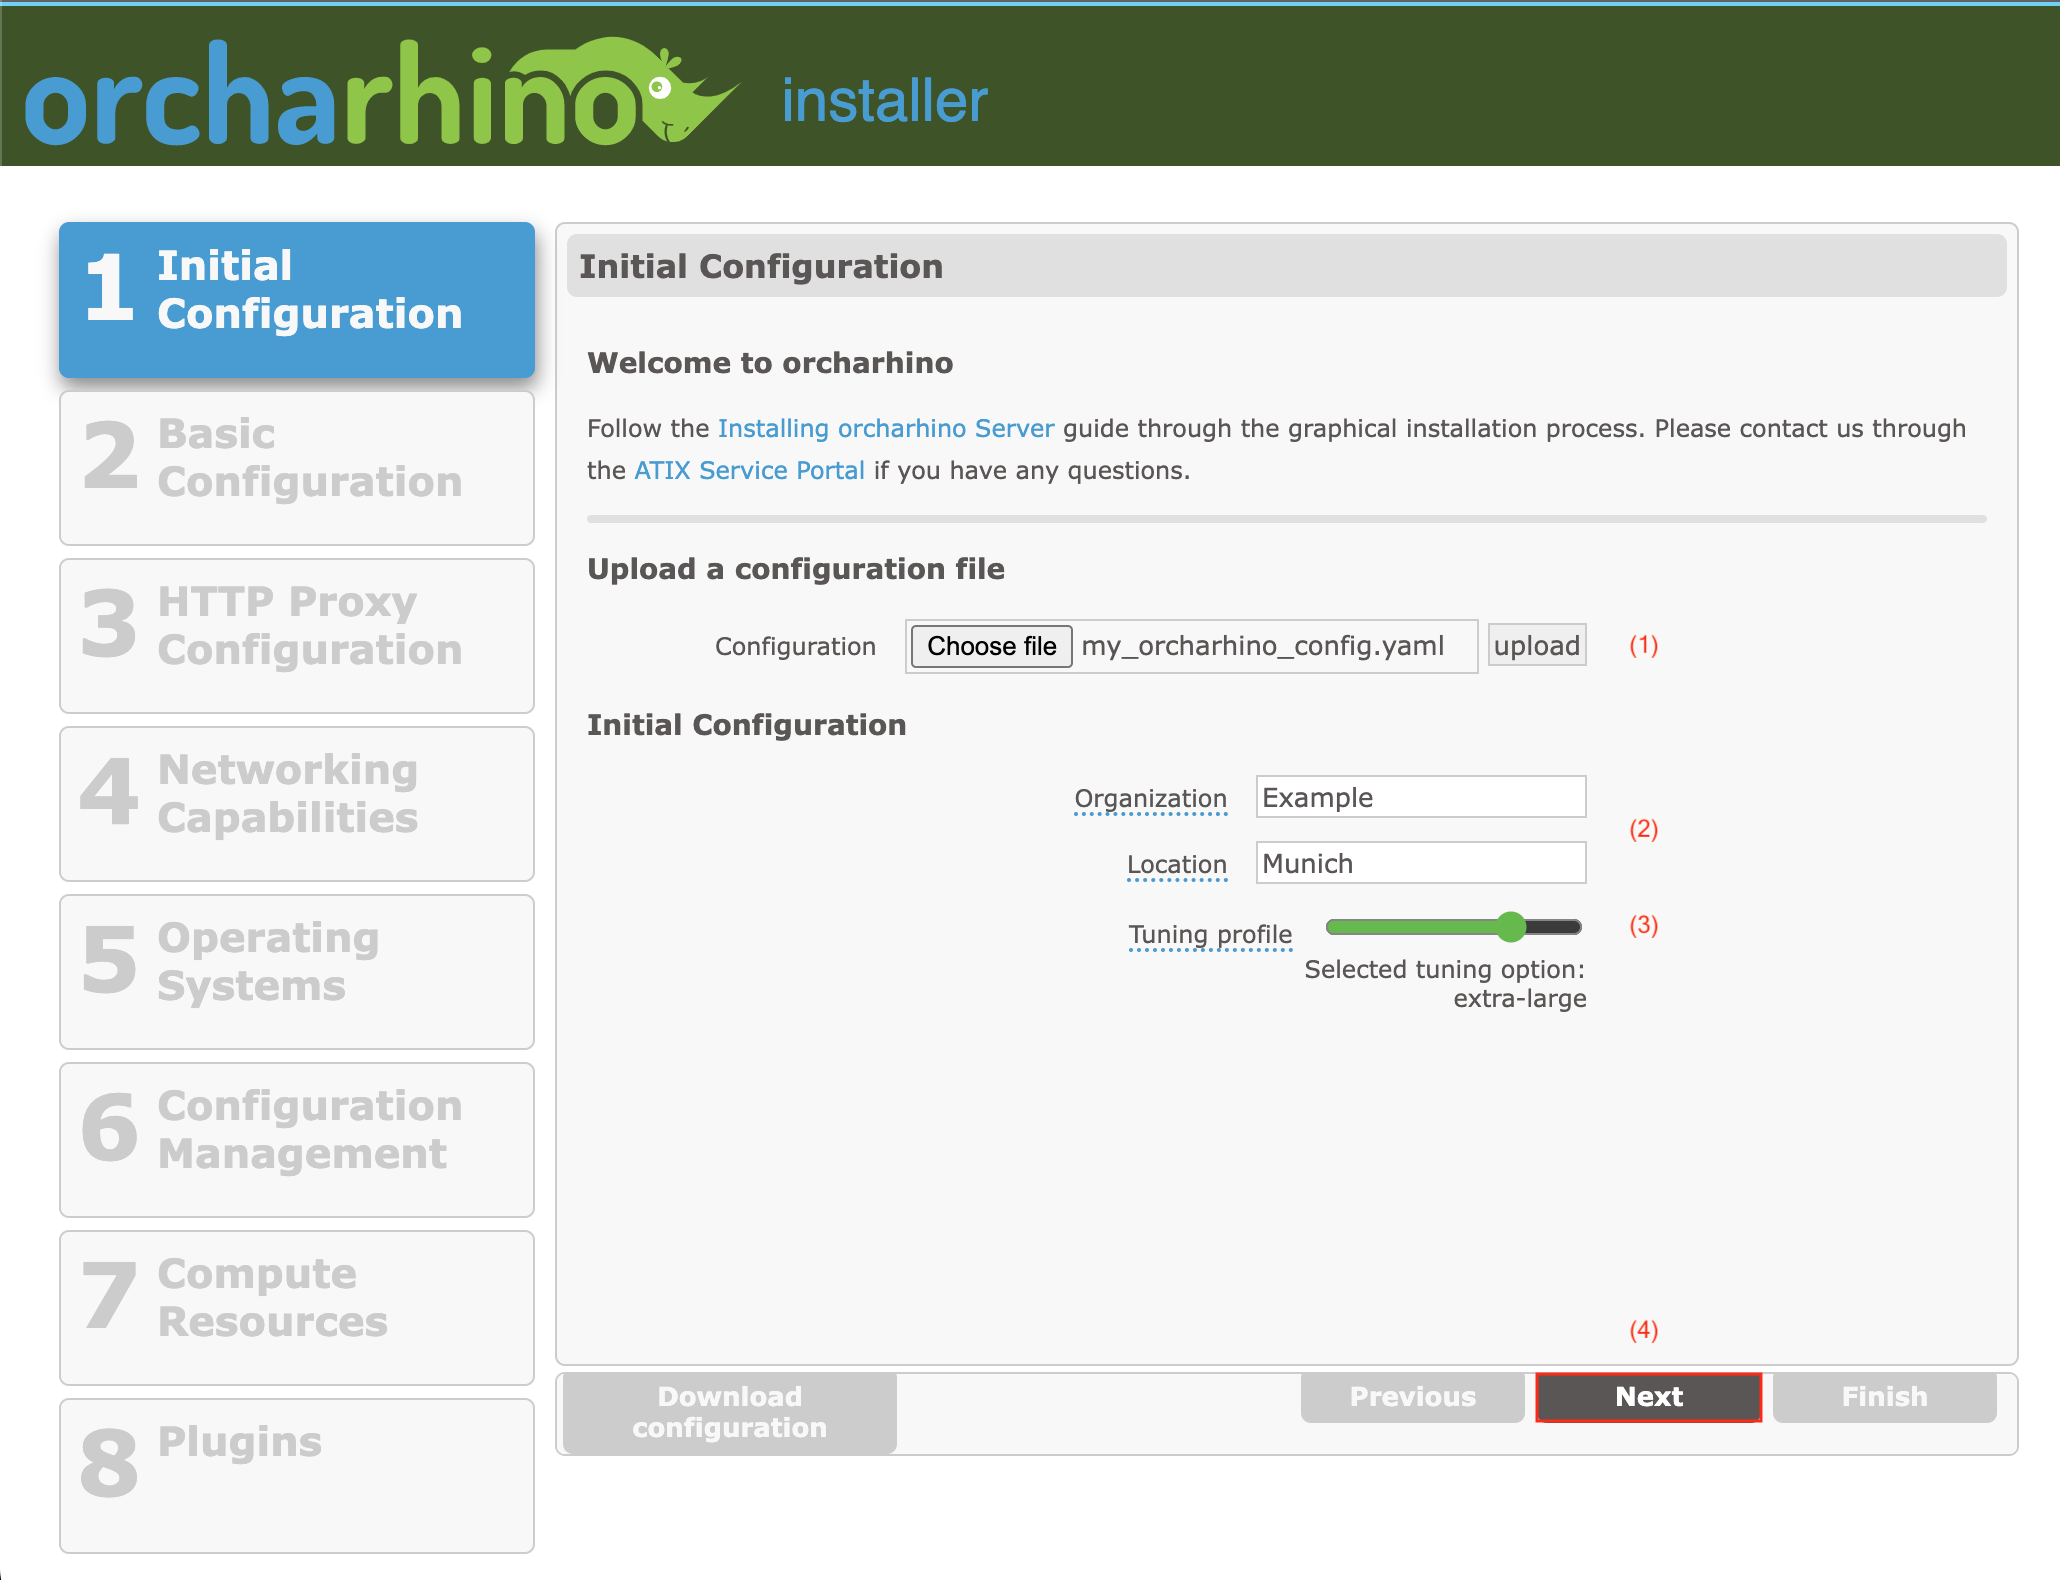
-
Click Choose file and upload (1) to upload an
answers.yamlfile to prefill the orcharhino Web Installer. -
Enter the initial Organization and Location context (2) for your orcharhino. You can add additional organizations and locations later.
One way to distinguish between orcharhino administrators and regular users is to place the orcharhino server as well as any attached orcharhino proxies into a separate location and/or organization context.
Alternatively, you can achieve a fine grained permissions concept using roles and filters.
Creating an Organization or Location that contains white space or non ASCII characters has been known to cause bugs. Please choose a single word that does not include umlauts or special characters.
-
Select a Tuning profile (3) using the slider. The tuning profile ensures your orcharhino makes best use of its available resources of your orcharhino host. The prefilled value is based on the resources of the host. For more information, see Tuning orcharhino.
-
Click Next (4) to continue.
-
-
On the Basic Configuration screen:
-
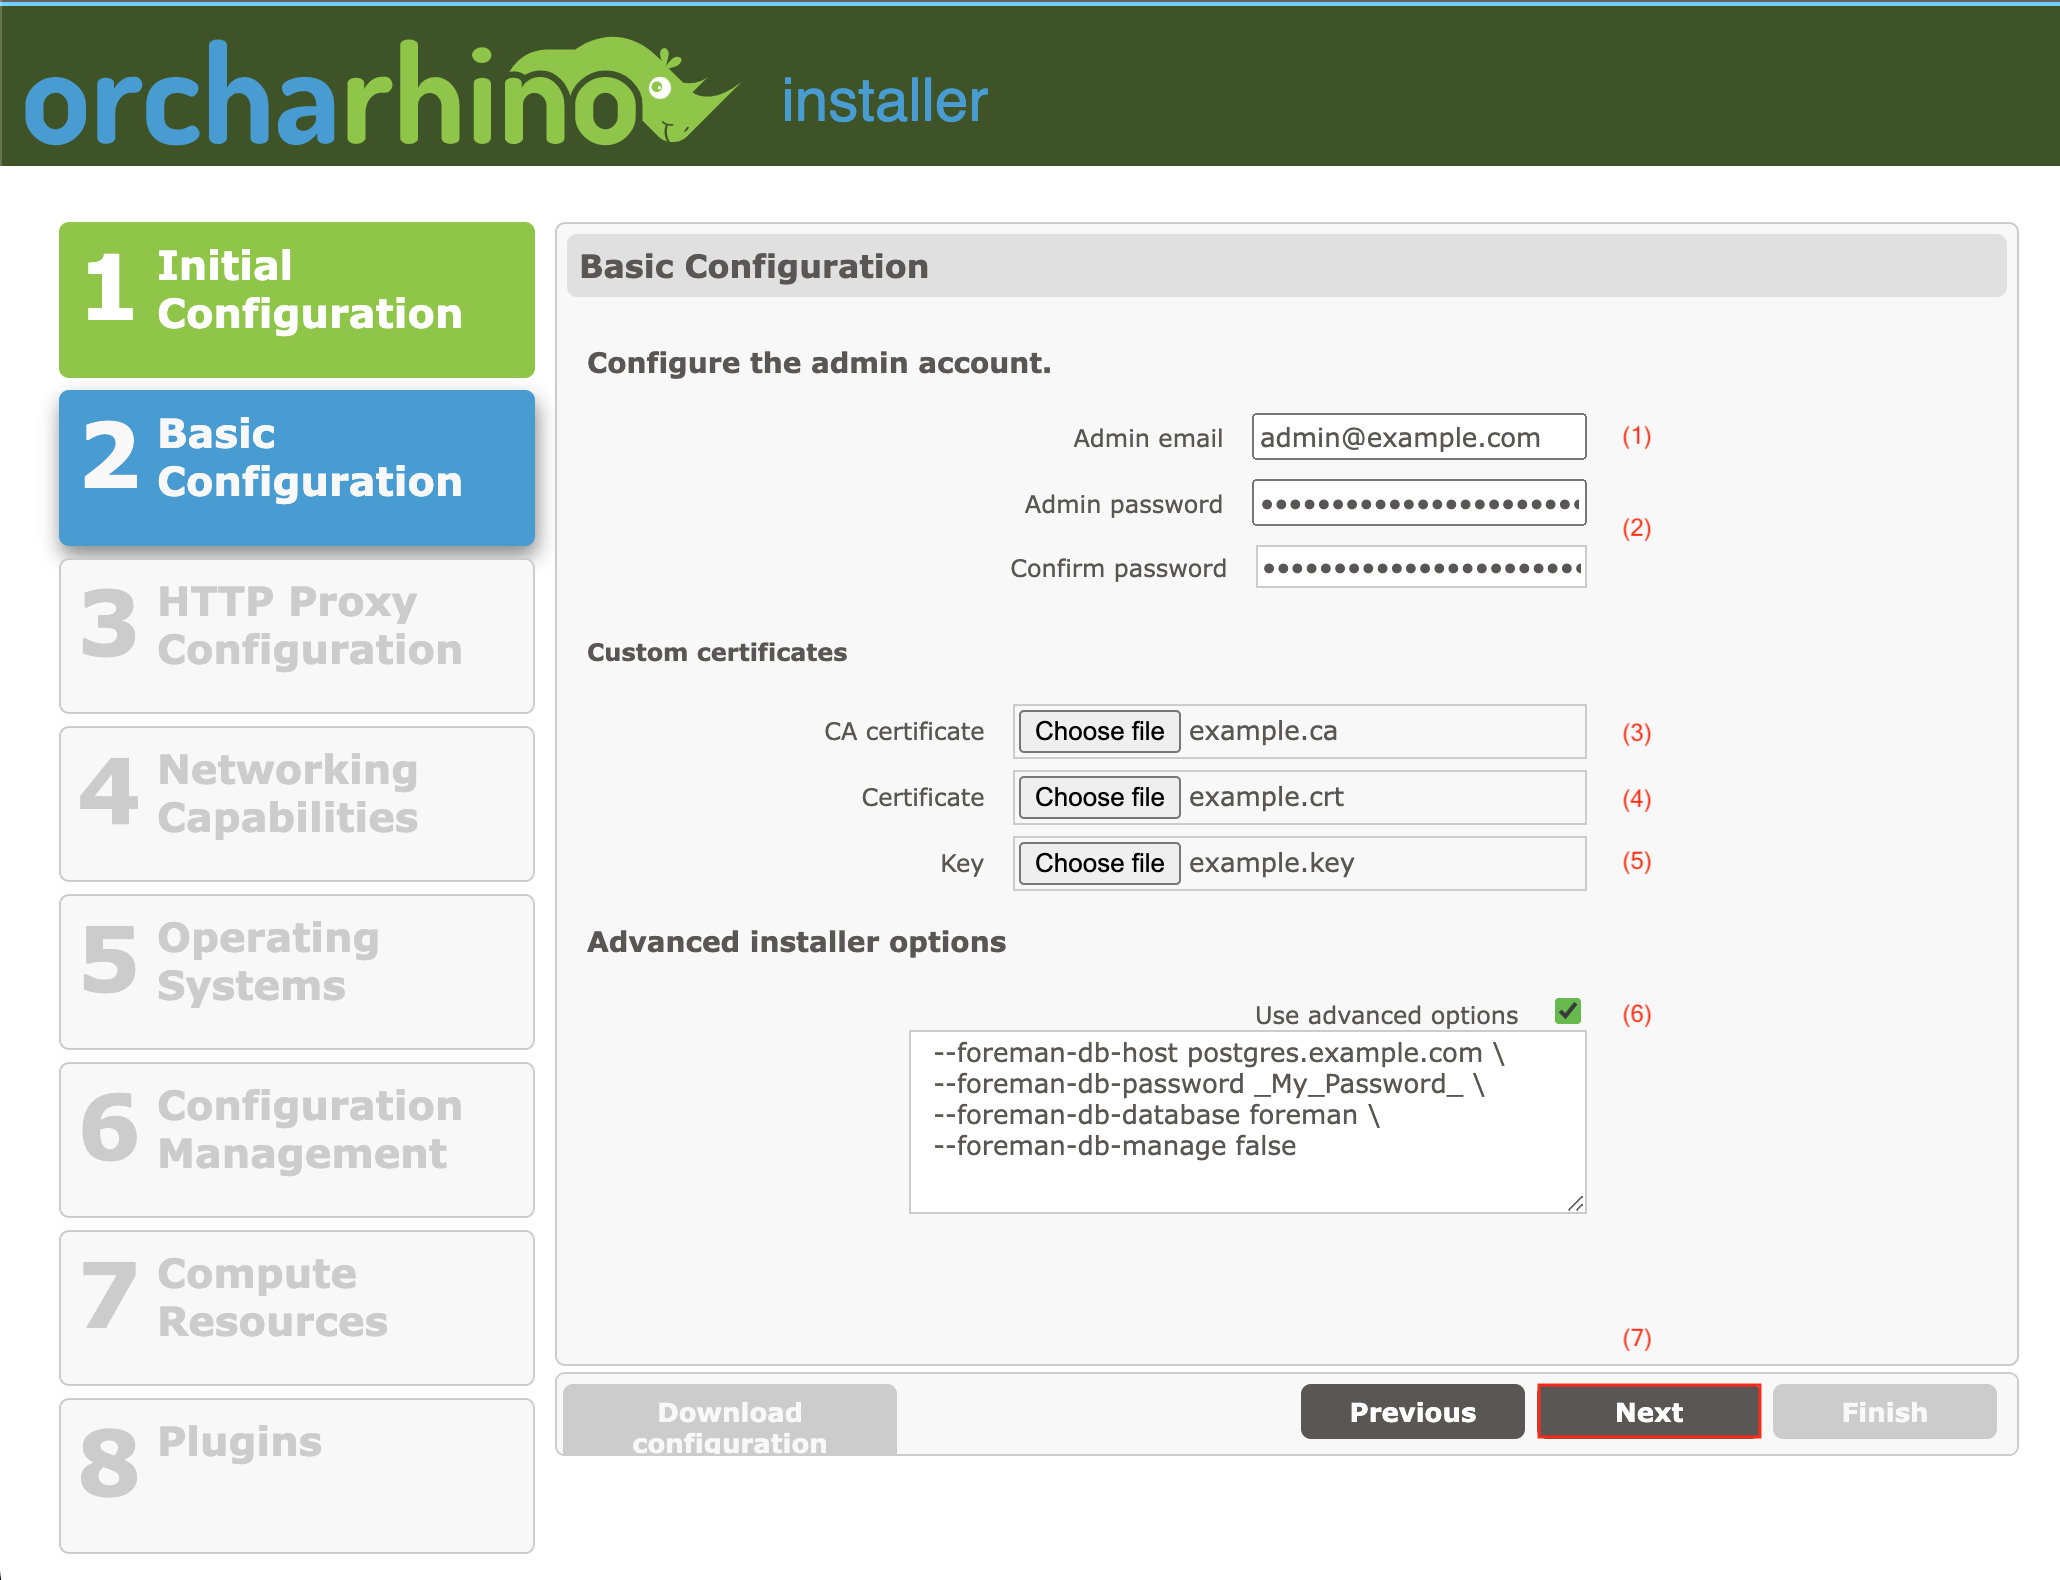
Enter a valid email address that can be used to reach the orcharhino administrator into the Admin email field (1).
-
Enter the password for your orcharhino
adminaccount (2). -
Optional: You can use custom certificates on orcharhino.
-
Click Choose file to upload a custom CA certificate (
.ca) file (3). -
Click Choose file to upload a custom certificate (
.crt) file (4). -
Click Choose file to upload a custom key (
.key) file (5).
-
-
Optional: Select Use advanced options (6) to provide advanced installer options. For example, you can use this to define an external database with orcharhino. Note that this is an advanced feature. If you are unsure, leave the field empty or contact us.
-
Click Next (7) to continue.
-
-
On the HTTP Proxy Configuration screen:
-
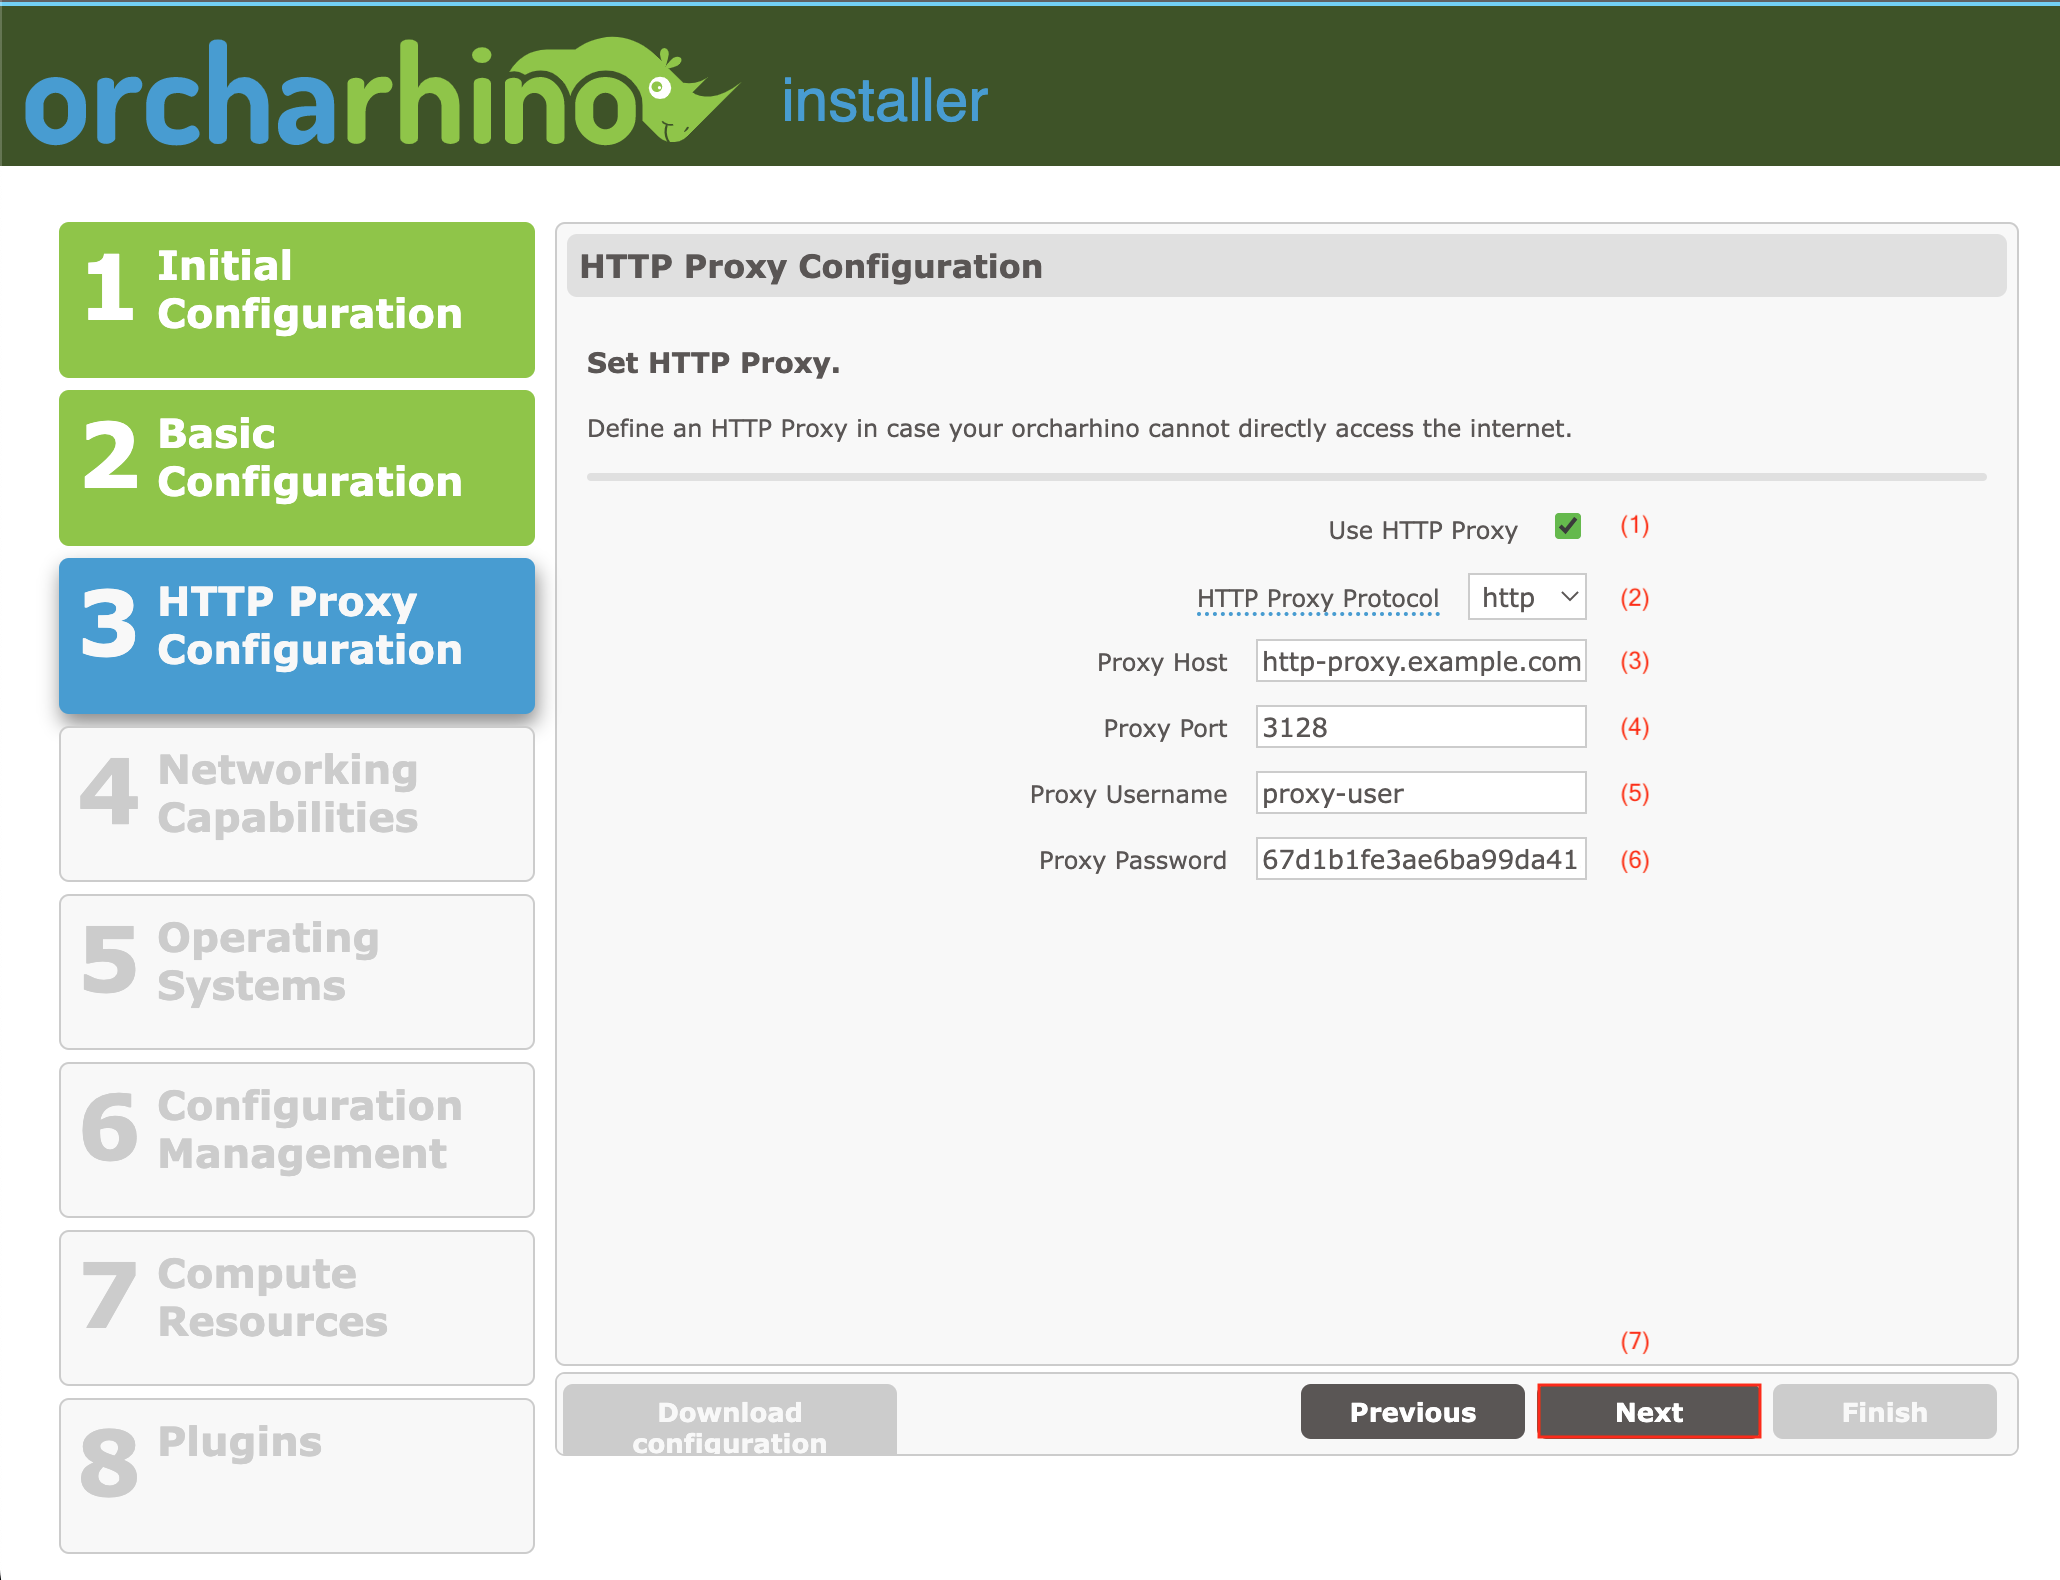
If your organization uses an HTTP proxy, select Use HTTP Proxy (1). Enter your HTTP/HTTPS proxy configuration data in the fields provided (2-6).
Ensure your HTTPS proxy does not modify the used certificates.
-
Click Next (7) to continue.
-
-
On the Networking Capabilities screen:
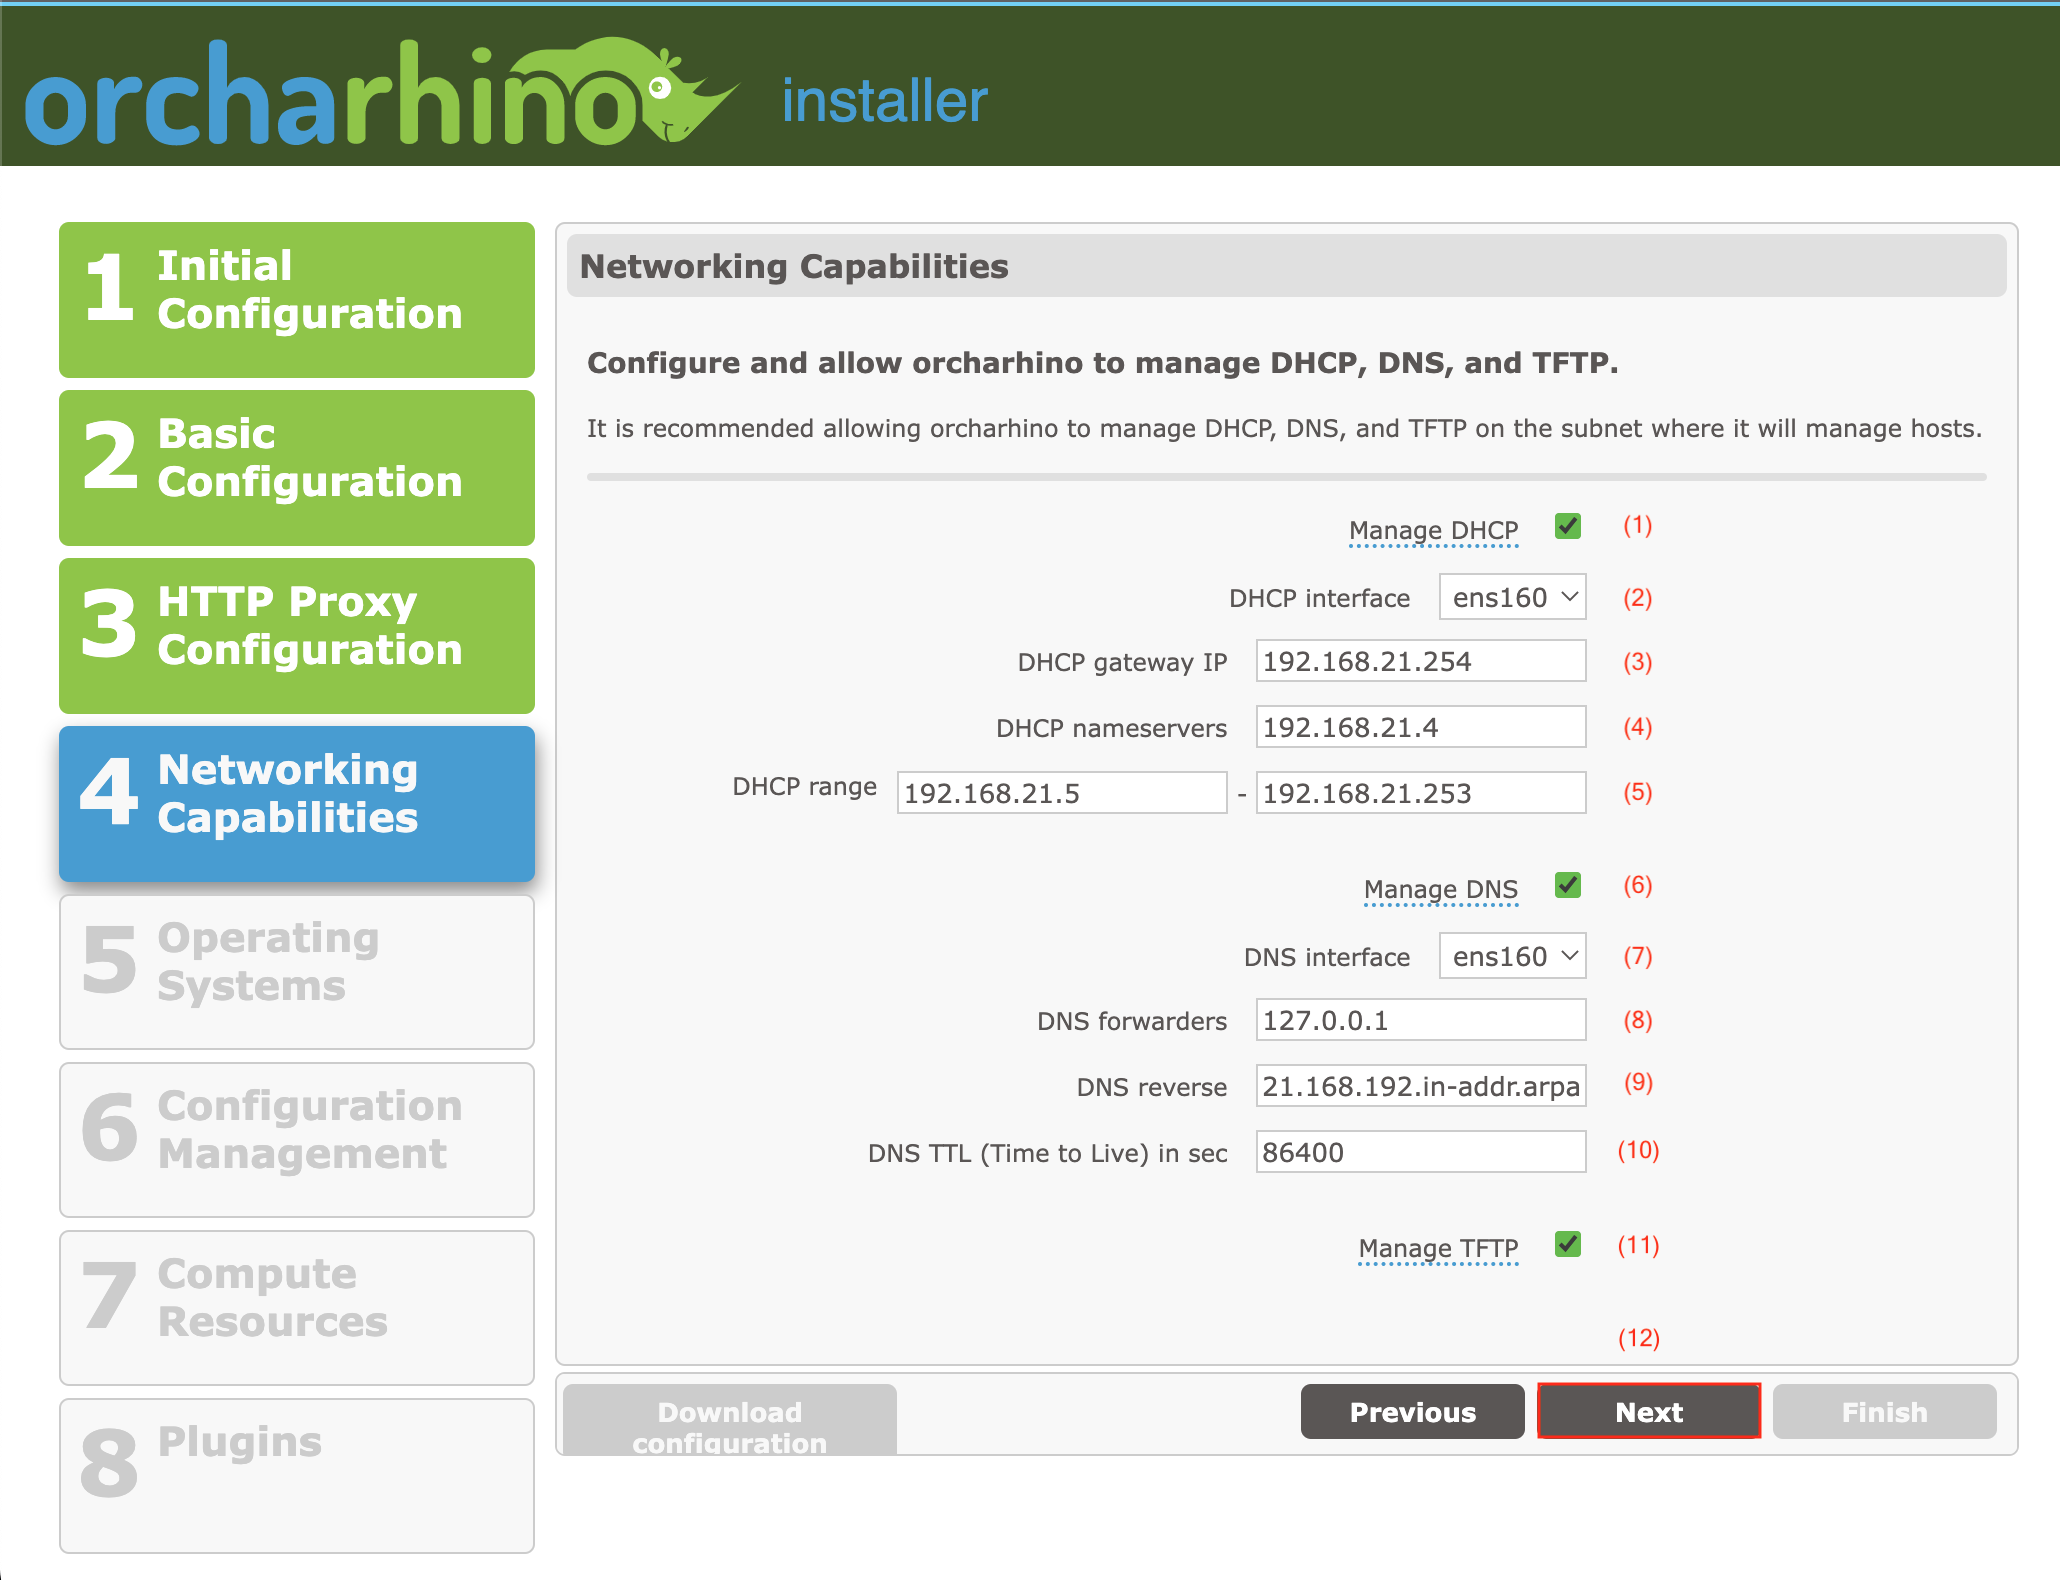
We recommend allowing orcharhino to manage DHCP, DNS, and TFTP on the subnet it manages hosts. Follow all of the steps below for this setup. However, if there is a good reason, then deselect the corresponding services (1), (6), and/or (11) and disregard steps (2a), (2b), and/or (2c).
-
Configure orcharhino’s DHCP capability (1).
-
For the DHCP interface field (2), select the interface to the network orcharhino deploys hosts to. We refer to this network as the internal network hence forth.
The orcharhino installer prefills the input fields (3), (4), and (5) with plausible values based on your DHCP interface selection. We highly recommend double checking these auto-generated values before continuing.
-
In the DHCP gateway IP field (3), enter the gateway IP address that managed hosts use on the internal network. The auto-generated value is the default gateway on the selected interface.
-
In the DHCP nameservers field (4), enter the IP address that managed hosts use to resolve DNS queries. If Manage DNS (6) is selected, this is the IP address of the orcharhino host on the internal interface.
-
For the DHCP range field (5), enter the range of IP addresses that is available for managed hosts on the internal network. The installer calculates the largest free range within the IP network by excluding its own address and those of the gateway and name server. It does not verify if any other hosts already exist within this range.
-
-
Configure orcharhino’s DNS capability (6).
-
For the DNS interface field (7), select the interface to the internal network which you used for the DHCP interface field (2).
The orcharhino installer prefills the input fields (8) and (9) with plausible values based on your DNS interface selection and the systems
resolv.conffile. We highly recommend double checking these auto-generated values before continuing. -
In the DNS forwarders field (8), enter the IP address of your DNS server. The installer pre-fills this field with a DNS server from the system’s
resolv.conffile. -
In the DNS reverse field (9), enter the net ID part of the IP address of the internal network in decimal notation, with the byte groups in reverse order, followed by
.in-addr-arpa. For example, a network address of192.168.0.0/24would turn into0.168.192.in-addr-arpa; pre-filled with the appropriate value for the chosen interface. -
In the DNS TTL (Time to Live) in sec field (10), enter a value in seconds.
-
-
Click Manage TFTP (11) to allow orcharhino Server to manage TFTP within its network.
-
Click Next (12) to continue.
-
-
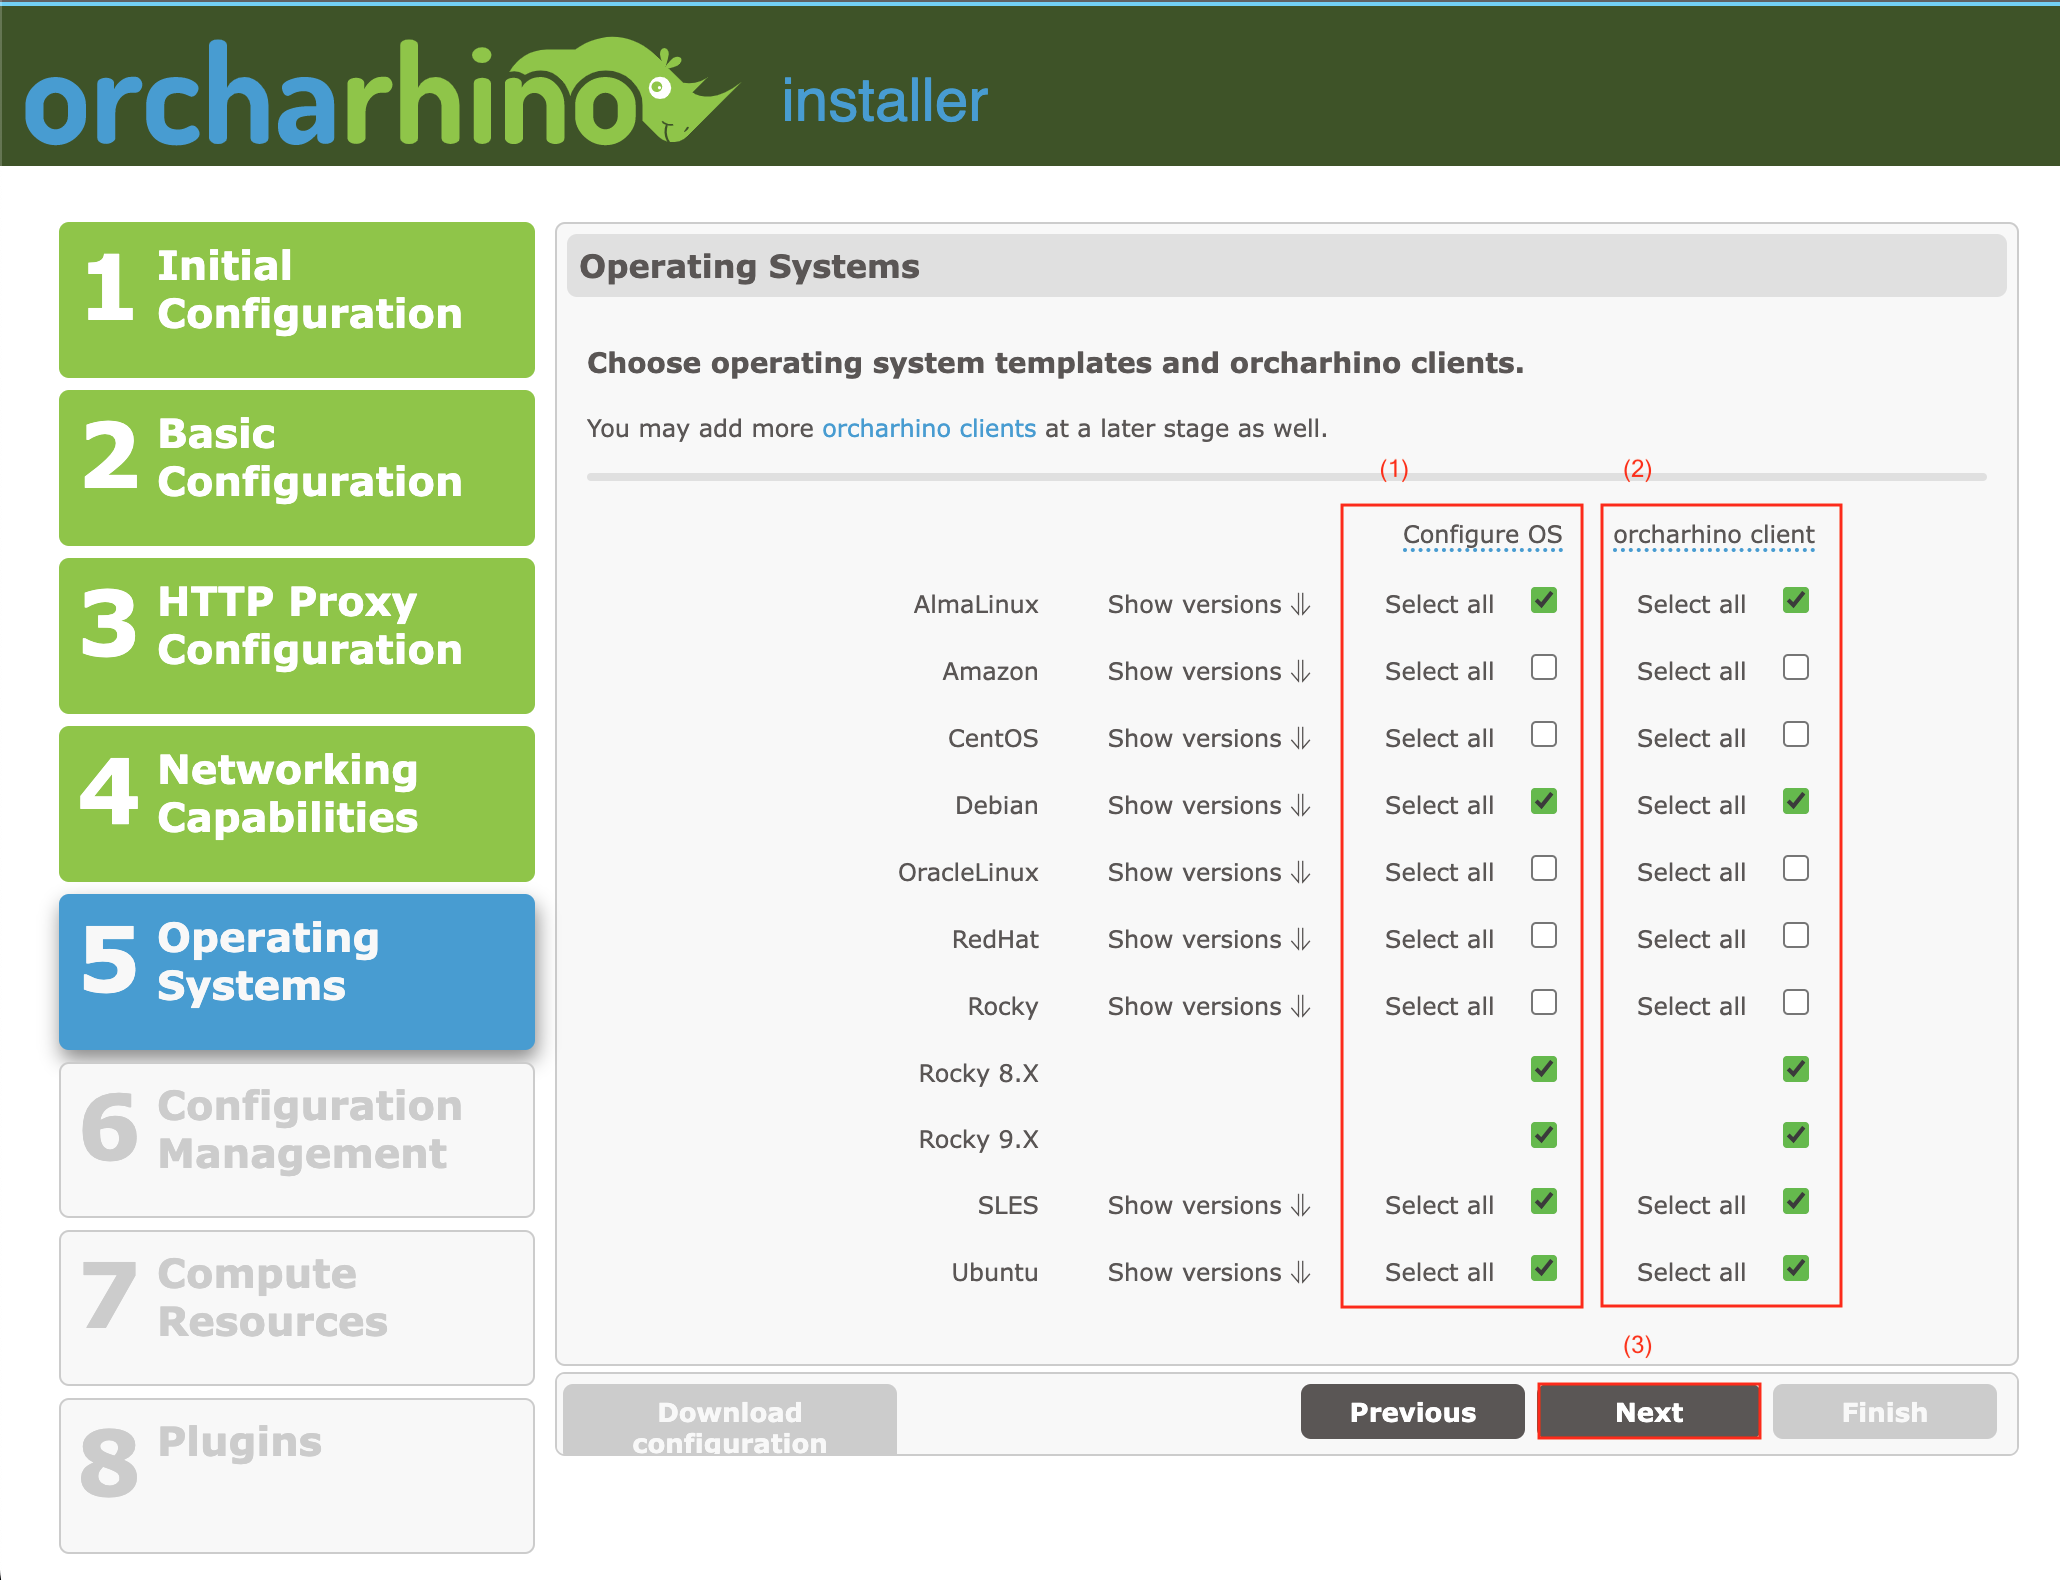
On the Operating Systems screen:
-
In the Configure OS column (1), preconfigure orcharhino with a selection of operating systems. The installer automatically configures the operating system entries, the installation media entries, and the provisioning templates for any selected operating systems.
You cannot select any Red Hat operating systems to be preconfigured by orcharhino because you need a valid subscription manifest file from Red Hat. For more information, see Managing Red Hat Subscriptions.
If you want to deploy hosts running SUSE Linux Enterprise Server, you need to perform additional steps at the end of the installation process to set up your SLES installation media.
-
orcharhino automatically synchronizes the orcharhino Client repositories for any operating system you select in the orcharhino Client column (2).
-
We recommend selecting both the operating system and orcharhino Client configuration for your operating systems at the same time.
-
Click Next (3) to continue.
-
-
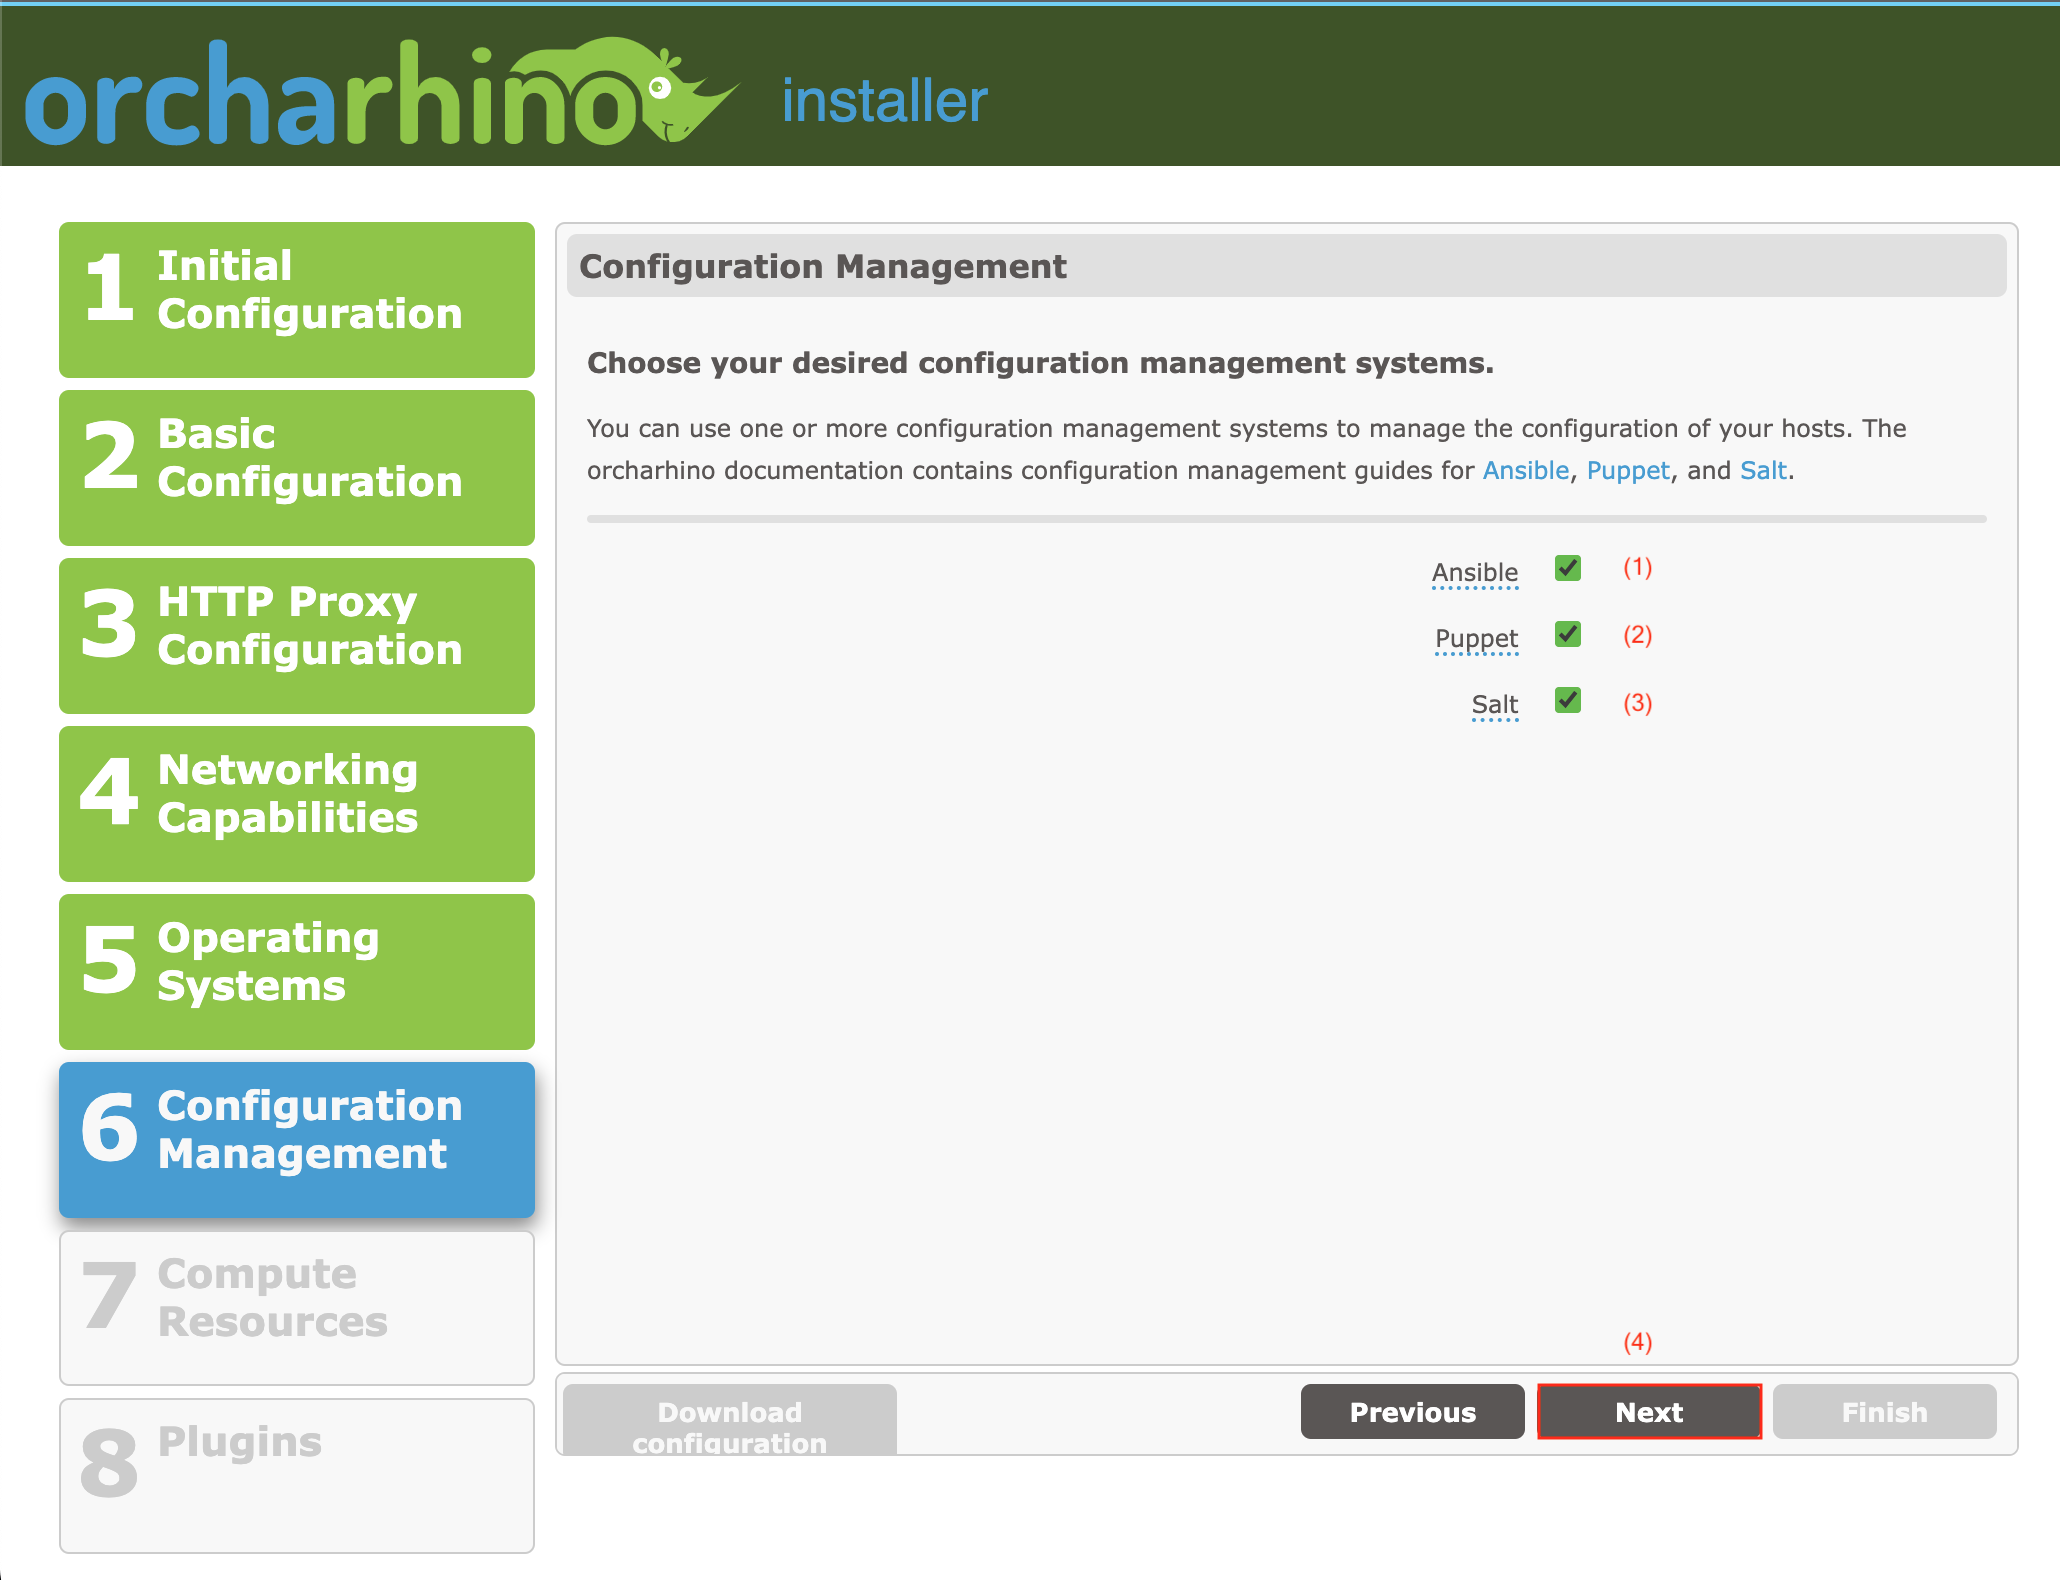
On the Configuration Management screen:
-
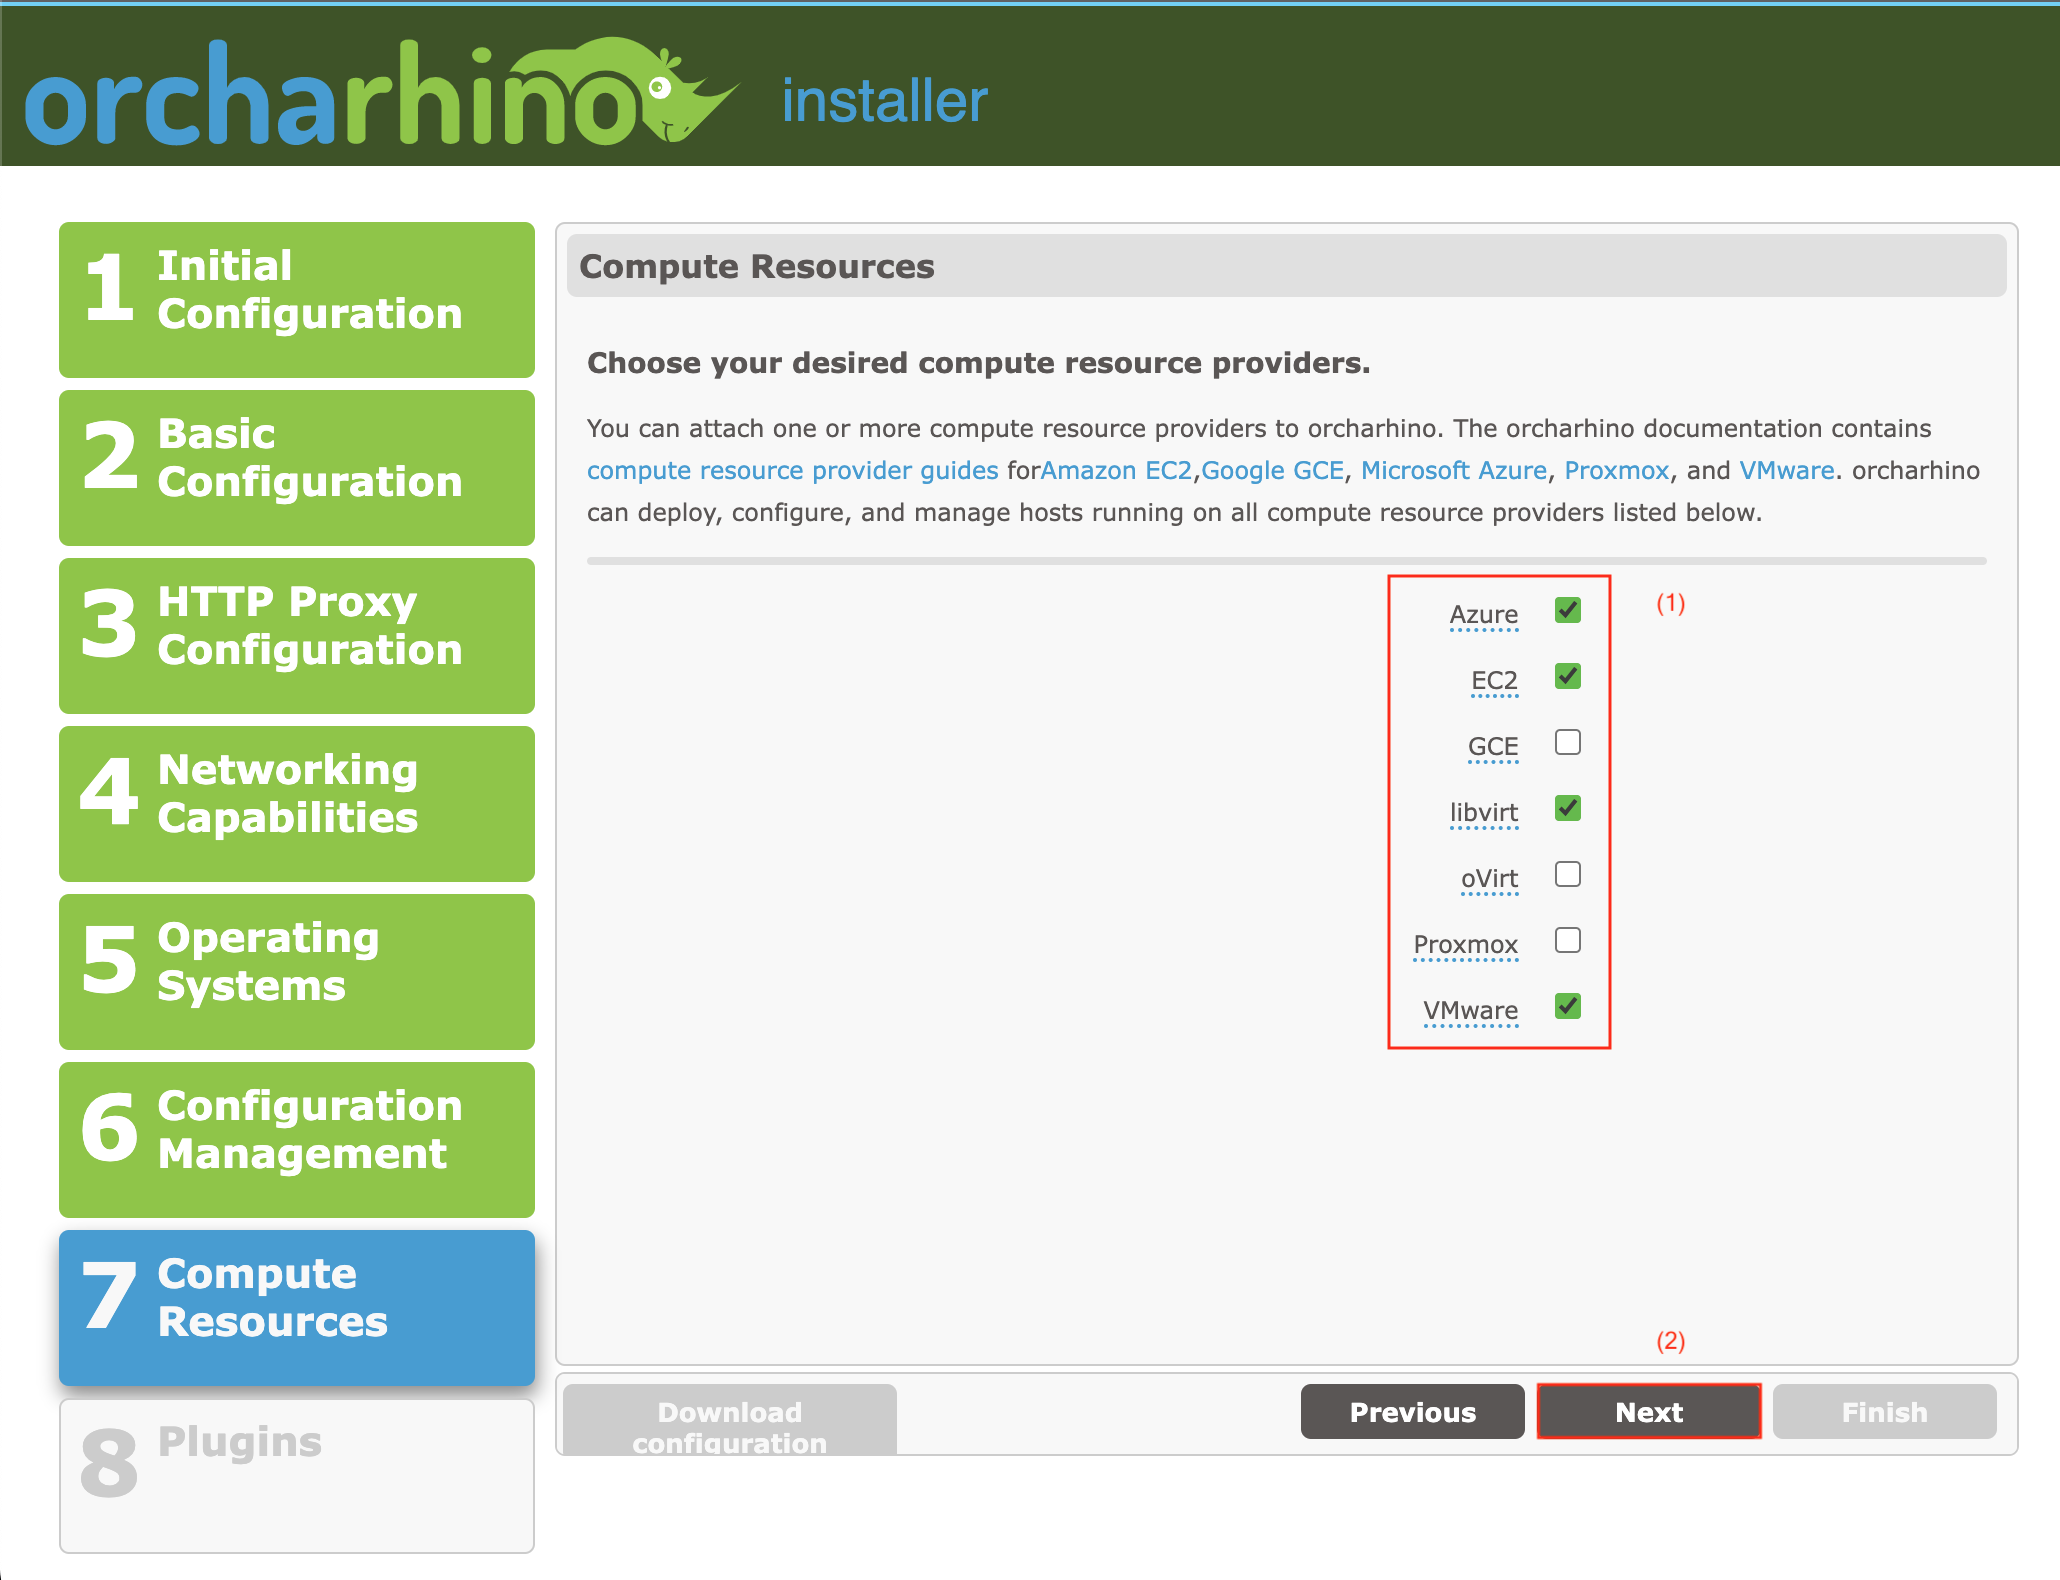
On the Compute Resources screen:
-
Choose Compute Resource Plugins (1) to install compute resource plugins to your orcharhino. For more information on how to attach those compute resources, see Amazon EC2, Google GCE, Microsoft Azure, Proxmox, and VMware.
-
Click Next (2) to continue.
-
-
On the Plugins screen:
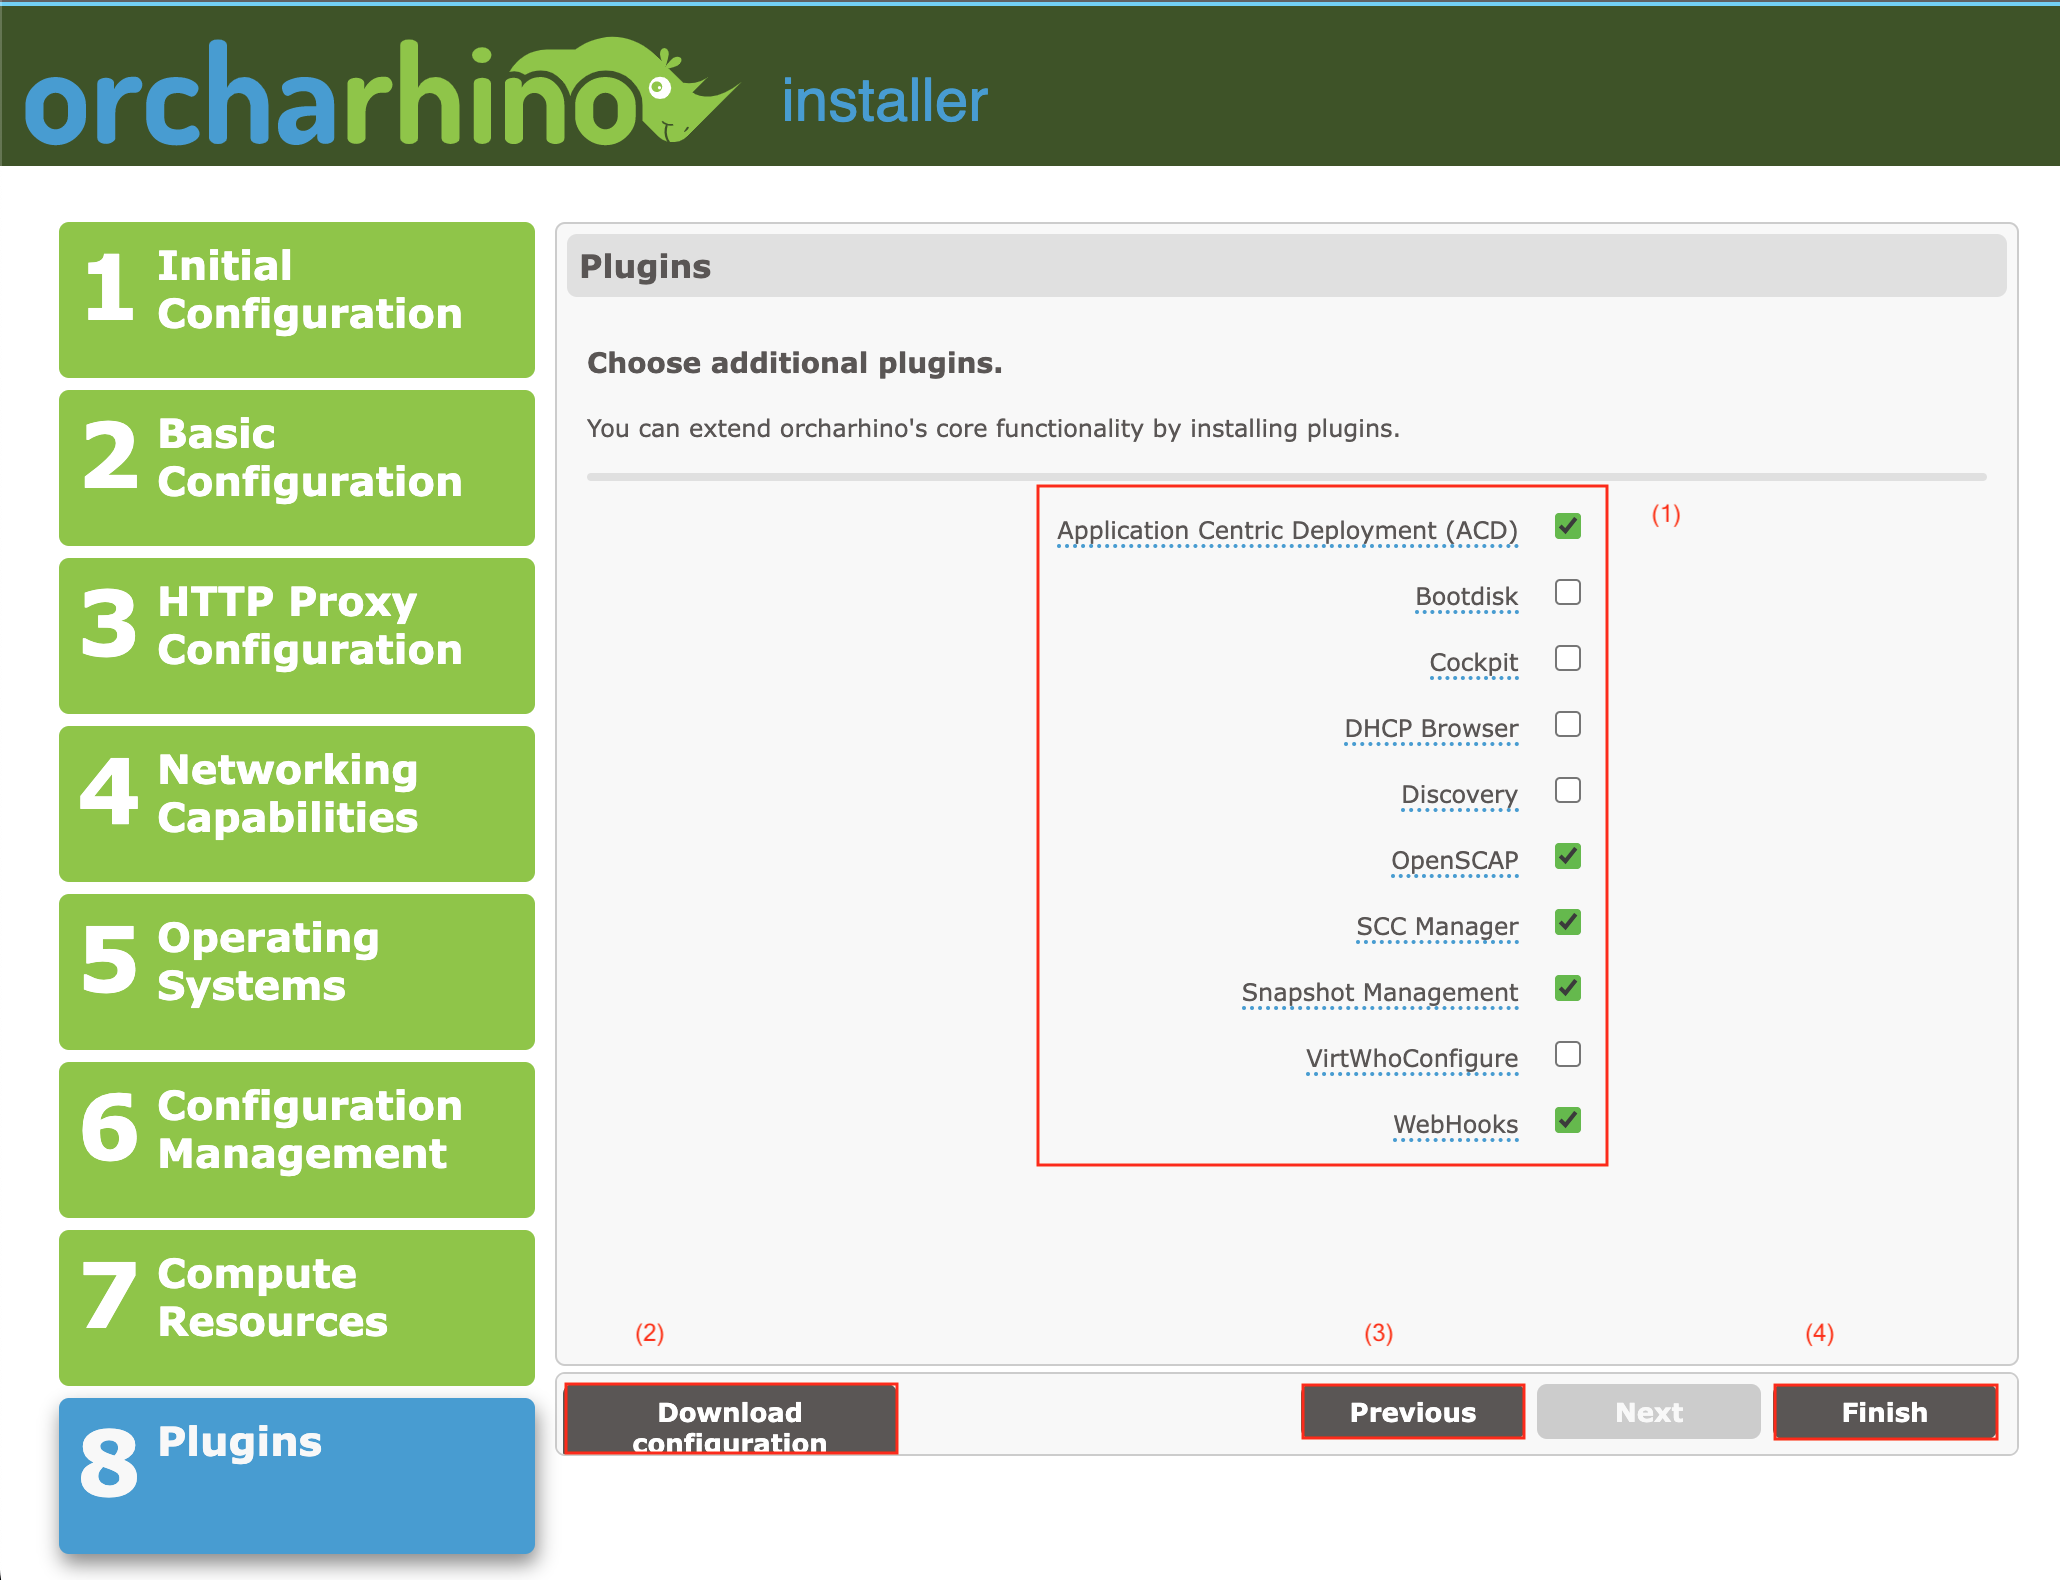
-
Select the Plugins (1) you want to install on your orcharhino Server. You can also install plugins at a later stage.
-
Click Download configuration (2) to download the
answers.yamlfile based on your settings within orcharhino Web Installer to your local machine. You can use this file to recreate your inputs for another orcharhino Server installation. Note that it does not contain any uploaded custom certificates. -
Click Previous (3) to review your configuration.
-
Click Finish (4) to start the installation process. This displays console output in the browser window and takes time depending on your environment.
-
After your orcharhino Server is successfully installed, the orcharhino Web Installer displays output similar to the following:

-
Click the button to go to the login page of your orcharhino.
-
Log in using the
adminuser along with the password you have set up during step 2 above. -
Enjoy your brand new orcharhino installation!
-
If you are unsure how to continue, have a look at the first steps guide.
-
If you want to deploy hosts running SUSE Linux Enterprise Server, you need to set up the required SLES installation media.
-
If you want to deploy hosts in additional networks, have a look at the orcharhino proxy installation guide.
Setting a Tuning Profile
You can set a tuning profile to make the best use of powerful orcharhino hosts.
-
Connect to your orcharhino Server using SSH:
# ssh root@orcharhino.example.com -
Set a tuning profile:
# foreman-installer --tuning My_Tuning_ProfileYou can choose between default as the smallest option, medium, large, extra-large, and extra-extra-large.
| Tuning Profile | Required Computing Power |
|---|---|
medium |
32 GiB of memory and 8 CPU cores |
large |
64 GiB of memory and 16 CPU cores |
extra-large |
128 GiB of memory and 32 CPU cores |
extra-extra-large |
256 GiB of memory and 48 CPU cores |
Resetting SSL Certificates
Resetting the SSL certificates removes changes made to the original self-signed certificates created during the installation. You can recover an incorrectly updated SSL certificate without reverting to a previous backup or snapshot.
-
Connect to your orcharhino using SSH:
# ssh root@orcharhino.example.com -
Reset the existing certificates:
# foreman-installer --scenario katello --certs-reset