Administering orcharhino
|
This guide uses orcharhino specific terminology. If you are new to orcharhino or unsure about certain terms, have a look at our glossary. |
Accessing orcharhino
After orcharhino has been installed and configured, use the orcharhino management UI interface to log in to orcharhino for further configuration.
Installing the Katello Root CA Certificate
The first time you log on to orcharhino, you might see a warning informing you that you are using the default self-signed certificate and you might not be able to connect this browser to orcharhino until the root CA certificate is installed in the browser. Use the following procedure to locate the root CA certificate on orcharhino and to install it in your browser.
-
Your orcharhino is installed and configured.
-
Identify the fully qualified domain name of your orcharhino Server:
# hostname -f
-
Access the
pubdirectory on your orcharhino Server using a web browser pointed to the fully qualified domain name:https://orcharhino.example.com/pub
-
When you access orcharhino for the first time, an untrusted connection warning displays in your web browser. Accept the self-signed certificate and add the orcharhino URL as a security exception to override the settings. This procedure might differ depending on the browser being used. Ensure that the orcharhino URL is valid before you accept the security exception.
-
Select
katello-server-ca.crt. -
Import the certificate into your browser as a certificate authority and trust it to identify websites.
-
From the orcharhino CLI, copy the
katello-server-ca.crtfile to the machine you use to access the orcharhino management UI:# scp /var/www/html/pub/katello-server-ca.crt username@hostname:remotefile
-
In the browser, import the
katello-server-ca.crtcertificate as a certificate authority and trust it to identify websites.
Logging on to orcharhino
Use the web user interface to log on to orcharhino for further configuration.
-
Ensure that the Katello root CA certificate is installed in your browser. For more information, see Installing the Katello Root CA Certificate.
-
Access orcharhino Server using a web browser pointed to the fully qualified domain name:
https://orcharhino.example.com/
-
Enter the user name and password created during the configuration process. If a user was not created during the configuration process, the default user name is admin. If you have problems logging on, you can reset the password. For more information, see Resetting the Administrative User Password.
Navigation Tabs in the orcharhino management UI
Use the navigation tabs to browse the orcharhino management UI.
| Navigation Tabs | Description |
|---|---|
Any Context |
Clicking this tab changes the organization and location. If no organization or location is selected, the default organization is Any Organization and the default location is Any Location. Use this tab to change to different values. |
Monitor |
Provides summary dashboards and reports. |
Content |
Provides content management tools. This includes Content Views, Activation Keys, and Life Cycle Environments. |
Hosts |
Provides host inventory and provisioning configuration tools. |
Configure |
Provides general configuration tools and data including Host Groups and Puppet data. |
Infrastructure |
Provides tools on configuring how orcharhino interacts with the environment. |
User Name |
Provides user administration where users can edit their personal information. |
|
Provides event notifications to keep administrators informed of important environment changes. |
Administer |
Provides advanced configuration for settings such as Users and RBAC, as well as general settings. |

Changing the Password
These steps show how to change your password.
-
Click your user name at the top right corner.
-
Select My Account from the menu.
-
In the Current Password field, enter the current password.
-
In the Password field, enter a new password.
-
In the Verify field, enter the new password again.
-
Click the Submit button to save your new password.
Resetting the Administrative User Password
Use the following procedures to reset the administrative password to randomly generated characters or to set a new administrative password.
-
Log on to the base operating system where orcharhino Server is installed.
-
Enter the following command to reset the password:
# foreman-rake permissions:reset
Reset to user: admin, password: qwJxBptxb7Gfcjj5
-
Use this password to reset the password in the orcharhino management UI.
-
Edit the
~/.hammer/cli.modules.d/foreman.ymlfile on orcharhino Server to add the new password:# vi ~/.hammer/cli.modules.d/foreman.yml
Unless you update the ~/.hammer/cli.modules.d/foreman.yml file, you cannot use the new password with Hammer CLI.
-
Log on to the base operating system where orcharhino Server is installed.
-
To set the password, enter the following command:
# foreman-rake permissions:reset password=new_password
-
Edit the
~/.hammer/cli.modules.d/foreman.ymlfile on orcharhino Server to add the new password:# vi ~/.hammer/cli.modules.d/foreman.yml
Unless you update the ~/.hammer/cli.modules.d/foreman.yml file, you cannot use the new password with Hammer CLI.
Setting a Custom Message on the Login Page
-
In the orcharhino management UI, navigate to Administer > Settings, and click the General tab.
-
Click the edit button next to Login page footer text, and enter the desired text to be displayed on the login page. For example, this text may be a warning message required by your company.
-
Click Save.
-
Log out of the orcharhino management UI and verify that the custom text is now displayed on the login page below the orcharhino version number.
Starting and Stopping orcharhino
orcharhino provides the foreman-maintain service command to manage orcharhino services from the command line.
This is useful when creating a backup of orcharhino.
For more information on creating backups, see Backing Up Server and Proxy.
After installing orcharhino with the foreman-installer command, all orcharhino services are started and enabled automatically.
View the list of these services by executing:
# foreman-maintain service list
To see the status of running services, execute:
# foreman-maintain service status
To stop orcharhino services, execute:
# foreman-maintain service stop
To start orcharhino services, execute:
# foreman-maintain service start
To restart orcharhino services, execute:
# foreman-maintain service restart
Migrating from Internal orcharhino Databases to External Databases
When you install orcharhino, the foreman-installer command installs PostgreSQL databases on the same server as orcharhino. If you are using the default internal databases but want to start using external databases to help with the server load, you can migrate your internal databases to external databases.
To confirm whether your orcharhino Server has internal or external databases, you can query the status of your databases:
For PostgreSQL, enter the following command:
# foreman-maintain service status --only postgresql
To migrate from the default internal databases to external databases, you must complete the following procedures:
-
preparing a host for external databases. Prepare a Enterprise Linux 7 server to host the external databases.
-
installing postgresql. Prepare PostgreSQL with databases for orcharhino, Pulp and Candlepin with dedicated users owning them.
-
migrating to external databases. Edit the parameters of
foreman-installerto point to the new databases, and runforeman-installer.
PostgreSQL as an External Database Considerations
Foreman, Katello, and Candlepin use the PostgreSQL database. If you want to use PostgreSQL as an external database, the following information can help you decide if this option is right for your orcharhino configuration. orcharhino supports PostgreSQL version 12.
-
Increase in free memory and free CPU on orcharhino
-
Flexibility to set
shared_bufferson the PostgreSQL database to a high number without the risk of interfering with other services on orcharhino -
Flexibility to tune the PostgreSQL server’s system without adversely affecting orcharhino operations
-
Increase in deployment complexity that can make troubleshooting more difficult
-
The external PostgreSQL server is an additional system to patch and maintain
-
If either orcharhino or the PostgreSQL database server suffers a hardware or storage failure, orcharhino is not operational
-
If there is latency between the orcharhino server and database server, performance can suffer
Preparing a Host for External Databases
Install a freshly provisioned system with the latest CentOS 7, Oracle Linux 7, or Enterprise Linux 7 to host the external databases.
-
The prepared host must meet orcharhino’s Storage Requirements.
-
Ensure the prepared host has the same content available as your orcharhino Server.
Installing PostgreSQL
You can install only the same version of PostgreSQL that is installed with the foreman-installer tool during an internal database installation.
You can install PostgreSQL using Enterprise Linux 8 or Red Hat Enterprise Linux Server 7 repositories.
orcharhino supports PostgreSQL version 12.
Installing PostgreSQL on Enterprise Linux 8
-
To install PostgreSQL, enter the following command:
# dnf install postgresql-server postgresql-evr
-
To initialize PostgreSQL, enter the following command:
# postgresql-setup initdb
-
Edit the
/var/lib/pgsql/data/postgresql.conffile:# vi /var/lib/pgsql/data/postgresql.conf
-
Remove the
#and edit to listen to inbound connections:listen_addresses = '*'
-
Edit the
/var/lib/pgsql/data/pg_hba.conffile:# vi /var/lib/pgsql/data/pg_hba.conf
-
Add the following line to the file:
host all all orcharhino_ip/24 md5
-
To start, and enable PostgreSQL service, enter the following commands:
# systemctl start postgresql
# systemctl enable postgresql
-
Open the postgresql port on the external PostgreSQL server:
# firewall-cmd --add-service=postgresql
# firewall-cmd --runtime-to-permanent
-
Switch to the
postgresuser and start the PostgreSQL client:$ su - postgres -c psql
-
Create three databases and dedicated roles: one for orcharhino, one for Candlepin, and one for Pulp:
CREATE USER "foreman" WITH PASSWORD 'Foreman_Password';
CREATE USER "candlepin" WITH PASSWORD 'Candlepin_Password';
CREATE USER "pulp" WITH PASSWORD 'Pulpcore_Password';
CREATE DATABASE foreman OWNER foreman;
CREATE DATABASE candlepin OWNER candlepin;
CREATE DATABASE pulpcore OWNER pulp;
-
Exit the
postgresuser:# \q
-
From orcharhino Server, test that you can access the database. If the connection succeeds, the commands return
1.# PGPASSWORD='Foreman_Password' psql -h postgres.example.com -p 5432 -U foreman -d foreman -c "SELECT 1 as ping" # PGPASSWORD='Candlepin_Password' psql -h postgres.example.com -p 5432 -U candlepin -d candlepin -c "SELECT 1 as ping" # PGPASSWORD='Pulpcore_Password' psql -h postgres.example.com -p 5432 -U pulp -d pulpcore -c "SELECT 1 as ping"
Installing PostgreSQL on Enterprise Linux 7
-
To install PostgreSQL, enter the following command:
# yum install rh-postgresql12-postgresql-server \
rh-postgresql12-syspaths \
rh-postgresql12-postgresql-evr
-
To initialize PostgreSQL, enter the following command:
# postgresql-setup initdb
-
Edit the
/var/opt/rh/rh-postgresql12/lib/pgsql/data/postgresql.conffile:# vi /var/opt/rh/rh-postgresql12/lib/pgsql/data/postgresql.conf
-
Remove the
#and edit to listen to inbound connections:listen_addresses = '*'
-
Edit the
/var/opt/rh/rh-postgresql12/lib/pgsql/data/pg_hba.conffile:# vi /var/opt/rh/rh-postgresql12/lib/pgsql/data/pg_hba.conf
-
Add the following line to the file:
host all all orcharhino_ip/24 md5
-
To start, and enable PostgreSQL service, enter the following commands:
# systemctl start postgresql
# systemctl enable postgresql
-
Open the postgresql port on the external PostgreSQL server:
# firewall-cmd --add-service=postgresql
# firewall-cmd --runtime-to-permanent
-
Switch to the
postgresuser and start the PostgreSQL client:$ su - postgres -c psql
-
Create three databases and dedicated roles: one for orcharhino, one for Candlepin, and one for Pulp:
CREATE USER "foreman" WITH PASSWORD 'Foreman_Password';
CREATE USER "candlepin" WITH PASSWORD 'Candlepin_Password';
CREATE USER "pulp" WITH PASSWORD 'Pulpcore_Password';
CREATE DATABASE foreman OWNER foreman;
CREATE DATABASE candlepin OWNER candlepin;
CREATE DATABASE pulpcore OWNER pulp;
-
Exit the
postgresuser:# \q
-
From orcharhino Server, test that you can access the database. If the connection succeeds, the commands return
1.# PGPASSWORD='Foreman_Password' psql -h postgres.example.com -p 5432 -U foreman -d foreman -c "SELECT 1 as ping" # PGPASSWORD='Candlepin_Password' psql -h postgres.example.com -p 5432 -U candlepin -d candlepin -c "SELECT 1 as ping" # PGPASSWORD='Pulpcore_Password' psql -h postgres.example.com -p 5432 -U pulp -d pulpcore -c "SELECT 1 as ping"
Migrating to External Databases
Back up and transfer existing data, then use the foreman-installer command to configure orcharhino to connect to an external PostgreSQL database server.
-
You have installed and configured a PostgreSQL server on a RHEL server.
-
On orcharhino Server, stop orcharhino services:
# foreman-maintain service stop
-
Start the PostgreSQL services:
# systemctl start postgresql
-
Back up the internal databases:
# foreman-maintain backup online --skip-pulp-content --preserve-directory -y /var/migration_backup
-
Transfer the data to the new external databases:
PGPASSWORD='Foreman_Password' pg_restore -h postgres.example.com -U foreman -d foreman < /var/migration_backup/foreman.dump
PGPASSWORD='Candlepin_Password' pg_restore -h postgres.example.com -U candlepin -d candlepin < /var/migration_backup/candlepin.dump
PGPASSWORD='Pulpcore_Password' pg_restore -h postgres.example.com -U pulp -d pulpcore < /var/migration_backup/pulpcore.dump
-
Use the
foreman-installercommand to update orcharhino to point to the new databases:foreman-installer --scenario katello \ --foreman-db-host postgres.example.com \ --foreman-db-password Foreman_Password \ --foreman-db-database foreman \ --foreman-db-manage false \ --foreman-db-username foreman \ --katello-candlepin-db-host postgres.example.com \ --katello-candlepin-db-name candlepin \ --katello-candlepin-db-password Candlepin_Password \ --katello-candlepin-manage-db false \ --katello-candlepin-db-user candlepin \ --foreman-proxy-content-pulpcore-manage-postgresql false \ --foreman-proxy-content-pulpcore-postgresql-host postgres.example.com \ --foreman-proxy-content-pulpcore-postgresql-db-name pulpcore \ --foreman-proxy-content-pulpcore-postgresql-password Pulpcore_Password \ --foreman-proxy-content-pulpcore-postgresql-user pulp
Managing orcharhino with Ansible Collections
orcharhino Ansible Collections is a set of Ansible modules that interact with the orcharhino API. You can use orcharhino Ansible Collections to manage and automate many aspects of orcharhino.
Installing the orcharhino Ansible Modules
Use this procedure to install the orcharhino Ansible modules.
-
Install the package using the following command:
# yum install ansible-collection-theforeman-foreman
Viewing the orcharhino Ansible Modules
You can view the installed orcharhino Ansible modules by listing the content of the following directory:
# ls /usr/share/ansible/collections/ansible_collections/theforeman/foreman/plugins/modules/
|
At the time of writing, the |
Managing Users and Roles
A User defines a set of details for individuals using the system. Users can be associated with organizations and environments, so that when they create new entities, the default settings are automatically used. Users can also have one or more roles attached, which grants them rights to view and manage organizations and environments. See User Management for more information on working with users.
You can manage permissions of several users at once by organizing them into user groups. User groups themselves can be further grouped to create a hierarchy of permissions. For more information on creating user groups, see Creating and Managing User Groups.
Roles define a set of permissions and access levels. Each role contains one on more permission filters that specify the actions allowed for the role. Actions are grouped according to the Resource type. Once a role has been created, users and user groups can be associated with that role. This way, you can assign the same set of permissions to large groups of users. orcharhino provides a set of predefined roles and also enables creating custom roles and permission filters as described in Creating and Managing Roles.
User Management
As an administrator, you can create, modify and remove orcharhino users. You can also configure access permissions for a user or a group of users by assigning them different roles.
Creating a User
Use this procedure to create a user. To use the CLI instead of the orcharhino management UI, see the CLI procedure.
-
In the orcharhino management UI, navigate to Administer > Users.
-
Click Create User.
-
In the Login field, enter a username for the user.
-
In the Firstname and Lastname fields, enter the real first name and last name of the user.
-
In the Mail field, enter the user’s email address.
-
In the Description field, add a description of the new user.
-
Select a specific language for the user from the Language list.
-
Select a timezone for the user from the Timezone list.
By default, orcharhino Server uses the language and timezone settings of the user’s browser.
-
Set a password for the user:
-
From the Authorized by list, select the source by which the user is authenticated.
-
INTERNAL: to enable the user to be managed inside orcharhino Server.
-
EXTERNAL: to configure external authentication as described in Configuring External Authentication.
-
-
Enter an initial password for the user in the Password field and the Verify field.
-
-
Click Submit to create the user.
-
To create a user, enter the following command:
# hammer user create \
--auth-source-id My_Authentication_Source \
--login My_User_Name \
--mail My_User_Mail \
--organization-ids My_Organization_ID_1,My_Organization_ID_2 \
--password My_User_Password
The
--auth-source-id 1setting means that the user is authenticated internally, you can specify an external authentication source as an alternative. Add the--adminoption to grant administrator privileges to the user. Specifying organization IDs is not required, you can modify the user details later using theupdatesubcommand.
For more information about user related subcommands, enter hammer user --help.
Creating Personal Access Tokens via Hammer CLI
-
sshinto your orcharhino server. -
Get a list of existing users:
hammer user list. -
Create an API personal access token:
hammer user access-token create --name my_PAT --location-id 1 --organization-id 2 --expires-at 2021-04-01 --user-id 3.Adjust the location, organization, and user ID accordingly. This will return the PAT as follows:
Personal access token [my_PAT] created:
7UqkVjcN6VyTdbmhYiDNmw
-
View existing API access tokens:
hammer user access-token list --user-id 3---|--------|--------|-------------------- ID | NAME | ACTIVE | EXPIRES AT ---|--------|--------|-------------------- 1 | my_PAT | yes | 2021/04/01 00:00:00 ---|--------|--------|--------------------Adjust the user ID accordingly. Run
hammer user access-token create --helpfor more information.
Refer to the API endpoint on your orcharhino for more information: https://orcharhino.example.com/apidoc/v2/personal_access_tokens.html.
|
If you set a random passphrase for a new user and adjust its user roles accordingly, you can create a PAT for this user and use it as an "API only" user. |
Assigning Roles to a User
Use this procedure to assign roles to a user. To use the CLI instead of the orcharhino management UI, see the CLI procedure.
-
In the orcharhino management UI, navigate to Administer > Users.
-
Click the username of the user to be assigned one or more roles.
If a user account is not listed, check that you are currently viewing the correct organization. To list all the users in orcharhino, click Default Organization and then Any Organization.
-
Click the Locations tab, and select a location if none is assigned.
-
Click the Organizations tab, and check that an organization is assigned.
-
Click the Roles tab to display the list of available roles.
-
Select the roles to assign from the Roles list.
To grant all the available permissions, select the Admin checkbox.
-
Click Submit.
To view the roles assigned to a user, click the Roles tab; the assigned roles are listed under Selected items. To remove an assigned role, click the role name in Selected items.
-
To assign roles to a user, enter the following command:
# hammer user add-role --id user_id --role role_name
Impersonating a Different User Account
Administrators can impersonate other authenticated users for testing and troubleshooting purposes by temporarily logging on to the orcharhino management UI as a different user. When impersonating another user, the administrator has permissions to access exactly what the impersonated user can access in the system, including the same menus.
Audits are created to record the actions that the administrator performs while impersonating another user. However, all actions that an administrator performs while impersonating another user are recorded as having been performed by the impersonated user.
-
Ensure that you are logged on to the orcharhino management UI as a user with administrator privileges for orcharhino.
-
In the orcharhino management UI, navigate to Administer > Users.
-
To the right of the user that you want to impersonate, from the list in the Actions column, select Impersonate.
When you want to stop the impersonation session, in the upper right of the main menu, click the impersonation icon.
Creating an API-Only User
You can create users that can interact only with the orcharhino API.
-
You have created a user and assigned roles to them. Note that this user must be authorized internally. For more information, see Creating a User and Assigning Roles to a User.
-
Log in to your orcharhino as admin.
-
Navigate to Administer > Users and select a user.
-
On the User tab, set a password. Do not save or communicate this password with others. You can create pseudo-random strings on your console:
# openssl rand -hex 32
-
On the Personal Access Tokens tab, click Add Personal Access Token.
-
Enter a name for the token.
-
Optional: Set an expiration date.
-
Click Submit to create the API token.
-
Copy the API token.
SSH Key Management
Adding SSH keys to a user allows deployment of SSH keys during provisioning. For information on deploying SSH keys during provisioning, see Deploying SSH Keys during Provisioning in the Provisioning guide.
Managing SSH Keys for a User
Use this procedure to add or remove SSH keys for a user. To use the CLI instead of the orcharhino management UI, see the CLI procedure.
Ensure that you are logged in to the orcharhino management UI as an Admin user of orcharhino or a user with the create_ssh_key permission enabled for adding SSH key and destroy_ssh_key permission for removing a key.
-
In the orcharhino management UI, navigate to Administer > Users.
-
From the Username column, click on the username of the required user.
-
Click on the SSH Keys tab.
-
To Add SSH key
-
Prepare the content of the public SSH key in a clipboard.
-
Click Add SSH Key.
-
In the Key field, paste the public SSH key content from the clipboard.
-
In the Name field, enter a name for the SSH key.
-
Click Submit.
-
-
To Remove SSH key
-
Click Delete on the row of the SSH key to be deleted.
-
Click OK in the confirmation prompt.
-
-
To add an SSH key to a user, you must specify either the path to the public SSH key file, or the content of the public SSH key copied to the clipboard.
-
If you have the public SSH key file, enter the following command:
# hammer user ssh-keys add \
--user-id user_id \
--name key_name \
--key-file ~/.ssh/id_rsa.pub
-
If you have the content of the public SSH key, enter the following command:
# hammer user ssh-keys add \
--user-id user_id \
--name key_name \
--key ecdsa-sha2-nistp256 AAAAE2VjZHNhLXNoYTItbmlzdHAyNTYAAAAIbmlzdHAyNtYAAABBBHHS2KmNyIYa27Qaa7EHp+2l99ucGStx4P77e03ZvE3yVRJEFikpoP3MJtYYfIe8k 1/46MTIZo9CPTX4CYUHeN8= host@user
To delete an SSH key from a user, enter the following command:
# hammer user ssh-keys delete --id key_id --user-id user_id
To view an SSH key attached to a user, enter the following command:
# hammer user ssh-keys info --id key_id --user-id user_id
To list SSH keys attached to a user, enter the following command:
# hammer user ssh-keys list --user-id user_id
Creating and Managing User Groups
User Groups
With orcharhino, you can assign permissions to groups of users. You can also create user groups as collections of other user groups. If using an external authentication source, you can map orcharhino user groups to external user groups as described in Configuring External User Groups.
User groups are defined in an organizational context, meaning that you must select an organization before you can access user groups.
Creating a User Group
Use this procedure to create a user group.
-
In the orcharhino management UI, navigate to Administer > User Groups.
-
Click Create User group.
-
On the User Group tab, specify the name of the new user group and select group members:
-
Select the previously created user groups from the User Groups list.
-
Select users from the Users list.
-
-
On the Roles tab, select the roles you want to assign to the user group. Alternatively, select the Admin checkbox to assign all available permissions.
-
Click Submit.
-
To create a user group, enter the following command:
# hammer user-group create \
--name My_User_Group_Name \
--role-ids My_Role_ID_1,My_Role_ID_2 \
--user-ids My_User_ID_1,My_User_ID_2
Creating and Managing Roles
orcharhino provides a set of predefined roles with permissions sufficient for standard tasks, as listed in Predefined Roles. It is also possible to configure custom roles, and assign one or more permission filters to them. Permission filters define the actions allowed for a certain resource type. Certain orcharhino plug-ins create roles automatically.
Creating a Role
Use this procedure to create a role.
-
In the orcharhino management UI, navigate to Administer > Roles.
-
Click Create Role.
-
Provide a Name for the role.
-
Click Submit to save your new role.
-
To create a role, enter the following command:
# hammer role create --name My_Role_Name
To serve its purpose, a role must contain permissions. After creating a role, proceed to Adding Permissions to a Role.
Cloning a Role
Use the orcharhino management UI to clone a role.
-
In the orcharhino management UI, navigate to Administer > Roles and select Clone from the drop-down menu to the right of the required role.
-
Provide a Name for the role.
-
Click Submit to clone the role.
-
Click the name of the cloned role and navigate to Filters.
-
Edit the permissions as required.
-
Click Submit to save your new role.
Adding Permissions to a Role
Use this procedure to add permissions to a role. To use the CLI instead of the orcharhino management UI, see the CLI procedure.
-
In the orcharhino management UI, navigate to Administer > Roles.
-
Select Add Filter from the drop-down list to the right of the required role.
-
Select the Resource type from the drop-down list. The (Miscellaneous) group gathers permissions that are not associated with any resource group.
-
Click the permissions you want to select from the Permission list.
-
Depending on the Resource type selected, you can select or deselect the Unlimited and Override checkbox. The Unlimited checkbox is selected by default, which means that the permission is applied on all resources of the selected type. When you disable the Unlimited checkbox, the Search field activates. In this field you can specify further filtering with use of the orcharhino search syntax. For more information, see Granular Permission Filtering. When you enable the Override checkbox, you can add additional locations and organizations to allow the role to access the resource type in the additional locations and organizations; you can also remove an already associated location and organization from the resource type to restrict access.
-
Click Next.
-
Click Submit to save changes.
-
List all available permissions:
# hammer filter available-permissions
-
Add permissions to a role:
# hammer filter create \
--permission-ids My_Permission_ID_1,My_Permission_ID_2 \
--role My_Role_Name
For more information about roles and permissions parameters, enter the hammer role --help and hammer filter --help commands.
Viewing Permissions of a Role
Use the orcharhino management UI to view the permissions of a role.
-
In the orcharhino management UI, navigate to Administer > Roles.
-
Click Filters to the right of the required role to get to the Filters page.
The Filters page contains a table of permissions assigned to a role grouped by the resource type. It is also possible to generate a complete table of permissions and actions that you can use on your orcharhino system. For more information, see Creating a Complete Permission Table.
Creating a Complete Permission Table
Use the orcharhino CLI to create a permission table.
-
Ensure that the required packages are installed. Execute the following command on orcharhino Server:
# yum install foreman-console
-
Start the orcharhino console with the following command:
# foreman-rake console
Insert the following code into the console:
f = File.open('/tmp/table.html', 'w')

result = Foreman::AccessControl.permissions {|a,b| a.security_block <=> b.security_block}.collect do |p|
      actions = p.actions.collect { |a| "<li>#{a}</li>" }
      "<tr><td>#{p.name}</td><td><ul>#{actions.join('')}</ul></td><td>#{p.resource_type}</td></tr>"
end.join("\n")

f.write(result)
The above syntax creates a table of permissions and saves it to the
/tmp/table.htmlfile. -
Press
Ctrl+Dto exit the orcharhino console. Insert the following text at the first line of/tmp/table.html:<table border="1"><tr><td>Permission name</td><td>Actions</td><td>Resource type</td></tr>
Append the following text at the end of
/tmp/table.html:</table>
-
Open
/tmp/table.htmlin a web browser to view the table.
Removing a Role
Use the orcharhino management UI to remove a role.
-
In the orcharhino management UI, navigate to Administer > Roles.
-
Select Delete from the drop-down list to the right of the role to be deleted.
-
In an alert box that appears, click OK to delete the role.
Predefined Roles Available in orcharhino
| Role | Permissions Provided by Role footnote:[The exact set of allowed actions associated with predefined roles can be viewed by the privileged user as described in ] |
|---|---|
Access Insights Admin |
Add and edit Insights rules. |
Access Insights Viewer |
View Insight reports. |
Ansible Roles Manager |
Play roles on hosts and host groups. View, destroy, and import Ansible roles. View, edit, create, destroy, and import Ansible variables. |
Ansible Tower Inventory Reader |
View facts, hosts, and host groups. |
Bookmarks manager |
Create, edit, and delete bookmarks. |
Boot disk access |
Download the boot disk. |
Compliance manager |
View, create, edit, and destroy SCAP content files, compliance policies, and tailoring files. View compliance reports. |
Compliance viewer |
View compliance reports. |
Create ARF report |
Create compliance reports. |
Default role |
The set of permissions that every user is granted, irrespective of any other roles. |
Discovery Manager |
View, provision, edit, and destroy discovered hosts and manage discovery rules. |
Discovery Reader |
View hosts and discovery rules. |
Edit hosts |
View, create, edit, destroy, and build hosts. |
Edit partition tables |
View, create, edit and destroy partition tables. |
Manager |
A role similar to administrator, but does not have permissions to edit global settings. In the orcharhino management UI, global settings can be found under Administer > Settings. |
Organization admin |
An administrator role defined per organization. The role has no visibility into resources in other organizations. |
Red Hat Access Logs |
View the log viewer and the logs. |
Remote Execution Manager |
Control which roles have permission to run infrastructure jobs. |
Remote Execution User |
Run remote execution jobs against hosts. |
Site manager |
A restrained version of the Manager role. |
System admin |
Users with this role can create users and assign all roles to them. Therefore, ensure to give this role only to trusted users. |
Tasks manager |
View and edit orcharhino tasks. |
Tasks reader |
A role that can only view orcharhino tasks. |
Viewer |
A passive role that provides the ability to view the configuration of every element of the orcharhino structure, logs, reports, and statistics. |
View hosts |
A role that can only view hosts. |
Virt-who Manager |
A role with full virt-who permissions. |
Virt-who Reporter |
Upload reports generated by virt-who to orcharhino. It can be used if you configure virt-who manually and require a user role that has limited virt-who permissions. |
Virt-who Viewer |
View virt-who configurations. Users with this role can deploy virt-who instances using existing virt-who configurations. |
Granular Permission Filtering
Granular Permission Filter
As mentioned in Adding Permissions to a Role, orcharhino provides the ability to limit the configured user permissions to selected instances of a resource type. These granular filters are queries to the orcharhino database and are supported by the majority of resource types.
Creating a Granular Permission Filter
Use this procedure to create a granular filter. To use the CLI instead of the orcharhino management UI, see the CLI procedure.
orcharhino does not apply search conditions to create actions. For example, limiting the create_locations action with name = "Default Location" expression in the search field does not prevent the user from assigning a custom name to the newly created location.
Specify a query in the Search field on the Edit Filter page. Deselect the Unlimited checkbox for the field to be active. Queries have the following form:
field_name operator value
-
field_name marks the field to be queried. The range of available field names depends on the resource type. For example, the Partition Table resource type offers family, layout, and name as query parameters.
-
operator specifies the type of comparison between field_name and value. See Supported Operators for Granular Search for an overview of applicable operators.
-
value is the value used for filtering. This can be for example a name of an organization. Two types of wildcard characters are supported: underscore (_) provides single character replacement, while percent sign (%) replaces zero or more characters.
For most resource types, the Search field provides a drop-down list suggesting the available parameters. This list appears after placing the cursor in the search field. For many resource types, you can combine queries using logical operators such as and, not and has operators.
-
To create a granular filter, enter the
hammer filter createcommand with the--searchoption to limit permission filters, for example:# hammer filter create \ --permission-ids 91 \ --search "name ~ ccv*" \ --role qa-user
This command adds to the qa-user role a permission to view, create, edit, and destroy Content Views that only applies to Content Views with name starting with ccv.
Examples of Using Granular Permission Filters
As an administrator, you can allow selected users to make changes in a certain part of the environment path. The following filter allows you to work with content while it is in the development stage of the application life cycle, but the content becomes inaccessible once is pushed to production.
Applying Permissions for the Host Resource Type
The following query applies any permissions specified for the Host resource type only to hosts in the group named host-editors.
hostgroup = host-editors
The following query returns records where the name matches XXXX, Yyyy, or zzzz example strings:
name ^ (XXXX, Yyyy, zzzz)
You can also limit permissions to a selected environment. To do so, specify the environment name in the Search field, for example:
Dev
You can limit user permissions to a certain organization or location with the use of the granular permission filter in the Search field. However, some resource types provide a GUI alternative, an Override checkbox that provides the Locations and Organizations tabs. On these tabs, you can select from the list of available organizations and locations. For more information, see Creating an Organization Specific Manager Role.
Creating an Organization Specific Manager Role
Use the orcharhino management UI to create an administrative role restricted to a single organization named org-1.
-
In the orcharhino management UI, navigate to Administer > Roles.
-
Clone the existing Organization admin role. Select Clone from the drop-down list next to the Filters button. You are then prompted to insert a name for the cloned role, for example org-1 admin.
-
Click the desired locations and organizations to associate them with the role.
-
Click Submit to create the role.
-
Click org-1 admin, and click Filters to view all associated filters. The default filters work for most use cases. However, you can optionally click Edit to change the properties for each filter. For some filters, you can enable the Override option if you want the role to be able to access resources in additional locations and organizations. For example, by selecting the Domain resource type, the Override option, and then additional locations and organizations using the Locations and Organizations tabs, you allow this role to access domains in the additional locations and organizations that is not associated with this role. You can also click New filter to associate new filters with this role.
Supported Operators for Granular Search
Operator |
Description |
and |
Combines search criteria. |
not |
Negates an expression. |
has |
Object must have a specified property. |
Operator |
Description |
= |
Is equal to. An equality comparison that is case-sensitive for text fields. |
!= |
Is not equal to. An inversion of the = operator. |
~ |
Like. A case-insensitive occurrence search for text fields. |
!~ |
Not like. An inversion of the ~ operator. |
^ |
In. An equality comparison that is case-sensitive search for text fields. This generates a different SQL query to the Is equal to comparison, and is more efficient for multiple value comparison. |
!^ |
Not in. An inversion of the ^ operator. |
>, >= |
Greater than, greater than or equal to. Supported for numerical fields only. |
<, ⇐ |
Less than, less than or equal to. Supported for numerical fields only. |
Email Notifications
Email notifications are created by orcharhino Server periodically or after completion of certain events. The periodic notifications can be sent daily, weekly or monthly.
The events that trigger a notification are the following:
-
Host build
-
Content View promotion
-
Error reported by host
-
Repository sync
Users do not receive any email notifications by default. An administrator can configure users to receive notifications based on criteria such as the type of notification, and frequency.
|
If you want email notifications sent to a group’s email address, instead of an individual’s email address, create a user account with the group’s email address and minimal orcharhino permissions, then subscribe the user account to the desired notification types. |
|
orcharhino Server does not enable outgoing emails by default, therefore you must review your email configuration. |
Configuring Email Notifications
You can configure orcharhino to send email messages to individual users registered to orcharhino. orcharhino sends the email to the email address that has been added to the account, if present. Users can edit the email address by clicking on their name in the top-right of the orcharhino management UI and selecting My account.
Configure email notifications for a user from the orcharhino management UI.
-
In the orcharhino management UI, navigate to Administer > Users.
-
Click the Username of the user you want to edit.
-
On the User tab, verify the value of the Mail field. Email notifications will be sent to the address in this field.
-
On the Email Preferences tab, select Mail Enabled.
-
Select the notifications you want the user to receive using the drop-down menus next to the notification types.
The Audit Summary notification can be filtered by entering the required query in the Mail Query text box.
-
Click Submit.
The user will start receiving the notification emails.
Testing Email Delivery
To verify the delivery of emails, send a test email to a user. If the email gets delivered, the settings are correct.
-
In the orcharhino management UI, navigate to Administer > Users.
-
Click on the username.
-
On the Email Preferences tab, click Test email.
A test email message is sent immediately to the user’s email address.
If the email is delivered, the verification is complete. Otherwise, you must perform the following diagnostic steps:
-
Verify the user’s email address.
-
Verify orcharhino Server’s email configuration.
-
Examine firewall and mail server logs.
Testing Email Notifications
To verify that users are correctly subscribed to notifications, trigger the notifications manually.
-
To trigger the notifications, execute the following command:
# foreman-rake reports:_My_Frequency_
Replace My_Frequency with one of the following:
-
daily
-
weekly
-
monthly
This triggers all notifications scheduled for the specified frequency for all the subscribed users. If every subscribed user receives the notifications, the verification succeeds.
|
Sending manually triggered notifications to individual users is currently not supported. |
Notification Types
The following are the notifications created by orcharhino:
-
Audit summary: A summary of all activity audited by orcharhino Server.
-
Host built: A notification sent when a host is built.
-
Host errata advisory: A summary of applicable and installable errata for hosts managed by the user.
-
OpenSCAP policy summary: A summary of OpenSCAP policy reports and their results.
-
Promote errata: A notification sent only after a Content View promotion. It contains a summary of errata applicable and installable to hosts registered to the promoted Content View. This allows a user to monitor what updates have been applied to which hosts.
-
Puppet error state: A notification sent after a host reports an error related to Puppet.
-
Puppet summary: A summary of Puppet reports.
-
Sync errata: A notification sent only after synchronizing a repository. It contains a summary of new errata introduced by the synchronization.
Changing Email Notification Settings for a Host
orcharhino can send event notifications for a host to the host’s registered owner. You can configure orcharhino to send email notifications either to an individual user or a user group. When set to a user group, all group members who are subscribed to the email type receive a message.
To view the notification status for a host, navigate to Hosts > All Hosts and click the host you want to view. In the host details page, click the Additional Information tab, you can view the email notification status.
Receiving email notifications for a host can be useful, but also overwhelming if you are expecting to receive frequent errors, for example, because of a known issue or error you are working around. To change the email notification settings for a host, complete the following steps.
-
In the orcharhino management UI, navigate to Hosts > All Hosts, and select the host with the notification setting you want to change.
-
Select the host’s checkbox, and from the Select Action list, select Enable Notifications or Disable Notifications, depending on what you want.
Managing Security Compliance
Security compliance management is the ongoing process of defining security policies, auditing for compliance with those policies and resolving instances of non-compliance. Any non-compliance is managed according to the organization’s configuration management policies. Security policies range in scope from host-specific to industry-wide, therefore, flexibility in their definition is required.
Security Content Automation Protocol
orcharhino uses the Security Content Automation Protocol (SCAP) to define security configuration policies.
For example, a security policy might specify that for hosts running RHEL, login via SSH is not permitted for the root account.
With orcharhino, you can schedule compliance auditing and reporting on all managed hosts.
SCAP Content
SCAP content is a datastream format containing the configuration and security baseline against which hosts are checked.
Checklists are described in the extensible checklist configuration description format (XCCDF) and vulnerabilities in the open vulnerability and assessment language (OVAL).
Checklist items, also known as rules express the desired configuration of a system item.
For example, you may specify that no one can log in to a host over SSH using the root user account.
Rules can be grouped into one or more profiles, allowing multiple profiles to share a rule.
SCAP content consists of both rules and profiles.
You can either create SCAP content or obtain it from a vendor. Supported profiles are provided for RHEL in the scap-security-guide package.
The default SCAP content provided with the OpenSCAP components of orcharhino depends on the version of RHEL. On RHEL 7, content for both RHEL 6 and RHEL 7 is installed.
XCCDF Profile
An XCCDF profile is a checklist against which a host or host group is evaluated. Profiles are created to verify compliance with an industry standard or custom standard.
The profiles provided with orcharhino are obtained from the OpenSCAP project.
Installing the OpenSCAP Plug-in
You can install and enable the OpenSCAP plug-in to generate OpenSCAP compliance reports. The OpenSCAP plug-in consists of the main OpenSCAP plug-in itself, the OpenSCAP smart proxy plug-in, and the OpenSCAP Hammer CLI plug-in.
-
Install the OpenSCAP plug-in on your orcharhino Server:
# foreman-installer --enable-foreman-plugin-openscap
-
Install the OpenSCAP plug-in on your orcharhino Proxies:
# foreman-installer --enable-foreman-proxy-plugin-openscap
Perform this command on both your orcharhino Server and any attached orcharhino Proxies.
-
Optional: Install the OpenSCAP Hammer CLI plug-in:
# foreman-installer --enable-foreman-cli-openscap
-
Install the OpenSCAP plug-in Puppet module:
# yum install puppet-foreman_scap_client
-
In the orcharhino management UI, navigate to Configure > Puppet Classes.
-
Click Import environments from orcharhino.example.com.
You can use Puppet to install and configure the OpenSCAP plug-in on your orcharhino Server and orcharhino Proxies.
Configuring SCAP Content
Importing OpenSCAP Puppet Modules
|
If you do not use Puppet to configure OpenSCAP auditing on hosts, you can skip this procedure. |
To audit hosts with OpenSCAP, you must first import a Puppet environment. The Puppet environment contains the Puppet classes you must assign to each host to deploy the OpenSCAP configuration.
You must associate each host that you want to audit with the Puppet environment in the orcharhino management UI.
-
In the orcharhino management UI, navigate to Configure > Environments.
-
Click Import environments from orcharhino.example.com.
-
Select the Puppet environment checkbox associated with the host you want to audit.
If no Puppet environment exists, select the production environment checkbox. The Puppet classes that you require for OpenSCAP are in the production environment by default.
-
Click Update.
Loading the Default OpenSCAP Content
In the CLI, load the default OpenSCAP content using one of the following methods.
-
Use the Hammer command:
# hammer scap-content bulk-upload --type default
-
(Deprecated) Use the
foreman-rakecommand:# foreman-rake foreman_openscap:bulk_upload:default
Extra SCAP Content
You can upload extra SCAP content into orcharhino Server, either content created by yourself or obtained elsewhere. SCAP content must be imported into orcharhino Server before being applied in a policy.
For example, the scap-security-guide RPM package available in the Enterprise Linux repositories includes a profile for the Payment Card Industry Data Security Standard (PCI-DSS) version 3.
You can upload this content into a orcharhino Server even if it is not running Enterprise Linux as the content is not specific to an operating system version.
Uploading Extra SCAP Content
In the orcharhino management UI, upload the extra SCAP content. To use the CLI instead of the orcharhino management UI, see the CLI procedure.
-
In the orcharhino management UI, navigate to Hosts > SCAP contents and click New SCAP Content.
-
Enter a title in the Title text box.
Example:
RHEL 7.2 SCAP Content. -
Click Choose file, navigate to the location containing the SCAP content file and select Open.
-
Click Submit.
If the SCAP content file is loaded successfully, a message similar to Successfully created RHEL 7.2 SCAP Content is shown and the list of SCAP Contents includes the new title.
-
To upload SCAP content to your orcharhino Server, enter the following command:
# hammer scap-content bulk-upload \
--directory /usr/share/xml/scap/ssg/content/ \
--location "_My_Location_" \
--organization "_My_Organization_" \
--type directory
SCAP content in
/usr/share/xml/scap/ssg/content/is part of thescap-security-guidepackage.
Managing Compliance Policies
Compliance Policy
A scheduled audit, also known as a compliance policy, is a scheduled task that checks the specified hosts for compliance against an XCCDF profile. The schedule for scans is specified by orcharhino Server and the scans are performed on the host. When a scan completes, an Asset Reporting File (ARF) is generated in XML format and uploaded to orcharhino Server. You can see the results of the scan in the compliance policy dashboard. No changes are made to the scanned host by the compliance policy. The SCAP content includes several profiles with associated rules but policies are not included by default.
Creating a Compliance Policy
With orcharhino, you can create a compliance policy to scan your content hosts to ensure that the hosts remain compliant to your security requirements.
You can use either Puppet or Ansible to deploy the compliance policy to your hosts. Note that Puppet runs by default every 30 minutes. If you assign a new policy, the next Puppet run synchronizes the policy to the host. However Ansible does not perform scheduled runs. To add a new policy, you must run Ansible role manually or using remote execution. For more information about remote execution, see Configuring and Setting up Remote Jobs in the Managing Hosts guide.
Before you begin, you must decide whether you want to use a Puppet or Ansible deployment.
-
For Puppet deployment, ensure that each host that you want to audit is associated with a Puppet environment. For more information, see Importing OpenSCAP Puppet Modules.
-
For Ansible deployment, ensure that you import the
theforeman.foreman_scap_clientAnsible role. For more information about importing Ansible roles, see Getting Started with Ansible in orcharhino in Configuring orcharhino to use Ansible.
-
In the orcharhino management UI, navigate to Hosts > Policies, and select whether you want a manual, Ansible, or Puppet deployment.
-
Enter a name for this policy, a description (optional), then click Next.
-
Select the SCAP Content and XCCDF Profile to be applied, then click Next.
Note that the openSCAP plugin does not detect if a SCAP content role has no content, which means that the
Default XCCDF Profilemight return an empty report. -
Specify the scheduled time when the policy is to be applied, then click Next.
Select Weekly, Monthly, or Custom from the Period list.
-
If you select Weekly, also select the desired day of the week from the Weekday list.
-
If you select Monthly, also specify the desired day of the month in the Day of month field.
-
If you select Custom, enter a valid Cron expression in the Cron line field.
The Custom option allows for greater flexibility in the policy’s schedule than either the Weekly or Monthly options.
-
-
Select the locations to which the policy is to be applied, then click Next.
-
Select the organizations to which the policy is to be applied, then click Next.
-
Select the host groups to which the policy is to be applied, then click Submit.
When the Puppet agent runs on the hosts which belong to the selected host group, or hosts to which the policy has been applied, the OpenSCAP client will be installed and a Cron job added with the policy’s specified schedule.
The SCAP Content tab provides the name of the SCAP content file which will be distributed to the directory /var/lib/openscap/content/ on all target hosts.
Viewing a Compliance Policy
You can preview the rules which will be applied by specific OpenSCAP content and profile combination. This is useful when planning policies.
-
In the orcharhino management UI, navigate to Hosts > Policies.
-
Click Show Guide.
Editing a Compliance Policy
In the orcharhino management UI, you can edit compliance policies.
-
In the orcharhino management UI, navigate to Hosts > Policies.
-
From the drop-down list to the right of the policy’s name, select Edit.
-
Edit the necessary attributes.
-
Click Submit.
An edited policy is applied to the host when its Puppet agent next checks with orcharhino Server for updates. By default, this occurs every 30 minutes.
Tailoring Files
Tailoring Files allow existing OpenSCAP policies to be customized without forking or rewriting the policy. You can assign a Tailoring File to a policy when creating or updating a policy.
You can create a Tailoring File using the SCAP Workbench. For more information on using the SCAP Workbench tool, see Customizing SCAP Security Guide for your use-case.
Uploading a Tailoring File
In the orcharhino management UI, you can upload a Tailoring file.
-
In the orcharhino management UI, navigate to Hosts > Compliance – Tailoring Files and click New Tailoring File.
-
Enter a name in the Name text box.
-
Click Choose File, navigate to the location containing the SCAP DataStream Tailoring File and select Open.
-
Click Submit to upload the chosen Tailoring File.
Assigning a Tailoring File to a Policy
In the orcharhino management UI, assign a Tailoring file to a policy.
-
In the orcharhino management UI, navigate to Hosts > Compliance – Policies.
-
Click New Policy, or New Compliance Policy if there are existing Compliance Policies.
-
Enter a name in the Name text box, and click Next.
-
Select a Scap content from the dropdown menu.
-
Select a XCCDF Profile from the dropdown menu.
-
Select a Tailoring File from the dropdown menu.
-
Select a XCCDF Profile in Tailoring File from the dropdown menu.
It is important to select the XCCDF Profile because Tailoring Files are able to contain multiple XCCDF Profiles.
-
Click Next.
-
Select a Period from the dropdown menu.
-
Select a Weekday from the dropdown menu, and click Next.
-
Select a Location to move it to the Selected Items window, and click Next.
-
Select an Organization to move it to the Selected Items window, and click Next.
-
Select a Hostgroup to move it to the Selected Items window, and click Submit.
Configuring a Host Group for OpenSCAP
Use this procedure to configure all the OpenSCAP requirements for a host group.
-
Enable OpenSCAP on orcharhino Proxy. For more information, see Enabling OpenSCAP on External orcharhino Proxies in the Installing orcharhino Proxy guide.
-
Assign an OpenSCAP orcharhino Proxy.
-
Assign a Puppet environment that contains the Puppet classes to deploy the OpenSCAP policies.
-
Assign the
foreman_scap_clientandforeman_scap_client::paramsPuppet classes. -
Assign any compliance policies that you want to add.
For information about creating and administering hosts, see the Managing Hosts guide.
-
In the orcharhino management UI, navigate to Configure > Host Groups, and either create a host group or click the host group that you want to configure for OpenSCAP reporting.
-
From the Puppet Environment list, select the Puppet environment that contains the
foreman_scap_clientandforeman_scap_client::paramsPuppet classes. -
From the OpenSCAP orcharhino Proxy list, select the orcharhino Proxy with OpenSCAP enabled that you want to use.
-
Click the Puppet Classes tab, and add the
foreman_scap_clientandforeman_scap_client::paramsPuppet classes. -
Click Submit to save your changes.
-
In the orcharhino management UI, navigate to Hosts > Policies.
-
Select the policy that you want to assign to the host group.
-
Click the Host Groups tab.
-
From the Host Groups list, select as many host groups as you want to assign to this policy.
-
Click Submit to save your changes.
Backing Up orcharhino Server and orcharhino Proxy
You can back up your orcharhino deployment to ensure the continuity of your orcharhino deployment and associated data in the event of a disaster. If your deployment uses custom configurations, you must consider how to handle these custom configurations when you plan your backup and disaster recovery policy.
To create a backup of your orcharhino Server or orcharhino Proxy and all associated data, use the foreman-maintain backup command.
Backing up to a separate storage device on a separate system is highly recommended.
orcharhino services are unavailable during the backup.
Therefore, you must ensure that no other tasks are scheduled by other administrators.
You can schedule a backup using cron.
For more information, see the Example of a Weekly Full Backup Followed by Daily Incremental Backups.
During offline or snapshot backups, the services are inactive and orcharhino is in a maintenance mode. All the traffic from outside on port 443 is rejected by a firewall to ensure there are no modifications triggered.
A backup contains sensitive information from the /root/ssl-build directory.
For example, it can contain hostnames, ssh keys, request files and SSL certificates.
You must encrypt or move the backup to a secure location to minimize the risk of damage or unauthorized access to the hosts.
You can also use conventional backup methods.
|
If you plan to use the |
-
When creating a snapshot or conventional backup, you must stop all services as follows:
# foreman-maintain service stop
-
Start the services after creating a snapshot or conventional backup:
# foreman-maintain service start
Estimating the Size of a Backup
The full backup creates uncompressed archives of PostgreSQL and Pulp database files, and orcharhino configuration files. Compression occurs after the archives are created to decrease the time when orcharhino services are unavailable.
A full backup requires space to store the following data:
-
Uncompressed orcharhino database and configuration files
-
Compressed orcharhino database and configuration files
-
An extra 20% of the total estimated space to ensure a reliable backup
-
Enter the
ducommand to estimate the size of uncompressed directories containing orcharhino database and configuration files:For Enterprise Linux 8:# du -sh /var/lib/pgsql/data /var/lib/pulp 100G /var/lib/pgsql/data 100G /var/lib/pulp # du -csh /var/lib/qpidd /var/lib/tftpboot /etc /root/ssl-build \ /var/www/html/pub /opt/puppetlabs 886M /var/lib/qpidd 16M /var/lib/tftpboot 37M /etc 900K /root/ssl-build 100K /var/www/html/pub 2M /opt/puppetlabs 942M total
For Enterprise Linux 7:# du -sh /var/opt/rh/rh-postgresql12/lib/pgsql/data /var/lib/pulp 100G /var/opt/rh/rh-postgresql12/lib/pgsql/data 100G /var/lib/pulp # du -csh /var/lib/qpidd /var/lib/tftpboot /etc /root/ssl-build \ /var/www/html/pub /opt/puppetlabs 886M /var/lib/qpidd 16M /var/lib/tftpboot 37M /etc 900K /root/ssl-build 100K /var/www/html/pub 2M /opt/puppetlabs 942M total
-
Calculate how much space is required to store the compressed data.
The following table describes the compression ratio of all data items included in the backup:
Table 3. Backup Data Compression Ratio for Enterprise Linux 8 Data type Directory Ratio Example results PostgreSQL database files
/var/lib/pgsql/data80 – 85%
100 GB → 20 GB
Pulp RPM files
/var/lib/pulp(not compressed)
100 GB
Configuration files
/var/lib/qpidd
/var/lib/tftpboot
/etc
/root/ssl-build
/var/www/html/pub
/opt/puppetlabs85%
942 MB → 141 MB
Table 4. Backup Data Compression Ratio for Enterprise Linux 7 Data type Directory Ratio Example results PostgreSQL database files
/var/opt/rh/rh-postgresql12/lib/pgsql/data80 - 85%
100 GB → 20 GB
Pulp RPM files
/var/lib/pulp(not compressed)
100 GB
Configuration files
/var/lib/qpidd
/var/lib/tftpboot
/etc
/root/ssl-build
/var/www/html/pub
/opt/puppetlabs85%
942 MB → 141 MB
In this example, the compressed backup data occupies 180 GB in total.
-
To calculate the amount of available space you require to store a backup, calculate the sum of the estimated values of compressed and uncompressed backup data, and add an extra 20% to ensure a reliable backup.
This example requires 681 GB plus 180 GB for the uncompressed and compressed backup data, 861 GB in total. With 172 GB of extra space, 1033 GB must be allocated for the backup location.
Performing a Full Backup of orcharhino Server or orcharhino Proxy
orcharhino uses the foreman-maintain backup command to make backups.
There are three main methods of backing up orcharhino Server:
-
Offline backup
-
Online backup
-
Snapshot backups
For more information about each of these methods, you can view the usage statements for each backup method.
# foreman-maintain backup offline --help
# foreman-maintain backup online --help
# foreman-maintain backup snapshot --help
The foreman-maintain backup command creates a time-stamped subdirectory in the backup directory that you specify.
The foreman-maintain backup command does not overwrite backups, therefore you must select the correct directory or subdirectory when restoring from a backup or an incremental backup.
The foreman-maintain backup command stops and restarts services as required.
When you run the foreman-maintain backup offline command, the following default backup directories are created:
-
orcharhino-backupon orcharhino -
foreman-proxy-backupon orcharhino Proxy
If you want to set a custom directory name, add the --preserve-directory option and add a directory name.
The backup is then stored in the directory you provide in the command line.
If you use the --preserve-directory option, no data is removed if the backup fails.
Note that if you use a local PostgreSQL database, the postgres user requires write access to the backup directory.
You can use the foreman-maintain backup command to back up remote databases.
You can use both online and offline methods to back up remote databases, but if you use offline methods, such as snapshot, the foreman-maintain backup command performs a database dump.
-
Ensure that your backup location has sufficient available disk space to store the backup. For more information, see Estimating the Size of a Backup.
|
Request other users of orcharhino Server or orcharhino Proxy to save any changes and warn them that orcharhino services are unavailable for the duration of the backup. Ensure no other tasks are scheduled for the same time as the backup. |
-
On orcharhino Server, enter the following command:
# foreman-maintain backup offline /var/orcharhino-backup
-
On orcharhino Proxy, enter the following command:
# foreman-maintain backup offline /var/foreman-proxy-backup
Performing a Backup without Pulp Content
You can perform an offline backup that excludes the contents of the Pulp directory. The backup without Pulp content is useful for debugging purposes and is only intended to provide access to configuration files without backing up the Pulp database. You cannot restore from a directory that does not contain Pulp content.
|
Request other users of orcharhino Server or orcharhino Proxy to save any changes and warn them that orcharhino services are unavailable for the duration of the backup. Ensure no other tasks are scheduled for the same time as the backup. |
-
Ensure that your backup location has sufficient available disk space to store the backup. For more information, see Estimating the Size of a Backup.
-
To perform an offline backup without Pulp content, enter the following command:
# foreman-maintain backup offline --skip-pulp-content /var/backup_directory
Performing an Incremental Backup
Use this procedure to perform an offline backup of any changes since a previous backup.
To perform incremental backups, you must perform a full backup as a reference to create the first incremental backup of a sequence. Keep the most recent full backup and a complete sequence of incremental backups to restore from.
|
Request other users of orcharhino Server or orcharhino Proxy to save any changes and warn them that orcharhino services are unavailable for the duration of the backup. Ensure no other tasks are scheduled for the same time as the backup. |
-
Ensure that your backup location has sufficient available disk space to store the backup. For more information, see Estimating the Size of a Backup.
-
To perform a full offline backup, enter the following command:
# foreman-maintain backup offline /var/backup_directory
-
To create a directory within your backup directory to store the first incremental back up, enter the
foreman-maintain backupcommand with the--incrementaloption:# foreman-maintain backup offline --incremental /var/backup_directory/full_backup /var/backup_directory
-
To create the second incremental backup, enter the
foreman-maintain backupcommand with the--incrementaloption and include the path to the first incremental backup to indicate the starting point for the next increment. This creates a directory for the second incremental backup in your backup directory:# foreman-maintain backup offline --incremental /var/backup_directory/first_incremental_backup /var/backup_directory
-
Optional: If you want to point to a different version of the backup, and make a series of increments with that version of the backup as the starting point, you can do this at any time. For example, if you want to make a new incremental backup from the full backup rather than the first or second incremental backup, point to the full backup directory:
# foreman-maintain backup offline --incremental /var/backup_directory/full_backup /var/backup_directory
Example of a Weekly Full Backup Followed by Daily Incremental Backups
The following script performs a full backup on a Sunday followed by incremental backups for each of the following days. A new subdirectory is created for each day that an incremental backup is performed. The script requires a daily cron job.
#!/bin/bash -e
PATH=/sbin:/bin:/usr/sbin:/usr/bin
DESTINATION=/var/backup_directory
if [[ $(date +%w) == 0 ]]; then
  foreman-maintain backup offline --assumeyes $DESTINATION
else
  LAST=$(ls -td -- $DESTINATION/*/ | head -n 1)
  foreman-maintain backup offline --assumeyes --incremental "$LAST" $DESTINATION
fi
exit 0
Note that the foreman-maintain backup command requires /sbin and /usr/sbin directories to be in PATH and the --assumeyes option is used to skip the confirmation prompt.
Performing an Online Backup
Perform an online backup only for debugging purposes.
When performing an online backup, if there are procedures affecting the Pulp database, the Pulp part of the backup procedure repeats until it is no longer being altered. Because the backup of the Pulp database is the most time consuming part of backing up orcharhino, if you make a change that alters the Pulp database during this time, the backup procedure keeps restarting.
For production environments, use the snapshot method. For more information, see Performing a Snapshot Backup. If you want to use the online backup method in production, proceed with caution and ensure that no modifications occur during the backup.
|
Request other users of orcharhino Server or orcharhino Proxy to save any changes and warn them that orcharhino services are unavailable for the duration of the backup. Ensure no other tasks are scheduled for the same time as the backup. |
-
Ensure that your backup location has sufficient available disk space to store the backup. For more information, see Estimating the Size of a Backup.
-
To perform an online backup, enter the following command:
# foreman-maintain backup online /var/backup_directory
Performing a Snapshot Backup
You can perform a snapshot backup that uses Logical Volume Manager (LVM) snapshots of the Pulp, and PostgreSQL directories. Creating a backup from LVM snapshots mitigates the risk of an inconsistent backup.
The snapshot backup method is faster than a full offline backup and therefore reduces orcharhino downtime.
To view the usage statement, enter the following command:
foreman-maintain backup snapshot -h
|
Request other orcharhino Server or orcharhino Proxy users to save any changes and warn them that orcharhino services are unavailable for the duration of the backup. Ensure no other tasks are scheduled for the same time as the backup. |
-
The system uses LVM for the directories that you snapshot:
/var/lib/pulp/, and/var/opt/rh/rh-postgresql12/lib/pgsql. -
The free disk space in the relevant volume group (VG) is three times the size of the snapshot. More precisely, the VG must have enough space unreserved by the member logical volumes (LVs) to accommodate new snapshots. In addition, one of the LVs must have enough free space for the backup directory.
-
The target backup directory is on a different LV than the directories that you snapshot.
-
To perform a snapshot backup, enter the
foreman-maintain backup snapshotcommand:# foreman-maintain backup snapshot /var/backup_directory
The foreman-maintain backup snapshot command creates snapshots when the services are active, and stops all services which can impact the backup.
This makes the maintenance window shorter.
After the successful snapshot, all services are restarted and LVM snapshots are removed.
White-listing and Skipping Steps When Performing Backups
A backup using the foreman-maintain backup command proceeds in a sequence of steps.
To skip part of the backup add the --whitelist option to the command and add the step label that you want to omit.
-
To display a list of available step labels, enter the following command:
# foreman-maintain advanced procedure run -h
-
To skip a step of the backup, enter the
foreman-maintain backupcommand with the--whitelistoption. For example:# foreman-maintain backup online --whitelist backup-metadata -y /var/backup_directory
Restoring orcharhino Server or orcharhino Proxy from a Backup
You can restore orcharhino Server or orcharhino Proxy from the backup data that you create as part of Backing Up Server and Proxy. This process outlines how to restore the backup on the same server that generated the backup, and all data covered by the backup is deleted on the target system. If the original system is unavailable, provision a system with the same configuration settings and host name.
Restoring from a Full Backup
Use this procedure to restore orcharhino or orcharhino Proxy from a full backup. When the restore process completes, all processes are online, and all databases and system configuration revert to the state at the time of the backup.
-
Ensure that you are restoring to the correct instance. The orcharhino instance must have the same host name, configuration, and be the same minor version (X.Y) as the original system.
-
Ensure that you have an existing target directory. The target directory is read from the configuration files contained within the archive.
-
Ensure that you have enough space to store this data on the base system of orcharhino Server or orcharhino Proxy as well as enough space after the restoration to contain all the data in the
/etc/and/var/directories contained within the backup.To check the space used by a directory, enter the following command:
# du -sh /var/backup_directory
To check for free space, enter the following command:
# df -h /var/backup_directory
Add the
--totaloption to get a total of the results from more than one directory. -
Ensure that all SELinux contexts are correct. Enter the following command to restore the correct SELinux contexts:
# restorecon -Rnv /
-
Choose the appropriate method to install orcharhino or orcharhino Proxy:
-
To install orcharhino Server from a connected network, follow the procedures in Installing orcharhino Server.
-
To install a orcharhino Proxy, follow the procedures in Installing orcharhino Proxy.
-
-
Copy the backup data to orcharhino Server’s local file system. Use
/var/or/var/tmp/. -
Run the restoration script.
# foreman-maintain restore /var/backup_directory
Where backup_directory is the time-stamped directory or subdirectory containing the backed-up data.
The restore process can take a long time to complete, because of the amount of data to copy.
-
For troubleshooting, you can check
/var/log/foreman/production.logand/var/log/messages.
Restoring from Incremental Backups
Use this procedure to restore orcharhino or orcharhino Proxy from incremental backups. If you have multiple branches of incremental backups, select your full backup and each incremental backup for the branch you want to restore, in chronological order.
When the restore process completes, all processes are online, and all databases and system configuration revert to the state at the time of the backup.
-
Restore the last full backup using the instructions in Restoring from a Full Backup.
-
Remove the full backup data from orcharhino Server’s local file system, for example,
/var/or/var/tmp/. -
Copy the incremental backup data to orcharhino Server’s local file system, for example,
/var/or/var/tmp/. -
Restore the incremental backups in the same sequence that they are made:
# foreman-maintain restore -i /var/backup_directory/FIRST_INCREMENTAL
# foreman-maintain restore -i /var/backup_directory/SECOND_INCREMENTAL
If you created the backup using the
foreman-maintain backupcommand, you do not need to use-ioption in the command.
-
For troubleshooting, you can check
/var/log/foreman/production.logand/var/log/messages.
Backup and Restore orcharhino Proxy Using a Virtual Machine Snapshot
If your orcharhino Proxy is a virtual machine, you can restore it from a snapshot. Creating weekly snapshots to restore from is recommended. In the event of failure, you can install, or configure a new orcharhino Proxy, and then synchronize the database content from orcharhino Server.
If required, deploy a new orcharhino Proxy, ensuring the host name is the same as before, and then install the orcharhino Proxy certificates. You may still have them on orcharhino Server, the package name ends in -certs.tar, alternately create new ones. Follow the procedures in Installing orcharhino Proxy until you can confirm, in the orcharhino management UI, that orcharhino Proxy is connected to orcharhino Server. Then use the procedure Synchronizing an External Smart Proxy to synchronize from orcharhino.
Synchronizing an External orcharhino Proxy
Synchronize an external orcharhino Proxy with orcharhino.
-
To synchronize an external orcharhino Proxy, select the relevant organization and location in the orcharhino management UI, or choose Any Organization and Any Location.
-
In the orcharhino management UI, navigate to Infrastructure > orcharhino Proxies and click the name of the orcharhino Proxy to synchronize.
-
On the Overview tab, select Synchronize.
Running OpenSCAP Scans
-
In the orcharhino management UI, navigate to Hosts > All Hosts.
-
Select one or multiple hosts.
-
Click on Run OpenSCAP scan.
Alternatively, schedule a remote job to scan one or multiple hosts.
Configuring a Host for OpenSCAP
Use this procedure to configure all the OpenSCAP requirements for a host.
-
Enable OpenSCAP on orcharhino Proxy. For more information, see Enabling OpenSCAP on External orcharhino Proxies in the Installing orcharhino Proxy guide.
-
Assign an OpenSCAP orcharhino Proxy.
-
Assign a Puppet environment that contains the Puppet classes to deploy the OpenSCAP policies.
-
Assign the
foreman_scap_clientandforeman_scap_client::paramsPuppet classes. -
Assign any compliance policies that you want to add.
For information about creating and administering hosts, see the Managing Hosts guide.
-
In the orcharhino management UI, navigate to Hosts > All Hosts, and select Edit on the host you want to configure for OpenSCAP reporting.
-
From the Puppet Environment list, select the Puppet environment that contains the
foreman_scap_clientandforeman_scap_client::paramsPuppet classes. -
From the OpenSCAP orcharhino Proxy list, select the orcharhino Proxy with OpenSCAP enabled that you want to use.
-
Click the Puppet Classes tab, and add the
foreman_scap_clientandforeman_scap_client::paramsPuppet classes. -
To add a compliance policy, navigate to one of the following locations:
-
In the orcharhino management UI, navigate to Hosts > All Hosts.
-
Select the host or hosts to which you want to add the policy.
-
Click Select Action.
-
Select Assign Compliance Policy from the list.
-
In the Policy window, select the policy that you want from the list of available policies and click Submit.
Monitoring Compliance
orcharhino enables centralized compliance monitoring and management. A compliance dashboard provides an overview of compliance of hosts and the ability to view details for each host within the scope of that policy. Compliance reports provide a detailed analysis of compliance of each host with the applicable policy. With this information, you can evaluate the risks presented by each host and manage the resources required to bring hosts into compliance.
Common objectives when monitoring compliance using SCAP include the following:
-
Verifying policy compliance.
-
Detecting changes in compliance.
Compliance Policy Dashboard
The compliance policy dashboard provides a statistical summary of compliance of hosts and the ability to view details for each host within the scope of that policy.
For all hosts which were evaluated as non-compliant, the Failed statistic provides a useful metric for prioritizing compliance effort.
The hosts detected as Never audited should also be a priority, since their status is unknown.
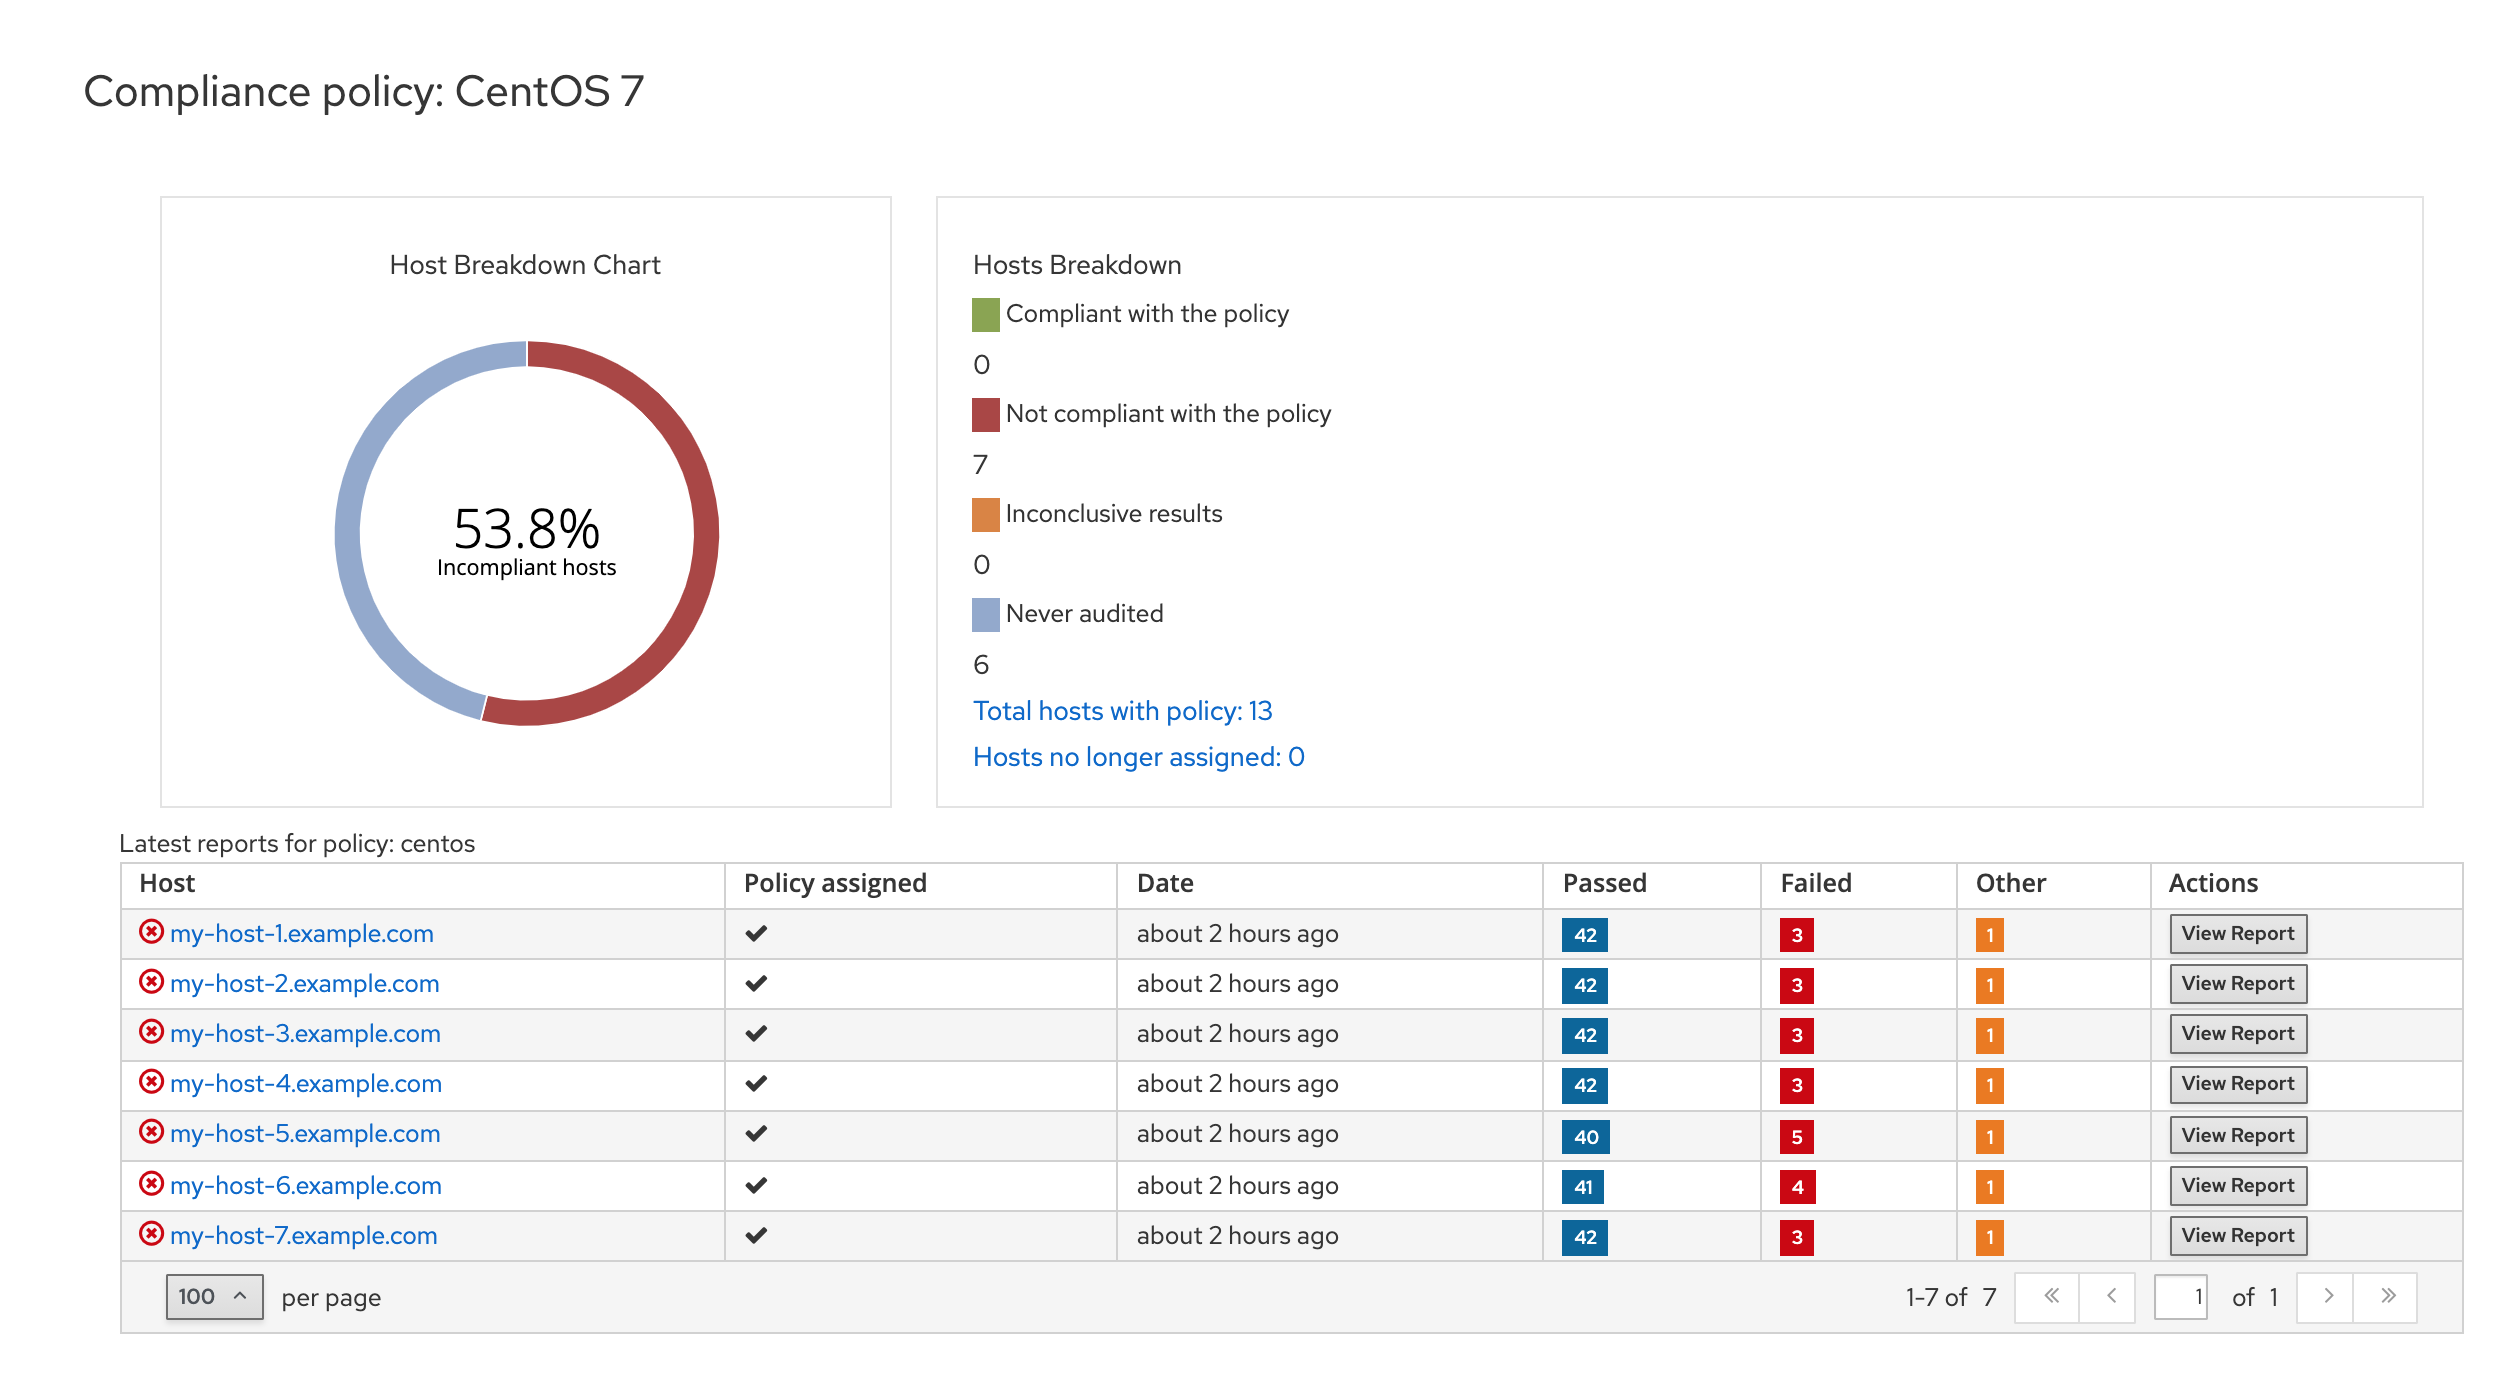
Viewing the Compliance Policy Dashboard
Use the orcharhino management UI to verify policy compliance with the compliance policy dashboard.
-
In the orcharhino management UI, navigate to Hosts > Policies.
-
Click the required policy name. The dashboard provides the following information:
-
A ring chart illustrating a high-level view of compliance of hosts with the policy.
-
A statistical breakdown of compliance of hosts with the policy, in a tabular format.
-
Links to the latest policy report for each host.
-
Compliance Email Notifications
orcharhino Server sends an OpenSCAP Summary email to all users who subscribe to the Openscap policy summary email notifications. For more information on subscribing to email notifications, see Configuring Email Notifications. Each time a policy is run, orcharhino checks the results against the previous run, noting any changes between them. The email is sent according to the frequency requested by each subscriber, providing a summary of each policy and its most recent result.
An OpenSCAP Summary email message contains the following information:
-
Details of the time period it covers.
-
Totals for all hosts by status: changed, compliant, and noncompliant.
-
A tabular breakdown of each host and the result of its latest policy, including totals of the rules that passed, failed, changed, or where results were unknown.
Compliance Reports
A compliance report is the output of a policy run against a host. Each report includes the total number of rules passed or failed per policy. By default, reports are listed in descending date order.
In the orcharhino management UI, navigate to Hosts > Reports to list all compliance reports.
A compliance report consists of the following areas:
-
Introduction
-
Evaluation Characteristics
-
Compliance and Scoring
-
Rule Overview
The Evaluation Characteristics area provides details about an evaluation against a specific profile, including the host that was evaluated, the profile used in the evaluation, and when the evaluation started and finished. For reference, the IPv4, IPv6, and MAC addresses of the host are also listed.
| Name | Description | Example |
|---|---|---|
Target machine |
The fully-qualified domain name (FQDN) of the evaluated host. |
|
Benchmark URL |
The URL of the SCAP content against which the host was evaluated. |
|
Benchmark ID |
The identifier of the benchmark against which the host was evaluated. A benchmark is a set of profiles |
|
Profile ID |
The identifier of the profile against which the host was evaluated. |
|
Started at |
The date and time at which the evaluation started, in ISO 8601 format. |
|
Finished at |
The date and time at which the evaluation finished, in ISO 8601 format. |
|
Performed by |
The local account name under which the evaluation was performed on the host. |
|
The Compliance and Scoring area provides an overview of whether or not the host is in compliance with the profile rules, a breakdown of compliance failures by severity, and an overall compliance score as a percentage. If compliance with a rule was not checked, this is categorized in the Rule results field as Other.
The Rule Overview area provides details about every rule and the compliance result, with the rules presented in a hierarchical layout.
Select or clear the checkboxes to narrow the list of rules included in the compliance report. For example, if the focus of your review is any non-compliance, clear the pass and informational checkboxes.
To search all rules, enter a criterion in the Search field. The search is dynamically applied as you type. The Search field only accepts a single plain-text search term and it is applied as a case-insensitive search. When you perform a search, only those rules whose descriptions match the search criterion will be listed. To remove the search filter, delete the search criterion.
For an explanation of each result, hover the cursor over the status shown in the Result column.
Examining Compliance Failures of Hosts
Use the orcharhino management UI to determine why a host failed compliance on a rule.
-
In the orcharhino management UI, navigate to Hosts > Reports to list all compliance reports.
-
Click View Report in the row of the specific host to view the details of an individual report.
-
Click on the rule’s title to see further details:
-
A description of the rule with instructions for bringing the host into compliance if available.
-
The rationale for the rule.
-
In some cases, a remediation script.
-
|
Do not implement any of the recommended remedial actions or scripts without first testing them in a non-production environment. |
Searching Compliance Reports
Use the Compliance Reports search field to filter the list of available reports on any given subset of hosts.
-
To apply a filter, enter the search query in the Search field and click Search. The search query is case insensitive.
-
The following search query finds all compliance reports for which more than five rules failed:
failed > 5
-
The following search query finds all compliance reports created after January 1, YYYY, for hosts with host names that contain the
prod-group of characters:host ~ prod- AND date > "Jan 1, YYYY"
-
The following search query finds all reports generated by the
rhel7_auditcompliance policy from an hour ago:"1 hour ago" AND compliance_policy = date = "1 hour ago" AND compliance_policy = rhel7_audit
-
The following search query finds reports that pass an XCCDF rule:
xccdf_rule_passed = xccdf_org.ssgproject.content_rule_firefox_preferences-auto-download_actions
-
The following search query finds reports that fail an XCCDF rule:
xccdf_rule_failed = xccdf_org.ssgproject.content_rule_firefox_preferences-auto-download_actions
-
The following search query finds reports that have a result different than fail or pass for an XCCDF rule:
xccdf_rule_othered = xccdf_org.ssgproject.content_rule_firefox_preferences-auto-download_actions
-
To see a list of available search parameters, click the empty Search field.
-
You can create complex queries with the following logical operators:
and,notandhas. For more information about logical operators, see Supported Operators for Granular Search. -
You cannot use regular expressions in a search query. However, you can use multiple fields in a single search expression. For more information about all available search operators, see Supported Operators for Granular Search.
-
You can bookmark a search to reuse the same search query. For more information, see Creating Bookmarks.
Deleting a Compliance Report
You can delete compliance reports on your orcharhino.
-
In the orcharhino management UI, navigate to Hosts > Reports.
-
In the Compliance Reports window, identify the policy that you want to delete and, on the right of the policy’s name, select Delete.
-
Click OK.
Deleting Multiple Compliance Reports
You can delete multiple compliance policies simultaneously. However, in the orcharhino management UI, compliance policies are paginated, so you must delete one page of reports at a time.
-
In the orcharhino management UI, navigate to Hosts > Reports.
-
In the Compliance Reports window, select the compliance reports that you want to delete.
-
In the upper right of the list, select Delete reports.
-
Repeat these steps for as many pages as you want to delete.
Specifications Supported by OpenSCAP
The following specifications are supported by OpenSCAP:
| Title | Description | Version |
|---|---|---|
XCCDF |
The Extensible Configuration Checklist Description Format |
1.2 |
OVAL |
Open Vulnerability and Assessment Language |
5.11 |
- |
Asset Identification |
1.1 |
ARF |
Asset Reporting Format |
1.1 |
CCE |
Common Configuration Enumeration |
5.0 |
CPE |
Common Platform Enumeration |
2.3 |
CVE |
Common Vulnerabilities and Exposures |
- |
CVSS |
Common Vulnerability Scoring System |
2.0 |
Renaming orcharhino Server or orcharhino Proxy
To rename orcharhino Server or orcharhino Proxy, you must use the katello-change-hostname script.
If you rename orcharhino Server, you must reregister all orcharhino clients and configure each orcharhino Proxy to point them to the new orcharhino host name. If you use custom SSL certificates, you must regenerate them with the new host name. If you use virt-who, you must update the virt-who configuration files with the new host name.
If you rename orcharhino Proxy, you must reregister all orcharhino Proxy clients and update the orcharhino Proxy host name in the orcharhino management UI. If you use custom SSL certificates, you must regenerate them with the new host name.
|
The renaming process shuts down all orcharhino Server services on the host being renamed. When the renaming is complete, all services are restarted. |
Renaming orcharhino Server
The host name of orcharhino Server is used by orcharhino Server components, all orcharhino Proxys, and hosts registered to it for communication. This procedure ensures that you update all references to the new host name.
If you use external authentication, you must reconfigure orcharhino Server for external authentication after you run the katello-change-hostname script.
The katello-change-hostname script breaks external authentication for orcharhino Server.
For more information about configuring external authentication, see Configuring External Authentication.
If you use virt-who, you must update the virt-who configuration files with the new host name after you run the katello-change-hostname script.
-
Both the
hostnameandhostname -fcommands must return the FQDN of orcharhino Server or thekatello-change-hostnamescript will fail to complete. If thehostnamecommand returns the shortname of orcharhino Server instead of the FQDN, usehostnamectl set-hostname old_fqdnto set the old FQDN correctly before attempting to use thekatello-change-hostnamescript. -
Perform a backup of orcharhino Server before changing a host name. If the renaming process is not successful, you must restore it from a backup. For more information, see Backing Up Server and Proxy.
-
Optional: If orcharhino Server has a custom SSL certificate installed, a new certificate must be obtained for the host’s new name.
-
On orcharhino Server, choose the appropriate method to run the
katello-change-hostnamescript, providing the new host name and orcharhino credentials:-
If your orcharhino Server is installed with default self-signed SSL certificates, enter the following command:
# katello-change-hostname new-orcharhino \
--username admin \
--password password
-
If your orcharhino Server is installed with custom SSL certificates:
# katello-change-hostname new-orcharhino \
--username admin \
--password password \
--custom-cert "/root/ownca/test.com/test.com.crt" \
--custom-key "/root/ownca/test.com/test.com.key"
-
-
Optional: If you have created a custom SSL certificate for the new orcharhino Server host name, run the orcharhino installation script to install the certificate. For more information about installing a custom SSL certificate, see Deploying a Custom SSL Certificate to orcharhino Server in Installing orcharhino Server from a Connected Network.
-
On all orcharhino clients, enter the following commands to reinstall the bootstrap RPM, reregister clients, and refresh their subscriptions.
You can use remote execution feature to perform this step. For more information, see Configuring and Setting up Remote Jobs in Managing Hosts.
# yum remove -y katello-ca-consumer*

# rpm -Uvh http://new-orcharhino.example.com/pub/katello-ca-consumer-latest.noarch.rpm

# subscription-manager register \
--org="My_Organization" \
--environment="Library" \
--force

# subscription-manager refresh
-
On all orcharhino Proxys, run the orcharhino installation script to update references to the new host name:
# foreman-installer \
--foreman-proxy-foreman-base-url https://new-orcharhino.example.com \
--foreman-proxy-trusted-hosts new-orcharhino.example.com \
--puppet-server-foreman-url new-orcharhino.example.com
-
On orcharhino Server, list all orcharhino Proxys:
# hammer proxy list
-
On orcharhino Server, synchronize content for each orcharhino Proxy:
# hammer proxy_content synchronize \
--id proxy_id_number
Renaming orcharhino Proxy
The host name of orcharhino Proxy is referenced by orcharhino Server components, and all hosts registered to it. This procedure ensures that you update all references to the new host name.
|
-
Backup orcharhino Proxy. The
katello-change-hostnamescript makes irreversible changes to orcharhino Proxy. If the renaming process is not successful, you must restore it from a backup.Perform a backup before changing a host name. For more information, see Backing Up Server and Proxy.
-
On orcharhino Server, generate a new certificates archive file for orcharhino Proxy.
-
If you are using the default SSL certificate, enter the following command:
# foreman-proxy-certs-generate \
--foreman-proxy-fqdn new-orcharhino-proxy.network2.example.com \
--certs-tar /root/new-orcharhino-proxy.network2.example.com-certs.tar
Ensure that you enter the full path to the
.tarfile. -
If you are using a custom SSL certificate, create a new SSL certificate for orcharhino Proxy. For more information, see Configuring orcharhino Proxy with a Custom SSL Certificate in Installing orcharhino Proxy.
-
-
On orcharhino Server, copy the certificates archive file to orcharhino Proxy, providing the
rootuser’s password when prompted. In this example the archive file is copied to therootuser’s home directory, but you may prefer to copy it elsewhere.# scp /root/new-orcharhino-proxy.network2.example.com-certs.tar root@orcharhino-proxy.network2.example.com:
-
On orcharhino Proxy, run the
katello-change-hostnamescript and provide the host’s new name, orcharhino credentials, and certificates archive filename.# katello-change-hostname new-orcharhino-proxy --username admin \ --password password \ --certs-tar /root/new-orcharhino-proxy.network2.example.com-certs.tar
Ensure that you enter the full path to the
.tarfile. -
Optional: If you have created a custom certificate for orcharhino Proxy, on orcharhino Proxy, to deploy the certificate, enter the
foreman-installercommand that theforeman-proxy-certs-generatecommand returns. For more information, see Deploying a Custom SSL Certificate to orcharhino Proxy in Installing orcharhino Proxy. -
On all orcharhino Proxy clients, enter the following commands to reinstall the bootstrap RPM, reregister clients, and refresh their subscriptions.
You can use remote execution feature to perform this step. For more information, see Configuring and Setting up Remote Jobs in the Managing Hosts Guide.
# yum remove -y katello-ca-consumer*

# rpm -Uvh http://new-orcharhino-proxy.network2.example.com/pub/katello-ca-consumer-latest.noarch.rpm

# subscription-manager register --org="Default_Organization" \
--environment="Library" \
--force

# subscription-manager refresh
-
In the orcharhino management UI, navigate to Infrastructure > orcharhino Proxies.
-
Locate orcharhino Proxy in the list, and click Edit to the right of it.
-
Edit the Name and URL fields to match orcharhino Proxy’s new host name, then click Submit.
-
On your DNS server, add a record for orcharhino Proxy’s new host name, and delete the record for the previous host name.
Maintaining orcharhino Server
This chapter provides information on how to maintain a orcharhino Server, including information on how to work with audit records, how to clean unused tasks, and how to recover Pulp from a full disk.
Deleting Audit Records
Audit records are created automatically in orcharhino.
You can use the foreman-rake audits:expire command to remove audits at any time.
You can also use a cron job to schedule audit record deletions at the set interval that you want.
By default, using the foreman-rake audits:expire command removes audit records that are older than 90 days.
You can specify the number of days to keep the audit records by adding the days option and add the number of days.
For example, if you want to delete audit records that are older than seven days, enter the following command:
# foreman-rake audits:expire days=7
Anonymizing Audit Records
You can use the foreman-rake audits:anonymize command to remove any user account or IP information while maintaining the audit records in the database.
You can also use a cron job to schedule anonymizing the audit records at the set interval that you want.
By default, using the foreman-rake audits:anonymize command anonymizes audit records that are older than 90 days.
You can specify the number of days to keep the audit records by adding the days option and add the number of days.
For example, if you want to anonymize audit records that are older than seven days, enter the following command:
# foreman-rake audits:anonymize days=7
Deleting Report Records
Report records are created automatically in orcharhino.
You can use the foreman-rake reports:expire command to remove reports at any time.
You can also use a cron job to schedule report record deletions at the set interval that you want.
By default, using the foreman-rake reports:expire command removes report records that are older than 90 days.
You can specify the number of days to keep the report records by adding the days option and add the number of days.
For example, if you want to delete report records that are older than seven days, enter the following command:
# foreman-rake reports:expire days=7
Configuring the Cleaning Unused Tasks Feature
orcharhino performs regular cleaning to reduce disc space in the database and limit the rate of disk growth. As a result, orcharhino backup completes faster and overall performance is higher.
By default, orcharhino executes a cron job that cleans tasks every day at 19:45. orcharhino removes the following tasks during the cleaning:
-
Tasks that have run successfully and are older than thirty days
-
All tasks that are older than a year
You can configure the cleaning unused tasks feature using these options:
-
To configure the time at which orcharhino runs the cron job, set the
--foreman-plugin-tasks-cron-lineparameter to the time you want in cron format. For example, to schedule the cron job to run every day at 15:00, enter the following command:# foreman-installer --foreman-plugin-tasks-cron-line "00 15 * * *"
-
To configure the period after which orcharhino deletes the tasks, edit the
:rules:section in the/etc/foreman/plugins/foreman-tasks.yamlfile. -
To disable regular task cleanup on orcharhino, enter the following command:
# foreman-installer --foreman-plugin-tasks-automatic-cleanup false
-
To reenable regular task cleanup on orcharhino, enter the following command:
# foreman-installer --foreman-plugin-tasks-automatic-cleanup true
Deleting Task Records
Task records are created automatically in orcharhino.
You can use the foreman-rake foreman_tasks:cleanup command to remove tasks at any time.
You can also use a cron job to schedule Task record deletions at the set interval that you want.
For example, if you want to delete task records from successful repository synchronizations, enter the following command:
# foreman-rake foreman_tasks:cleanup TASK_SEARCH='label = Actions::Katello::Repository::Sync' STATES='stopped'
Deleting a Task by ID
You can delete tasks by ID, for example if you have submitted confidential data by mistake.
-
Connect to your orcharhino Server using SSH:
# ssh root@orcharhino.example.com
-
Optional: View the task:
# hammer task info --id My_Task_ID
-
Delete the task:
# foreman-rake foreman_tasks:cleanup TASK_SEARCH="id=My_Task_ID"
-
Optional: Ensure the task has been removed from orcharhino Server:
# hammer task info --id My_Task_ID
Note that because the task is deleted, this command returns a non-zero exit code.
Recovering from a Full Disk
The following procedure describes how to resolve the situation when a logical volume (LV) with the Pulp database on it has no free space.
-
Let running Pulp tasks finish but do not trigger any new ones as they can fail due to the full disk.
-
Ensure that the LV with the
/var/lib/pulpdirectory on it has sufficient free space. Here are some ways to achieve that:-
Remove orphaned content:
# foreman-rake katello:delete_orphaned_content RAILS_ENV=production
This is run weekly so it will not free much space.
-
Change the download policy from Immediate to On Demand for as many repositories as possible and remove already downloaded packages.
-
Grow the file system on the LV with the
/var/lib/pulpdirectory on it.If you use an untypical file system (other than for example ext3, ext4, or xfs), you might need to unmount the file system so that it is not in use. In that case, complete the following steps:
-
Stop orcharhino services:
# foreman-maintain service stop
-
Grow the file system on the LV.
-
Start orcharhino services:
# foreman-maintain service start
-
-
-
If some Pulp tasks failed due to the full disk, run them again.
Reclaiming PostgreSQL Space
The PostgreSQL database can use a large amount of disk space especially in heavily loaded deployments. Use this procedure to reclaim some of this disk space on orcharhino.
-
Stop all services, except for the
postgresqlservice:# foreman-maintain service stop --exclude postgresql
-
Switch to the
postgresuser and reclaim space on the database:# su - postgres -c 'vacuumdb --full --all'
-
Start the other services when the vacuum completes:
# foreman-maintain service start
Logging and Reporting Problems
This chapter provides information on how to log and report problems in orcharhino, including information on relevant log files, how to enable debug logging, how to open a support case and attach the relevant log tar files, and how to access support cases within the orcharhino management UI.
For more information about orcharhino logging settings, use foreman-installer with the --full-help option:
# foreman-installer --full-help | grep logging
Enabling Debug Logging
Debug logging provides the most detailed log information and can help with troubleshooting issues that can arise with orcharhino and its components. In the orcharhino CLI, enable debug logging to log detailed debugging information for orcharhino.
-
To enable debug logging, enter the following command:
# foreman-installer --foreman-logging-level debug
-
After you complete debugging, reset the logging level to the default value:
# foreman-installer --reset-foreman-logging-level
Increasing the Logging Levels to Help with Debugging
By default, orcharhino comes with :INFO level logging enabled.
You can increase or decrease the log levels on your orcharhino.
# hammer admin logging --all --level-debug
# foreman-maintain service restart
# hammer admin logging --components "Component" --level-debug
INFO# hammer admin logging --all --level-production # foreman-maintain service restart
# hammer admin logging --list
-----------|-------------------------------------|-------------------------------------
COMPONENT  | AUTO-DETECTED BY EXISTENCE OF       | DESTINATIONS
-----------|-------------------------------------|-------------------------------------
dhcpd      | /etc/dhcp/dhcpd.conf                | syslog /var/log/dhcpd-debug.log
postgresql | /var/lib/pgsql/data/postgresql.conf | syslog /var/lib/pgsql/data/pg_log/
proxy      | /etc/foreman-proxy/settings.yml     | /var/log/foreman-proxy/proxy.log
qpidd      | /etc/qpid/qpidd.conf                | syslog
rails      | /etc/foreman/settings.yaml          | /var/log/foreman/production.log
tomcat     | /etc/candlepin/candlepin.conf       | /var/log/candlepin/ /var/log/tomcat/
virt-who   | /etc/sysconfig/virt-who             | syslog
-----------|-------------------------------------|-------------------------------------
Increasing the Logging Level For Hammer
You can find the log for Hammer in ~/.hammer/log/hammer.log.
Edit /etc/hammer/cli_config.yml and set the :log_level::
:log_level: 'debug'
Increasing the Logging Level On orcharhino Proxy
You can find the log for orcharhino Proxy in /var/log/foreman-proxy/proxy.log.
Uncomment the DEBUG line in /etc/foreman-proxy/settings.yml:
:log_level: DEBUG
Ensure to restart the foreman-proxy service afterwards:
# systemctl restart foreman-proxy
|
Running the installer will revert this change back. |
Increasing the Logging Level For Candlepin
You can find the log for Candlepin in /var/log/candlepin/candlepin.log.
Errors are also logged to a separate file for easier debugging /var/log/candlepin/error.log.
Extend /etc/candlepin/candlepin.conf:
log4j.logger.org.candlepin=DEBUG
Ensure to restart the tomcat service afterwards:
# systemctl restart tomcat
If the candlepin log files are too verbose, you can decrease the default debug level:
log4j.logger.org.candlepin.resource.ConsumerResource=WARN
log4j.logger.org.candlepin.resource.HypervisorResource=WARN
Increasing the Logging Level On orcharhino
You can find the log for orcharhino in /var/log/foreman/production.log.
orcharhino stores logs for Apache in:
-
/var/log/httpd/foreman_error.log -
/var/log/httpd/foreman_access.log -
/var/log/httpd/foreman_ssl_error.log -
/var/log/httpd/foreman_ssl_access.log
-
Set the logging level in
/etc/foreman/settings.yaml::logging: :production: :type: file :layout: pattern :level: debug -
Enable selected loggers in
/etc/foreman/settings.yaml::loggers: :ldap: :enabled: true :permissions: :enabled: true :sql: :enabled: trueNote that to see logging from some area, debug logging has to be set.
-
Restart orcharhino services:
# foreman-maintain service restart
You can find the complete list of loggers with their default values in /usr/share/foreman/config/application.rb in the Foreman::Logging.add_loggers command.
Increasing the Logging Level For Qpid Dispatch Router
Qpid logs to syslog and can be viewed in /var/log/messages or with journalctl.
Enable debug logging in /etc/qpid-dispatch/qdrouterd.conf:
enable: debug+
Ensure to restart the Qpid Dispatch Router afterwards:
# systemctl restart qdrouterd
|
Running the installer will revert this change back. |
Increasing the Logging Level For Qpid Broker
Qpid logs to syslog and can be viewed in /var/log/messages or with journalctl.
Set the log level in /etc/qpid/qpidd.conf:
log-enable=debug+
Ensure to restart the Qpid Broker afterwards:
# systemctl restart qpidd
|
Running the installer will revert this change. |
Increasing the Logging Level For Redis
You can find the log for Redis in /var/log/redis/redis.log.
Set the log level in /etc/opt/rh/rh-redis5/redis.conf:
loglevel debug
Ensure to restart the Redis service afterwards:
# systemctl restart rh-redis5-redis
Increasing the Logging Level For Postgres
You can find the log for Postgres in /var/opt/rh/rh-postgresql12/lib/pgsql/data/log/.
Uncomment the log_statement in /var/opt/rh/rh-postgresql12/lib/pgsql/data/postgresql.conf:
log_statement = 'all'
Ensure to restart orcharhino services afterwards:
# foreman-maintain service restart
|
Based on the size of your orcharhino installation, this can cause disk space to fill up very quickly. Only turn this on if absolutely needed. |
For more debug log settings, refer to the Postgresql documentation.
Increasing the Logging Level For orcharhino Installer
You can find the log files in /var/log/foreman-installer/.
To increase the log level of the orcharhino Installer during an install:
# foreman-installer --verbose-log-level debug
Increasing the Logging Level For Pulp
By default, Pulp logs to syslog and can be viewed in /var/log/messages or with journalctl.
Add the following config to the /etc/pulp/settings.py file:
LOGGING = {"dynaconf_merge": True, "loggers": {'': {'handlers': ['console'], 'level': 'DEBUG'}}}
Ensure to restart the Pulp services afterwards:
# systemctl restart \
pulpcore-api \
pulpcore-content \
pulpcore-resource-manager \
pulpcore-worker@1 \
pulpcore-worker@2 \
rh-redis5-redis
Increasing the Logging Level For Puppet Agent
You can increase the logging level for Puppet agent on your orcharhino Server.
-
Add the following line to the
[agent]block in the/etc/puppetlabs/puppet/puppet.conffile:[agent] log_level = debug
You can find the logs in /var/log/puppetlabs/puppet/
Increasing the Logging Level For Puppet Server
You can increase the logging level for Puppet server on your orcharhino Server.
-
Add the following line to the
[master]block in/etc/puppetlabs/puppet/puppet.conffile:[master] log_level = debug -
Restart the Puppet server:
# foreman-maintain service restart --only puppetserver
You can find the logs in /var/log/puppetlabs/puppetserver/.
Retrieving the Status of Services
-
In the orcharhino management UI, navigate to Administer > About.
-
On the Smart Proxies tab, you can view the status of all orcharhino Proxies.
-
On the Compute Resources tab, you can view the status of attached compute resource providers.
-
In the Backend System Status table, you can view the status of all back-end services.
-
Run
hammer pingto get information from the database and orcharhino services:# hammer ping
-
Use
foreman-maintainto check the status of the services running in systemd:# foreman-maintain service status
-
Use
foreman-maintainto perform a health check:$ foreman-maintain health check
Restarting Services
orcharhino uses a set of back-end services to perform tasks. You you experience an issue with your orcharhino, check the status of orcharhino services.
-
Use
foreman-maintainto restart orcharhino services:# foreman-maintain service restart
|
Run |
Enabling Individual Loggers
You can enable individual loggers for selective logging. orcharhino uses the following loggers:
app-
Logs web requests and all general application messages. Default value: true.
audit-
Logs additional fact statistics, numbers of added, updated, and removed facts. Default value: true.
ldap-
Logs high level LDAP queries and LDAP operations. Default value: false.
permissions-
Logs queries to user roles, filters, and permissions when loading pages. Default value: false.
sql-
Logs SQL queries made through Rails ActiveRecord. Default value: false.
-
Enable the individual loggers that you want. For example, to enable
sqlandldaploggers, enter the following command:# foreman-installer \ --foreman-loggers ldap:true \ --foreman-loggers sql:true
-
Optional: To reset loggers to their default values, enter the following command:
# foreman-installer --reset-foreman-loggers
Configuring Logging to Journal
You can configure orcharhino to manage logging with Journal.
Journal then forwards log messages to rsyslog and rsyslog writes the log messages to /var/log/messages.
Note that after this change the log messages do not appear in /var/log/foreman/production.log or /var/log/foreman-proxy.log any more.
-
Enter the following
foreman-installercommand to configure logging tojournald:# foreman-installer \ --foreman-logging-layout pattern \ --foreman-logging-level info \ --foreman-logging-type journald \ --foreman-proxy-log JOURNAL
Log File Directories Provided by orcharhino
orcharhino provides system information in the form of notifications and log files.
| Log File Directories | Description of Log File Content |
|---|---|
|
Subscription management |
|
Installer |
|
Foreman maintain |
|
Foreman proxy |
|
Foreman |
|
Apache HTTP server |
|
Various other log messages |
|
Configuration management |
|
Subscription management |
|
Candlepin webservice logs |
You can also use the foreman-tail command to follow many of the log files related to orcharhino.
You can run foreman-tail -l to list the processes and services that it follows.
Utilities for Collecting Log Information
You can collect information from log files to troubleshoot orcharhino.
- foreman-debug
-
The
foreman-debugcommand collects configuration and log file data for orcharhino, its back-end services, and system information. This information is collected and written to a tar file. By default, the output tar file is located at/tmp/foreman-debug-xxx.tar.xz.
Additionally, the foreman-debug command exports tasks run during the last 60 days.
By default, the output tar file is located at /tmp/task-export-xxx.tar.xz.
If the file is missing, see the file /tmp/task-export.log to learn why task export was unsuccessful.
There is no timeout when running this command.
For more information, run orcharhino-debug -h.
|
The collection process removes security information such as passwords, tokens, and keys while collecting information. However, the tar files can still contain sensitive information about the orcharhino Server. ATIX AG recommends that you send this information directly to the intended recipient and not to a public target. |
Configuring External Authentication
By using external authentication you can derive user and user group permissions from user group membership in an external identity provider. When you use external authentication, you do not have to create these users and maintain their group membership manually on orcharhino Server. In case the external source does not provide email, it will be requested during the first login through orcharhino management UI.
All user and group accounts must be local accounts. This is to ensure that there are no authentication conflicts between local accounts on your orcharhino Server and accounts in your Active Directory domain.
Your system is not affected by this conflict if your user and group accounts exist in both /etc/passwd and /etc/group files.
For example, to check if entries for puppet, apache, foreman and foreman-proxy groups exist in both /etc/passwd and /etc/group files, enter the following commands:
# cat /etc/passwd | grep 'puppet\|apache\|foreman\|foreman-proxy'
# cat /etc/group | grep 'puppet\|apache\|foreman\|foreman-proxy'
orcharhino supports the following general scenarios for configuring external authentication:
-
Using Lightweight Directory Access Protocol (LDAP) server as an external identity provider. LDAP is a set of open protocols used to access centrally stored information over a network. With orcharhino, you can manage LDAP entirely through the orcharhino management UI. For more information, see Using LDAP. Though you can use LDAP to connect to a FreeIPA or AD server, the setup does not support server discovery, cross-forest trusts, or single sign-on with Kerberos in orcharhino’s web UI.
-
Using a FreeIPA server as an external identity provider. FreeIPA deals with the management of individual identities, their credentials and privileges used in a networking environment. Configuration using FreeIPA cannot be completed using only the orcharhino management UI and requires some interaction with the CLI. For more information see Using FreeIPA.
-
Using Active Directory (AD) integrated with FreeIPA through cross-forest Kerberos trust as an external identity provider. For more information see Active Directory with Cross Forest Trust.
-
Using Keycloak as an OpenID provider for external authentication to orcharhino. For more information, see Configuring orcharhino with Keycloak Authentication.
-
Using Keycloak as an OpenID provider for external authentication to orcharhino with TOTP. For more information, see Configuring Keycloak Authentication with TOTP.
As well as providing access to orcharhino Server, hosts provisioned with orcharhino can also be integrated with FreeIPA realms. orcharhino has a realm feature that automatically manages the life cycle of any system registered to a realm or domain provider. For more information, see External Authentication for Provisioned Hosts.
| Type | Authentication | User Groups |
|---|---|---|
FreeIPA |
Kerberos or LDAP |
Yes |
Active Directory |
Kerberos or LDAP |
Yes |
POSIX |
LDAP |
Yes |
|
You can set up multi-factor (MFA) or two-factor authentication (2FA) in orcharhino by using an Identity Management system (IdM) as external authentication source which enables multi-factor authentication. For more information, see Configuring External Authentication in Administering orcharhino. |
Using LDAP
orcharhino supports LDAP authentication using one or multiple LDAP directories.
If you require orcharhino to use TLS to establish a secure LDAP connection (LDAPS), first obtain certificates used by the LDAP server you are connecting to and mark them as trusted on the base operating system of your orcharhino Server as described below.
If your LDAP server uses a certificate chain with intermediate certificate authorities, all of the root and intermediate certificates in the chain must be trusted, so ensure all certificates are obtained.
If you do not require secure LDAP at this time, proceed to Configuring Project to Use LDAP.
Though direct LDAP integration is covered in this section, Red Hat recommends that you use SSSD and configure it against FreeIPA, AD, or an LDAP server. SSSD improves the consistency of the authentication process. For more information about the preferred configurations, see Using Active Directory. You can also cache the SSSD credentials and use them for LDAP authentication.
Configuring TLS for Secure LDAP
Use the orcharhino CLI to configure TLS for secure LDAP (LDAPS).
-
Obtain the Certificate from the LDAP Server.
-
If you use Active Directory Certificate Services, export the Enterprise PKI CA Certificate using the Base-64 encoded X.509 format.
-
Download the LDAP server certificate to a temporary location onto orcharhino Server and remove it when finished.
For example,
/tmp/example.crt. The filename extensions.cerand.crtare only conventions and can refer to DER binary or PEM ASCII format certificates.
-
-
Trust the Certificate from the LDAP Server.
orcharhino Server requires the CA certificates for LDAP authentication to be individual files in
/etc/pki/tls/certs/directory.-
Use the
installcommand to install the imported certificate into the/etc/pki/tls/certs/directory with the correct permissions:# install /tmp/example.crt /etc/pki/tls/certs/
-
Enter the following command as
rootto trust the example.crt certificate obtained from the LDAP server:# ln -s example.crt /etc/pki/tls/certs/$(openssl \ x509 -noout -hash -in \ /etc/pki/tls/certs/example.crt).0
-
Restart the
httpdservice:# systemctl restart httpd
-
Configuring orcharhino to use LDAP
In the orcharhino management UI, configure orcharhino to use LDAP.
Note that if you need single sign-on functionality with Kerberos on orcharhino management UI, you should use FreeIPA and AD external authentication instead. For more information, see Using Red Hat Identity Management or Using Active Directory.
-
Set the Network Information System (NIS) service boolean to true to prevent SELinux from stopping outgoing LDAP connections:
# setsebool -P nis_enabled on
-
In the orcharhino management UI, navigate to Administer > LDAP Authentication.
-
Click Create Authentication Source.
-
On the LDAP server tab, enter the LDAP server’s name, host name, port, and server type. The default port is 389, the default server type is POSIX (alternatively you can select FreeIPA or Active Directory depending on the type of authentication server). For
TLSencrypted connections, select the LDAPS checkbox to enable encryption. The port should change to 636, which is the default for LDAPS. -
On the Account tab, enter the account information and domain name details. See Description of LDAP Settings for descriptions and examples.
-
On the Attribute mappings tab, map LDAP attributes to orcharhino attributes. You can map login name, first name, last name, email address, and photo attributes. See Example Settings for LDAP Connections for examples.
-
On the Locations tab, select locations from the left table. Selected locations are assigned to users created from the LDAP authentication source, and available after their first login.
-
On the Organizations tab, select organizations from the left table. Selected organizations are assigned to users created from the LDAP authentication source, and available after their first login.
-
Click Submit.
-
Configure new accounts for LDAP users:
-
If you did not select Automatically Create Accounts In orcharhino checkbox, see Creating a User to create user accounts manually.
-
If you selected the Automatically Create Accounts In orcharhino checkbox, LDAP users can now log in to orcharhino using their LDAP accounts and passwords. After they log in for the first time, the orcharhino administrator has to assign roles to them manually. See Assigning Roles to a User to assign user accounts appropriate roles in orcharhino.
-
Description of LDAP Settings
The following table provides a description for each setting in the Account tab.
| Setting | Description |
|---|---|
Account |
The user name of the LDAP account that has read access to the LDAP server. User name is not required if the server allows anonymous reading, otherwise use the full path to the user’s object. For example: uid=$login,cn=users,cn=accounts,dc=example,dc=com The The variable cannot be used with external user groups from an LDAP source because orcharhino needs to retrieve the group list without the user logging in. Use either an anonymous, or dedicated service user. |
Account password |
The LDAP password for the user defined in the Account username field.
This field can remain blank if the Account username is using the |
Base DN |
The top level domain name of the LDAP directory. |
Groups base DN |
The top level domain name of the LDAP directory tree that contains groups. |
LDAP filter |
A filter to restrict LDAP queries. |
Automatically Create Accounts In orcharhino |
If this checkbox is selected, orcharhino creates user accounts for LDAP users when they log in to orcharhino for the first time. After they log in for the first time, the orcharhino administrator has to assign roles to them manually. See Assigning Roles to a User to assign user accounts appropriate roles in orcharhino. |
Usergroup Sync |
If this option is selected, the user group membership of a user is automatically synchronized when the user logs in, which ensures the membership is always up to date. If this option is cleared, orcharhino relies on a cron job to regularly synchronize group membership (every 30 minutes by default). For more information, see Configuring External User Groups. |
Example Settings for LDAP Connections
The following table shows example settings for different types of LDAP connections. The example below uses a dedicated service account called redhat that has bind, read, and search permissions on the user and group entries. Note that LDAP attribute names are case sensitive.
| Setting | Active Directory | FreeIPA or Red Hat Identity Management | POSIX (OpenLDAP) |
|---|---|---|---|
Account |
DOMAIN\redhat |
uid=redhat,cn=users, cn=accounts,dc=example, dc=com |
uid=redhat,ou=users, dc=example,dc=com |
Account password |
P@ssword |
- |
- |
Base DN |
DC=example,DC=COM |
dc=example,dc=com |
dc=example,dc=com |
Groups Base DN |
CN=Users,DC=example,DC=com |
cn=groups,cn=accounts, dc=example,dc=com |
cn=employee,ou=userclass, dc=example,dc=com |
Login name attribute |
userPrincipalName |
uid |
uid |
First name attribute |
givenName |
givenName |
givenName |
Last name attribute |
sn |
sn |
sn |
Email address attribute |
|||
Photo attribute |
thumbnailPhoto |
- |
- |
|
|
Example LDAP Filters
As an administrator, you can create LDAP filters to restrict the access of specific users to orcharhino.
| User | Filter |
|---|---|
User1, User3 |
(memberOf=cn=Group1,cn=Users,dc=domain,dc=example) |
User2, User3 |
(memberOf=cn=Group2,cn=Users,dc=domain,dc=example) |
User1, User2, User3 |
(|(memberOf=cn=Group1,cn=Users,dc=domain,dc=example)(memberOf=cn=Group2,cn=Users,dc=domain,dc=example)) |
The LDAP directory structure that the filters in the example use:
DC=Domain,DC=Example
   |
   |----- CN=Users
         |
         |----- CN=Group1
         |----- CN=Group2
         |----- CN=User1
         |----- CN=User2
         |----- CN=User3
The group membership that the filters in the example use:
| Group | Members |
|---|---|
Group1 |
User1, User3 |
Group2 |
User2, User3 |
Using FreeIPA
This section shows how to integrate orcharhino Server with a FreeIPA server and how to enable host-based access control.
|
You can attach FreeIPA as an external authentication source with no single sign-on support. For more information, see Using LDAP. |
-
The base operating system of orcharhino Server must be enrolled in the FreeIPA domain by the FreeIPA administrator of your organization.
The examples in this chapter assume separation between FreeIPA and orcharhino configuration.
Configuring FreeIPA Authentication on orcharhino Server
In the orcharhino CLI, configure FreeIPA authentication by first creating a host entry on the FreeIPA server.
-
On the FreeIPA server, to authenticate, enter the following command and enter your password when prompted:
# kinit admin
-
To verify that you have authenticated, enter the following command:
# klist
-
On the FreeIPA server, create a host entry for orcharhino Server and generate a one-time password, for example:
# ipa host-add --random hostname
The generated one-time password must be used on the client to complete FreeIPA-enrollment.
-
Create an HTTP service for orcharhino Server, for example:
# ipa service-add HTTP/hostname
-
On orcharhino Server, install the IPA client:
# yum install ipa-client
-
On orcharhino Server, enter the following command as root to configure FreeIPA-enrollment:
# ipa-client-install --password OTP
Replace OTP with the one-time password provided by the FreeIPA administrator.
-
If orcharhino Server is running on RHEL 7, execute the following command:
# subscription-manager repos --enable rhel-7-server-optional-rpms
The installer is dependent on packages which, on RHEL 7, are in the optional repository
rhel-7-server-optional-rpms. -
Set
foreman-ipa-authenticationto true, using the following command:# foreman-installer --foreman-ipa-authentication=true
-
Restart orcharhino services:
# foreman-maintain service restart
External users can now log in to orcharhino using their FreeIPA credentials. They can now choose to either log in to orcharhino Server directly using their username and password or take advantage of the configured Kerberos single sign-on and obtain a ticket on their client machine and be logged in automatically. The two-factor authentication with one-time password (2FA OTP) is also supported. If the user in FreeIPA is configured for 2FA, and orcharhino Server is running on RHEL 7, this user can also authenticate to orcharhino with an OTP.
Configuring Host-Based Authentication Control
HBAC rules define which machine within the domain a FreeIPA user is allowed to access. You can configure HBAC on the FreeIPA server to prevent selected users from accessing orcharhino Server. With this approach, you can prevent orcharhino from creating database entries for users that are not allowed to log in.
On the FreeIPA server, configure Host-Based Authentication Control (HBAC).
-
On the FreeIPA server, to authenticate, enter the following command and enter your password when prompted:
# kinit admin
-
To verify that you have authenticated, enter the following command:
# klist
-
Create HBAC service and rule on the FreeIPA server and link them together. The following examples use the PAM service name orcharhino-prod. Execute the following commands on the FreeIPA server:
# ipa hbacsvc-add orcharhino-prod
# ipa hbacrule-add allow_orcharhino_prod
# ipa hbacrule-add-service allow_orcharhino_prod --hbacsvcs=orcharhino-prod
-
Add the user who is to have access to the service orcharhino-prod, and the hostname of orcharhino Server:
# ipa hbacrule-add-user allow_orcharhino_prod --user=username
# ipa hbacrule-add-host allow_orcharhino_prod --hosts=orcharhino.example.com
Alternatively, host groups and user groups can be added to the alloworcharhino_prod_ rule.
-
To check the status of the rule, execute:
# ipa hbacrule-find orcharhino-prod
# ipa hbactest --user=username --host=orcharhino.example.com --service=orcharhino-prod
-
Ensure the allow_all rule is disabled on the FreeIPA server.
-
Configure the FreeIPA integration with orcharhino Server as described in Configuring FreeIPA Authentication on Server. On orcharhino Server, define the PAM service as root:
# foreman-installer --foreman-pam-service=orcharhino-prod
Using Active Directory
This section shows how to use direct Active Directory (AD) as an external authentication source for orcharhino Server.
|
You can attach Active Directory as an external authentication source with no single sign-on support. For more information, see Using LDAP. |
Direct AD integration means that orcharhino Server is joined directly to the AD domain where the identity is stored. The recommended setup consists of two steps:
-
Enrolling orcharhino Server with the Active Directory server as described in Enrolling Server with the AD Server.
-
Configuring direct Active Directory integration with GSS-proxy as described in Configuring Direct AD Integration with GSS Proxy.
GSS-Proxy
The traditional process of Kerberos authentication in Apache requires the Apache process to have read access to the keytab file. GSS-Proxy allows you to implement stricter privilege separation for the Apache server by removing access to the keytab file while preserving Kerberos authentication functionality. When using AD as an external authentication source for orcharhino, it is recommended to implement GSS-proxy, because the keys in the keytab file are the same as the host keys.
Enrolling orcharhino Server with the AD Server
In the orcharhino CLI, enroll orcharhino Server with the Active Directory server.
-
GSS-proxy and nfs-utils are installed.
Installing GSS-proxy and nfs-utils:
# yum install gssproxy nfs-utils
-
Install the required packages:
# yum install sssd adcli realmd ipa-python-compat krb5-workstation samba-common-tools
-
Enroll orcharhino Server with the AD server. You may need to have administrator permissions to perform the following command:
# realm join -v EXAMPLE.ORG --membership-software=samba -U Administrator
Configuring Direct AD Integration with GSS-Proxy
In the orcharhino CLI, configure the direct Active Directory integration with GSS-proxy.
-
orcharhino is enrolled with the Active Directory server. For more information, see Enrolling Server with the AD Server.
-
Create the
/etc/ipa/directory and thedefault.conffile:# mkdir /etc/ipa # touch /etc/ipa/default.conf
-
To the
default.conffile, add the following content:[global] server = unused realm = EXAMPLE.ORG
-
Create the
/etc/net-keytab.conffile with the following content:[global] workgroup = EXAMPLE realm = EXAMPLE.ORG kerberos method = system keytab security = ads
-
Determine the effective user ID of the Apache user:
# id apache
Apache user must not have access to the keytab file.
-
Create the
/etc/gssproxy/00-http.conffile with the following content:[service/HTTP] mechs = krb5 cred_store = keytab:/etc/krb5.keytab cred_store = ccache:/var/lib/gssproxy/clients/krb5cc_%U euid = ID_of_Apache_User
-
Create a keytab entry:
# KRB5_KTNAME=FILE:/etc/httpd/conf/http.keytab net ads keytab add HTTP -U administrator -d3 -s /etc/net-keytab.conf
# chown root.apache /etc/httpd/conf/http.keytab
# chmod 640 /etc/httpd/conf/http.keytab
-
Enable IPA authenication in orcharhino:
# foreman-installer --foreman-ipa-authentication=true
-
Start and enable the
gssproxyservice:# systemctl restart gssproxy.service # systemctl enable gssproxy.service
-
To configure the Apache server to use the
gssproxyservice, create asystemddrop-in file and add the following content to it:# mkdir -p /etc/systemd/system/httpd.service.d/ # vi /etc/systemd/system/httpd.service.d/gssproxy.conf [Service] Environment=GSS_USE_PROXY=1
-
Apply changes to the service:
# systemctl daemon-reload
-
Start and enable the
httpdservice:# systemctl restart httpd.service
-
Verify that SSO is working as expected.
With a running Apache server, users making HTTP requests against the server are authenticated if the client has a valid Kerberos ticket.
-
Retrieve the Kerberos ticket of the LDAP user, using the following command:
# kinit ldapuser
-
View the Kerberos ticket, using the following command:
# klist
-
View output from successful SSO-based authentication, using the following command:
# curl -k -u : --negotiate https://orcharhino.example.com/users/extlogin
This returns the following response:
<html><body>You are being <a href="https://orcharhino.example.com/users/4-ldapuserexample-com/edit">redirected</a>.</body></html>
-
Kerberos Configuration in Web Browsers
If you use the Internet Explorer browser, add orcharhino Server to the list of Local Intranet or Trusted sites, and turn on the Enable Integrated Windows Authentication setting. See the Internet Explorer documentation for details.
|
With direct AD integration, HBAC through FreeIPA is not available. As an alternative, you can use Group Policy Objects (GPO) that enable administrators to centrally manage policies in AD environments. To ensure correct GPO to PAM service mapping, use the following sssd configuration: access_provider = ad ad_gpo_access_control = enforcing ad_gpo_map_service = +foreman Here, foreman is the PAM service name. |
Active Directory with Cross-Forest Trust
Kerberos can create cross-forest trust that defines a relationship between two otherwise separate domain forests.
A domain forest is a hierarchical structure of domains; both AD and FreeIPA constitute a forest.
With a trust relationship enabled between AD and FreeIPA, users of AD can access Linux hosts and services using a single set of credentials.
From the orcharhino point of view, the configuration process is the same as integration with FreeIPA server without cross-forest trust configured. orcharhino Server has to be enrolled in the IPM domain and integrated as described in Using FreeIPA.
Configuring the FreeIPA Server to Use Cross-Forest Trust
On the FreeIPA server, configure the server to use cross-forest trust.
-
Enable HBAC:
-
Create an external group and add the AD group to it.
-
Add the new external group to a POSIX group.
-
Use the POSIX group in a HBAC rule.
-
-
Configure sssd to transfer additional attributes of AD users.
-
Add the AD user attributes to the nss and domain sections in
/etc/sssd/sssd.conf. For example:[nss] user_attributes=+mail, +sn, +givenname [domain/EXAMPLE] ldap_user_extra_attrs=mail, sn, givenname
-
Configuring External User Groups
orcharhino does not associate external users with their user group automatically. You must create a user group with the same name as in the external source on orcharhino. Members of the external user group then automatically become members of the orcharhino user group and receive the associated permissions.
The configuration of external user groups depends on the type of external authentication.
To assign additional permissions to an external user, add this user to an internal user group that has no external mapping specified. Then assign the required roles to this group.
-
If you use an LDAP server, configure orcharhino to use LDAP authentication. For more information see Using LDAP.
When using external user groups from an LDAP source, you cannot use the
$loginvariable as a substitute for the account user name. You must use either an anonymous or dedicated service user. -
If you use a FreeIPA or AD server, configure orcharhino to use FreeIPA or AD authentication. For more information, see Configuring External Authentication.
-
Ensure that at least one external user authenticates for the first time.
-
Retain a copy of the external group names you want to use. To find the group membership of external users, enter the following command:
# id username
-
In the orcharhino management UI, navigate to Administer > User Groups, and click Create User Group.
-
Specify the name of the new user group. Do not select any users to avoid adding users automatically when you refresh the external user group.
-
Click the Roles tab and select the roles you want to assign to the user group. Alternatively, select the Administrator checkbox to assign all available permissions.
-
Click the External groups tab, then click Add external user group, and select an authentication source from the Auth source drop-down menu.
Specify the exact name of the external group in the Name field.
-
Click Submit.
Refreshing External User Groups for LDAP
To set the LDAP source to synchronize user group membership automatically on user login, in the Auth Source page, select the Usergroup Sync option. If this option is not selected, LDAP user groups are refreshed automatically through a scheduled cron job synchronizing the LDAP Authentication source every 30 minutes by default.
If the user groups in the LDAP Authentication source change in the lapse of time between scheduled tasks, the user can be assigned to incorrect external user groups. This is corrected automatically when the scheduled task runs.
Use this procedure to refresh the LDAP source manually.
-
In the orcharhino management UI, navigate to Administer > Usergroups and select a user group.
-
On the External Groups tab, click Refresh to the right of the required user group.
-
Enter the following command:
# foreman-rake ldap:refresh_usergroups
Refreshing External User Groups for FreeIPA or AD
External user groups based on FreeIPA or AD are refreshed only when a group member logs in to orcharhino. It is not possible to alter user membership of external user groups in the orcharhino management UI, such changes are overwritten on the next group refresh.
External Authentication for Provisioned Hosts
Use this section to configure orcharhino Server or orcharhino Proxy for FreeIPA realm support, then add hosts to the FreeIPA realm group.
-
orcharhino Server that is registered to the Content Delivery Network or an external orcharhino Proxy that is registered to orcharhino Server.
-
A deployed realm or domain provider such as FreeIPA.
To use FreeIPA for provisioned hosts, complete the following steps to install and configure FreeIPA packages on orcharhino Server or orcharhino Proxy:
-
Install the
ipa-clientpackage on orcharhino Server or orcharhino Proxy:# yum install ipa-client
-
Configure the server as a FreeIPA client:
# ipa-client-install
-
Create a realm proxy user,
realm-orcharhino-proxy, and the relevant roles in FreeIPA:# foreman-prepare-realm admin realm-orcharhino-proxy
Note the principal name that returns and your FreeIPA server configuration details because you require them for the following procedure.
Complete the following procedure on orcharhino and every orcharhino Proxy that you want to use:
-
Copy the
/root/freeipa.keytabfile to any orcharhino Proxy that you want to include in the same principal and realm:# scp /root/freeipa.keytab root@orcharhino-proxy.network2.example.com:/etc/foreman-proxy/freeipa.keytab
-
Move the
/root/freeipa.keytabfile to the/etc/foreman-proxydirectory and set the ownership settings to theforeman-proxyuser:# mv /root/freeipa.keytab /etc/foreman-proxy # chown foreman-proxy:foreman-proxy /etc/foreman-proxy/freeipa.keytab
-
Enter the following command on all orcharhino Proxies that you want to include in the realm. If you use the integrated orcharhino Proxy on orcharhino, enter this command on orcharhino Server:
# foreman-installer --foreman-proxy-realm true \
--foreman-proxy-realm-keytab /etc/foreman-proxy/freeipa.keytab \
--foreman-proxy-realm-principal realm-orcharhino-proxy@EXAMPLE.COM \
--foreman-proxy-realm-provider freeipa
You can also use these options when you first configure the orcharhino Server.
-
Ensure that the most updated versions of the ca-certificates package is installed and trust the FreeIPA Certificate Authority:
# cp /etc/ipa/ca.crt /etc/pki/ca-trust/source/anchors/ipa.crt
# update-ca-trust enable
# update-ca-trust
-
Optional: If you configure FreeIPA on an existing orcharhino Server or orcharhino Proxy, complete the following steps to ensure that the configuration changes take effect:
-
Restart the foreman-proxy service:
# systemctl restart foreman-proxy
-
In the orcharhino management UI, navigate to Infrastructure > orcharhino Proxies.
-
Locate the orcharhino Proxy you have configured for FreeIPA and from the list in the Actions column, select Refresh.
-
After you configure your integrated or external orcharhino Proxy with FreeIPA, you must create a realm and add the FreeIPA-configured orcharhino Proxy to the realm.
-
In the orcharhino management UI, navigate to Infrastructure > Realms and click Create Realm.
-
In the Name field, enter a name for the realm.
-
From the Realm Type list, select the type of realm.
-
From the Realm orcharhino Proxy list, select orcharhino Proxy where you have configured FreeIPA.
-
Click the Locations tab and from the Locations list, select the location where you want to add the new realm.
-
Click the Organizations tab and from the Organizations list, select the organization where you want to add the new realm.
-
Click Submit.
You must update any host groups that you want to use with the new realm information.
-
In the orcharhino management UI, navigate to Configure > Host Groups, select the host group that you want to update, and click the Network tab.
-
From the Realm list, select the realm you create as part of this procedure, and then click Submit.
FreeIPA supports the ability to set up automatic membership rules based on a system’s attributes.
orcharhino’s realm feature provides administrators with the ability to map the orcharhino host groups to the FreeIPA parameter userclass which allow administrators to configure automembership.
When nested host groups are used, they are sent to the FreeIPA server as they are displayed in the orcharhino User Interface. For example, "Parent/Child/Child".
orcharhino Server or orcharhino Proxy sends updates to the FreeIPA server, however automembership rules are only applied at initial registration.
-
On the FreeIPA server, create a host group:
# ipa hostgroup-add hostgroup_name --desc=hostgroup_description
-
Create an
automembershiprule:# ipa automember-add --type=hostgroup hostgroup_name automember_rule
Where you can use the following options:
-
automember-addflags the group as an automember group. -
--type=hostgroupidentifies that the target group is a host group, not a user group. -
automember_ruleadds the name you want to identify the automember rule by.
-
-
Define an automembership condition based on the
userclassattribute:# ipa automember-add-condition --key=userclass --type=hostgroup --inclusive-regex=^webserver hostgroup_name ---------------------------------- Added condition(s) to "hostgroup_name" ---------------------------------- Automember Rule: automember_rule Inclusive Regex: userclass=^webserver ---------------------------- Number of conditions added 1 ----------------------------
Where you can use the following options:
-
automember-add-conditionadds regular expression conditions to identify group members. -
--key=userclassspecifies the key attribute asuserclass. -
--type=hostgroupidentifies that the target group is a host group, not a user group. -
--inclusive-regex=^webserver identifies matching values with a regular expression pattern. -
hostgroup_name – identifies the target host group’s name.
-
When a system is added to orcharhino Server’s hostgroup_name host group, it is added automatically to the FreeIPA server’s "hostgroup_name" host group. FreeIPA host groups allow for Host-Based Access Controls (HBAC), sudo policies and other FreeIPA functions.
Configuring orcharhino with Keycloak Authentication
Use this section to configure orcharhino to use Keycloak as an OpenID provider for external authentication.
Prerequisites for Configuring orcharhino with Keycloak Authentication
Before configuring orcharhino with Keycloak external authentication, ensure that you meet the following requirements:
-
A working installation of Keycloak server that uses HTTPS instead of HTTP.
-
A Keycloak account with admin privileges.
-
A realm for orcharhino user accounts created in Keycloak.
-
If the certificates or the CA are self-signed, ensure that they are added to the end-user certificate trust store.
-
Users imported or added to Keycloak.
If you have an existing user database configured such as LDAP or Kerberos, you can import users from it by configuring user federation.
If you do not have an existing user database configured, you can manually create users in Keycloak.
Registering orcharhino as a Keycloak Client
Use this procedure to register orcharhino to Keycloak as a client and configure orcharhino to use Keycloak as an authentication source.
You can configure orcharhino and Keycloak with two different authentication methods:
-
Users authenticate to orcharhino using the orcharhino management UI.
-
Users authenticate to orcharhino using the orcharhino CLI.
You must decide on how you want your users to authenticate in advance because both methods require different orcharhino clients to be registered to Keycloak and configured. The steps to register and configure orcharhino client in Keycloak are distinguished within the procedure.
You can also register two different orcharhino clients to Keycloak if you want to use both authentication methods and configure both clients accordingly.
-
On the orcharhino server, install the following packages:
# yum install mod_auth_openidc keycloak-httpd-client-install
-
Register orcharhino to Keycloak as a client. Note that you the registration process for logging in using the web UI and the CLI are different. You can register two clients orcharhino clients to Keycloak to be able to log in to orcharhino from the web UI and the CLI.
-
If you want you users to authenticate to orcharhino using the web UI, create a client as follows:
# keycloak-httpd-client-install --app-name foreman-openidc \
--keycloak-server-url "https://Keycloak.example.com" \
--keycloak-admin-username "admin" \
--keycloak-realm "orcharhino_Realm" \
--keycloak-admin-realm master \
--keycloak-auth-role root-admin \
-t openidc -l /users/extlogin --force
Enter the password for the administer account when prompted. This command creates a client for orcharhino in Keycloak.
Then, configure orcharhino to use Keycloak as an authentication source:
# foreman-installer --foreman-keycloak true \
--foreman-keycloak-app-name "foreman-openidc" \
--foreman-keycloak-realm "orcharhino_Realm"
-
If you want your users to authenticate to orcharhino using the CLI, create a client as follows:
# keycloak-httpd-client-install --app-name hammer-openidc \
--keycloak-server-url "https://Keycloak.example.com" \
--keycloak-admin-username "admin" \
--keycloak-realm "orcharhino_Realm" \
--keycloak-admin-realm master \
--keycloak-auth-role root-admin \
-t openidc -l /users/extlogin --force
Enter the password for the administer account when prompted. This command creates a client for orcharhino in Keycloak.
-
-
Restart the
httpdservice:# systemctl restart httpd
Configuring the orcharhino Client in Keycloak
Use this procedure to configure the orcharhino client in the Keycloak web UI and create group and audience mappers for the orcharhino client.
-
In the Keycloak web UI, navigate to Clients and click the orcharhino client.
-
Configure access type:
-
If you want your users to authenticate to orcharhino using the orcharhino management UI, from the Access Type list, select confidential.
-
If you want your users to authenticate to orcharhino using the CLI, from the Access Type list, select public.
-
-
In the Valid redirect URI fields, add a valid redirect URI.
-
If you want your users to authenticate to orcharhino using the orcharhino management UI, in the blank field below the existing URI, enter a URI in the form
https://orcharhino.example.com/users/extlogin. Note that you must add the string/users/extloginafter the orcharhino FQDN.After completing this step, the orcharhino client for logging in using the orcharhino management UI must have the following Valid Redirect URIs:
https://orcharhino.example.com/users/extlogin/redirect_uri
https://orcharhino.example.com/users/extlogin
-
If you want your users to authenticate to orcharhino using the CLI, in the blank field below the existing URI, enter urn:ietf:wg:oauth:2.0:oob.
After completing this step, the orcharhino client for logging in using the CLI must have the following Valid Redirect URIs:
https://orcharhino.example.com/users/extlogin/redirect_uri
urn:ietf:wg:oauth:2.0:oob
-
-
Click Save.
-
Click the Mappers tab and click Create to add an audience mapper.
-
In the Name field, enter a name for the audience mapper.
-
From the Mapper Type list, select Audience.
-
From the Included Client Audience list, select the orcharhino client.
-
Click Save.
-
Click Create to add a group mapper so that you can specify authorization in orcharhino based on group membership.
-
In the Name field, enter a name for the group mapper.
-
From the Mapper Type list, select Group Membership.
-
In the Token Claim Name field, enter groups.
-
Set the Full group path setting to OFF.
-
Click Save.
Configuring orcharhino Settings for Keycloak Authentication
Use this section to configure orcharhino for Keycloak authentication using the orcharhino management UI or the CLI.
Configuring orcharhino Settings for Keycloak Authentication Using the Web UI
Use this procedure to configure orcharhino settings for Keycloak authentication using the orcharhino management UI.
Note that you can navigate to the following URL within your realm to obtain values to configure orcharhino settings: https://Keycloak.example.com/auth/realms/orcharhino_Realm/.well-known/openid-configuration
-
Ensure that the Access Type setting in the orcharhino client in the Keycloak web UI is set to confidential
-
In the orcharhino management UI, navigate to Administer > Settings, and click the Authentication tab.
-
Locate the Authorize login delegation row, and in the Value column, set the value to Yes.
-
Locate the Authorize login delegation auth source user autocreate row, and in the Value column, set the value to External.
-
Locate the Login delegation logout URL row, and in the Value column, set the value to https://orcharhino.example.com/users/extlogout.
-
Locate the OIDC Algorithm row, and in the Value column, set the algorithm for encoding on Keycloak to RS256.
-
Locate the OIDC Audience row, and in the Value column, set the value to the client ID for Keycloak.
-
Locate the OIDC Issuer row, and in the Value column, set the value to https://Keycloak.example.com/auth/realms/orcharhino_Realm.
-
Locate the OIDC JWKs URL row, and in the Value column, set the value to https://Keycloak.example.com/auth/realms/orcharhino_Realm/protocol/openid-connect/certs.
-
In the orcharhino management UI, navigate to Administer > Authentication Sources and click External.
-
Click Create LDAP Authentication Source and select the Keycloak server.
-
Click the Locations tab and add locations that can use the Keycloak authentication source.
-
Click the Organizations tab and add organizations that can use the Keycloak authentication source.
-
Click Submit.
Configuring orcharhino Settings for Keycloak Authentication Using the CLI
Use this procedure to configure orcharhino settings for Keycloak authentication using the orcharhino CLI.
Note that you can navigate to the following URL within your realm to obtain values to configure orcharhino settings: https://Keycloak.example.com/auth/realms/orcharhino_Realm/.well-known/openid-configuration
-
Ensure that the Access Type setting in the orcharhino client in the Keycloak web UI is set to public
-
On orcharhino, set the login delegation to
trueso that users can authenticate using the Open IDC protocol:# hammer settings set --name authorize_login_delegation --value true
-
Set the login delegation logout URL:
# hammer settings set --name login_delegation_logout_url \
--value https://orcharhino.example.com/users/extlogout
-
Set the algorithm for encoding on Keycloak, for example,
RS256:# hammer settings set --name oidc_algorithm --value 'RS256'
-
Open the
Keycloak.example.com/auth/realms/Keycloak_REALM/.well-known/openid-configurationURL and note the values to populate the options in the following steps. -
Add the value for the Hammer client in the Open IDC audience:
# hammer settings set --name oidc_audience \
--value "['orcharhino.example.com-hammer-openidc']"
If you register several Keycloak clients to orcharhino, ensure that you append all audiences in the array. For example:
# hammer settings set --name oidc_audience \
--value "['orcharhino.example.com-foreman-openidc', 'orcharhino.example.com-hammer-openidc']"
-
Set the value for the Open IDC issuer:
# hammer settings set --name oidc_issuer \
--value "Keycloak.example.com/auth/realms/Keycloak_Realm"
-
Set the value for Open IDC Java Web Token (JWT):
# hammer settings set --name oidc_jwks_url \
--value "Keycloak.example.com/auth/realms/Keycloak_Realm/protocol/openid-connect/certs"
-
Retrieve the ID of the Keycloak authentication source:
# hammer auth-source external list
-
Set the location and organization:
# hammer auth-source external update --id Authentication Source ID \
--location-ids Location ID --organization-ids Organization ID
Logging in to the orcharhino management UI Using Keycloak
Use this procedure to log in to the orcharhino management UI using Keycloak.
-
In your browser, log in to orcharhino and enter your credentials.
Logging in to the orcharhino CLI Using Keycloak
Use this procedure to authenticate to the orcharhino CLI using the code grant type.
-
To authenticate to the orcharhino CLI using the code grant type, enter the following command:
# hammer auth login oauth \
--two-factor \
--oidc-token-endpoint 'https://Keycloak.example.com/auth/realms/ssl-realm/protocol/openid-connect/token' \
--oidc-authorization-endpoint 'https://Keycloak.example.com/auth' \
--oidc-client-id 'orcharhino.example.com-foreman-openidc' \
--oidc-redirect-uri urn:ietf:wg:oauth:2.0:oob
The command prompts you to enter a success code.
-
To retrieve the success code, navigate to the URL that the command returns and provide the required information.
-
Copy the success code that the web UI returns.
-
In the command prompt of
hammer auth login oauth, enter the success code to authenticate to the orcharhino CLI.
Configuring Group Mapping for Keycloak Authentication
Optionally, to implement the Role Based Access Control (RBAC), create a group in orcharhino, assign a role to this group, and then map an Active Directory group to the orcharhino group. As a result, anyone in the given group in Keycloak are logged in under the corresponding orcharhino group. This example configures users of the orcharhino-admin user group in the Active Directory to authenticate as users with administrator privileges on orcharhino.
-
In the orcharhino management UI, navigate to Administer > User Groups, and click the Create User Group button.
-
In the Name field, enter a name for the user group. The name should not be the same as in the Active Directory.
-
Do not add users and user groups to the right-hand columns. Click the Roles tab.
-
Select the Administer checkbox.
-
Click the External Groups tab.
-
Click Add external user group.
-
In the Name field, enter the name of the Active Directory group.
-
From the list, select EXTERNAL.
Configuring Keycloak Authentication with TOTP
Use this section to configure orcharhino to use Keycloak as an OpenID provider for external authentication with TOTP cards.
Prerequisites for Configuring orcharhino with Keycloak Authentication
Before configuring orcharhino with Keycloak external authentication, ensure that you meet the following requirements:
-
A working installation of Keycloak server that uses HTTPS instead of HTTP.
-
A Keycloak account with admin privileges.
-
A realm for orcharhino user accounts created in Keycloak.
-
If the certificates or the CA are self-signed, ensure that they are added to the end-user certificate trust store.
-
Users imported or added to Keycloak.
If you have an existing user database configured such as LDAP or Kerberos, you can import users from it by configuring user federation.
If you do not have an existing user database configured, you can manually create users in Keycloak.
Registering orcharhino as a Keycloak Client
Use this procedure to register orcharhino to Keycloak as a client and configure orcharhino to use Keycloak as an authentication source.
You can configure orcharhino and Keycloak with two different authentication methods:
-
Users authenticate to orcharhino using the orcharhino management UI.
-
Users authenticate to orcharhino using the orcharhino CLI.
You must decide on how you want your users to authenticate in advance because both methods require different orcharhino clients to be registered to Keycloak and configured. The steps to register and configure orcharhino client in Keycloak are distinguished within the procedure.
You can also register two different orcharhino clients to Keycloak if you want to use both authentication methods and configure both clients accordingly.
-
On the orcharhino server, install the following packages:
# yum install mod_auth_openidc keycloak-httpd-client-install
-
Register orcharhino to Keycloak as a client. Note that you the registration process for logging in using the web UI and the CLI are different. You can register two clients orcharhino clients to Keycloak to be able to log in to orcharhino from the web UI and the CLI.
-
If you want you users to authenticate to orcharhino using the web UI, create a client as follows:
# keycloak-httpd-client-install --app-name foreman-openidc \
--keycloak-server-url "https://Keycloak.example.com" \
--keycloak-admin-username "admin" \
--keycloak-realm "orcharhino_Realm" \
--keycloak-admin-realm master \
--keycloak-auth-role root-admin \
-t openidc -l /users/extlogin --force
Enter the password for the administer account when prompted. This command creates a client for orcharhino in Keycloak.
Then, configure orcharhino to use Keycloak as an authentication source:
# foreman-installer --foreman-keycloak true \
--foreman-keycloak-app-name "foreman-openidc" \
--foreman-keycloak-realm "orcharhino_Realm"
-
If you want your users to authenticate to orcharhino using the CLI, create a client as follows:
# keycloak-httpd-client-install --app-name hammer-openidc \
--keycloak-server-url "https://Keycloak.example.com" \
--keycloak-admin-username "admin" \
--keycloak-realm "orcharhino_Realm" \
--keycloak-admin-realm master \
--keycloak-auth-role root-admin \
-t openidc -l /users/extlogin --force
Enter the password for the administer account when prompted. This command creates a client for orcharhino in Keycloak.
-
-
Restart the
httpdservice:# systemctl restart httpd
Configuring the orcharhino Client in Keycloak
Use this procedure to configure the orcharhino client in the Keycloak web UI and create group and audience mappers for the orcharhino client.
-
In the Keycloak web UI, navigate to Clients and click the orcharhino client.
-
Configure access type:
-
If you want your users to authenticate to orcharhino using the orcharhino management UI, from the Access Type list, select confidential.
-
If you want your users to authenticate to orcharhino using the CLI, from the Access Type list, select public.
-
-
In the Valid redirect URI fields, add a valid redirect URI.
-
If you want your users to authenticate to orcharhino using the orcharhino management UI, in the blank field below the existing URI, enter a URI in the form
https://orcharhino.example.com/users/extlogin. Note that you must add the string/users/extloginafter the orcharhino FQDN.After completing this step, the orcharhino client for logging in using the orcharhino management UI must have the following Valid Redirect URIs:
https://orcharhino.example.com/users/extlogin/redirect_uri
https://orcharhino.example.com/users/extlogin
-
If you want your users to authenticate to orcharhino using the CLI, in the blank field below the existing URI, enter urn:ietf:wg:oauth:2.0:oob.
After completing this step, the orcharhino client for logging in using the CLI must have the following Valid Redirect URIs:
https://orcharhino.example.com/users/extlogin/redirect_uri
urn:ietf:wg:oauth:2.0:oob
-
-
Click Save.
-
Click the Mappers tab and click Create to add an audience mapper.
-
In the Name field, enter a name for the audience mapper.
-
From the Mapper Type list, select Audience.
-
From the Included Client Audience list, select the orcharhino client.
-
Click Save.
-
Click Create to add a group mapper so that you can specify authorization in orcharhino based on group membership.
-
In the Name field, enter a name for the group mapper.
-
From the Mapper Type list, select Group Membership.
-
In the Token Claim Name field, enter groups.
-
Set the Full group path setting to OFF.
-
Click Save.
Configuring orcharhino Settings for Keycloak Authentication
Use this section to configure orcharhino for Keycloak authentication using the orcharhino management UI or the CLI.
Configuring orcharhino Settings for Keycloak Authentication Using the Web UI
Use this procedure to configure orcharhino settings for Keycloak authentication using the orcharhino management UI.
Note that you can navigate to the following URL within your realm to obtain values to configure orcharhino settings: https://Keycloak.example.com/auth/realms/orcharhino_Realm/.well-known/openid-configuration
-
Ensure that the Access Type setting in the orcharhino client in the Keycloak web UI is set to confidential
-
In the orcharhino management UI, navigate to Administer > Settings, and click the Authentication tab.
-
Locate the Authorize login delegation row, and in the Value column, set the value to Yes.
-
Locate the Authorize login delegation auth source user autocreate row, and in the Value column, set the value to External.
-
Locate the Login delegation logout URL row, and in the Value column, set the value to https://orcharhino.example.com/users/extlogout.
-
Locate the OIDC Algorithm row, and in the Value column, set the algorithm for encoding on Keycloak to RS256.
-
Locate the OIDC Audience row, and in the Value column, set the value to the client ID for Keycloak.
-
Locate the OIDC Issuer row, and in the Value column, set the value to https://Keycloak.example.com/auth/realms/orcharhino_Realm.
-
Locate the OIDC JWKs URL row, and in the Value column, set the value to https://Keycloak.example.com/auth/realms/orcharhino_Realm/protocol/openid-connect/certs.
-
In the orcharhino management UI, navigate to Administer > Authentication Sources and click External.
-
Click Create LDAP Authentication Source and select the Keycloak server.
-
Click the Locations tab and add locations that can use the Keycloak authentication source.
-
Click the Organizations tab and add organizations that can use the Keycloak authentication source.
-
Click Submit.
Configuring orcharhino Settings for Keycloak Authentication Using the CLI
Use this procedure to configure orcharhino settings for Keycloak authentication using the orcharhino CLI.
Note that you can navigate to the following URL within your realm to obtain values to configure orcharhino settings: https://Keycloak.example.com/auth/realms/orcharhino_Realm/.well-known/openid-configuration
-
Ensure that the Access Type setting in the orcharhino client in the Keycloak web UI is set to public
-
On orcharhino, set the login delegation to
trueso that users can authenticate using the Open IDC protocol:# hammer settings set --name authorize_login_delegation --value true
-
Set the login delegation logout URL:
# hammer settings set --name login_delegation_logout_url \
--value https://orcharhino.example.com/users/extlogout
-
Set the algorithm for encoding on Keycloak, for example,
RS256:# hammer settings set --name oidc_algorithm --value 'RS256'
-
Open the
Keycloak.example.com/auth/realms/Keycloak_REALM/.well-known/openid-configurationURL and note the values to populate the options in the following steps. -
Add the value for the Hammer client in the Open IDC audience:
# hammer settings set --name oidc_audience \
--value "['orcharhino.example.com-hammer-openidc']"
If you register several Keycloak clients to orcharhino, ensure that you append all audiences in the array. For example:
# hammer settings set --name oidc_audience \
--value "['orcharhino.example.com-foreman-openidc', 'orcharhino.example.com-hammer-openidc']"
-
Set the value for the Open IDC issuer:
# hammer settings set --name oidc_issuer \
--value "Keycloak.example.com/auth/realms/Keycloak_Realm"
-
Set the value for Open IDC Java Web Token (JWT):
# hammer settings set --name oidc_jwks_url \
--value "Keycloak.example.com/auth/realms/Keycloak_Realm/protocol/openid-connect/certs"
-
Retrieve the ID of the Keycloak authentication source:
# hammer auth-source external list
-
Set the location and organization:
# hammer auth-source external update --id Authentication Source ID \
--location-ids Location ID --organization-ids Organization ID
Configuring orcharhino with Keycloak for TOTP Authentication
Use this procedure to configure orcharhino to use Keycloak as an OpenID provider for external authentication with Time-based One-time Password (TOTP).
-
In the Keycloak web UI, navigate to the orcharhino realm.
-
Navigate to Authentication, and click the OTP Policy tab.
-
Ensure that the Supported Applications field includes FreeOTP or Google Authenticator.
-
Configure the OTP settings to suit your requirements.
-
Optional: If you want to use TOTP authentication as a default authentication method for all users, click the Flows tab, and to the right of the OTP Form setting, select REQUIRED.
-
Click the Required Actions tab.
-
To the right of the Configure OTP row, select the Default Action checkbox.
Logging in to the orcharhino management UI Using Keycloak TOTP Authentication
Use this procedure to log in to the orcharhino management UI using Keycloak TOTP authentication.
-
Log in to orcharhino, orcharhino redirects you to the Keycloak login screen.
-
Enter your username and password, and click Log In.
-
The first attempt to log in, Keycloak requests you to configure your client by scanning the barcode and entering the pin displayed.
-
After you configure your client and enter a valid PIN, Keycloak redirects you to orcharhino and logs you in.
Logging in to the orcharhino CLI Using Keycloak
Use this procedure to authenticate to the orcharhino CLI using the code grant type.
-
To authenticate to the orcharhino CLI using the code grant type, enter the following command:
# hammer auth login oauth \
--two-factor \
--oidc-token-endpoint 'https://Keycloak.example.com/auth/realms/ssl-realm/protocol/openid-connect/token' \
--oidc-authorization-endpoint 'https://Keycloak.example.com/auth' \
--oidc-client-id 'orcharhino.example.com-foreman-openidc' \
--oidc-redirect-uri urn:ietf:wg:oauth:2.0:oob
The command prompts you to enter a success code.
-
To retrieve the success code, navigate to the URL that the command returns and provide the required information.
-
Copy the success code that the web UI returns.
-
In the command prompt of
hammer auth login oauth, enter the success code to authenticate to the orcharhino CLI.
Configuring Group Mapping for Keycloak Authentication
Optionally, to implement the Role Based Access Control (RBAC), create a group in orcharhino, assign a role to this group, and then map an Active Directory group to the orcharhino group. As a result, anyone in the given group in Keycloak are logged in under the corresponding orcharhino group. This example configures users of the orcharhino-admin user group in the Active Directory to authenticate as users with administrator privileges on orcharhino.
-
In the orcharhino management UI, navigate to Administer > User Groups, and click the Create User Group button.
-
In the Name field, enter a name for the user group. The name should not be the same as in the Active Directory.
-
Do not add users and user groups to the right-hand columns. Click the Roles tab.
-
Select the Administer checkbox.
-
Click the External Groups tab.
-
Click Add external user group.
-
In the Name field, enter the name of the Active Directory group.
-
From the list, select EXTERNAL.
Monitoring Resources
The following chapter details how to configure monitoring and reporting for managed systems. This includes host configuration, Content Views, compliance, subscriptions, registered hosts, promotions, and synchronization.
Using the orcharhino Content Dashboard
The orcharhino content dashboard contains various widgets which provide an overview of the host configuration, Content Views, compliance reports, subscriptions and hosts currently registered, promotions and synchronization, and a list of the latest notifications.
In the orcharhino management UI, navigate to Monitor > Dashboard to access the content dashboard. The dashboard can be rearranged by clicking on a widget and dragging it to a different position. The following widgets are available:
- Host Configuration Status
-
An overview of the configuration states and the number of hosts associated with it during the last reporting interval. The following table shows the descriptions of the possible configuration states.
Table 10. Host Configuration States Icon State Description 
Hosts that had performed modifications without error
Host that successfully performed modifications during the last reporting interval.

Hosts in error state
Hosts on which an error was detected during the last reporting interval.

Good host reports in the last 35 minutes
Hosts without error that did not perform any modifications in the last 35 minutes.

Hosts that had pending changes
Hosts on which some resources would be applied but Puppet was configured to run in the
noopmode.
Out of sync hosts
Hosts that were not synchronized and the report was not received during the last reporting interval.

Hosts with no reports
Hosts for which no reports were collected during the last reporting interval.

Hosts with alerts disabled
Hosts which are not being monitored.
Click the particular configuration status to view hosts associated with it.
- Host Configuration Chart
-
A pie chart shows the proportion of the configuration status and the percentage of all hosts associated with it.
- Latest Events
-
A list of messages produced by hosts including administration information, product and subscription changes, and any errors.
Monitor this section for global notifications sent to all users and to detect any unusual activity or errors.
- Run Distribution (last 30 minutes)
-
A graph shows the distribution of the running Puppet agents during the last puppet interval which is 30 minutes by default. In this case, each column represents a number of reports received from clients during 3 minutes.
- New Hosts
-
A list of the recently created hosts. Click the host for more details.
- Task Status
-
A summary of all current tasks, grouped by their state and result. Click the number to see the list of corresponding tasks.
- Latest Warning/Error Tasks
-
A list of the latest tasks that have been stopped due to a warning or error. Click a task to see more details.
- Discovered Hosts
-
A list of all bare-metal hosts detected on the provisioning network by the Discovery plug-in.
- Latest Errata
-
A list of all errata available for hosts registered to orcharhino.
- Content Views
-
A list of all Content Views in orcharhino and their publish status.
- Sync Overview
-
An overview of all products or repositories enabled in orcharhino and their synchronization status. All products that are in the queue for synchronization, are unsynchronized or have been previously synchronized are listed in this section.
- Host Subscription Status
-
An overview of the subscriptions currently consumed by the hosts registered to orcharhino. A subscription is a purchased certificate that unlocks access to software, upgrades, and security fixes for hosts. The following table shows the possible states of subscriptions.
Table 11. Host Subscription States Icon State Description 
Invalid
Hosts that have products installed, but are not correctly subscribed. These hosts need attention immediately.

Partial
Hosts that have a subscription and a valid entitlement, but are not using their full entitlements. These hosts should be monitored to ensure they are configured as expected.

Valid
Hosts that have a valid entitlement and are using their full entitlements.
Click the subscription type to view hosts associated with subscriptions of the selected type.
- Subscription Status
-
An overview of the current subscription totals that shows the number of active subscriptions, the number of subscriptions that expire in the next 120 days, and the number of subscriptions that have recently expired.
- Host Collections
-
A list of all host collections in orcharhino and their status, including the number of content hosts in each host collection.
- Virt-who Configuration Status
-
An overview of the status of reports received from the
virt-whodaemon running on hosts in the environment. The following table shows the possible states.Table 12. Virt-who Configuration States State Description No Reports
No report has been received because either an error occurred during the virt-who configuration deployment, or the configuration has not been deployed yet, or virt-who cannot connect to orcharhino during the scheduled interval.
No Change
No report has been received because hypervisor did not detect any changes on the virtual machines, or virt-who failed to upload the reports during the scheduled interval. If you added a virtual machine but the configuration is in the No Change state, check that virt-who is running.
OK
The report has been received without any errors during the scheduled interval.
Total Configurations
A total number of virt-who configurations.
Click the configuration status to see all configurations in this state.
The widget also lists the three latest configurations in the No Change state under Latest Configurations Without Change.
- Latest Compliance Reports
-
A list of the latest compliance reports. Each compliance report shows a number of rules passed (P), failed (F), or othered (O). Click the host for the detailed compliance report. Click the policy for more details on that policy.
- Compliance Reports Breakdown
-
A pie chart shows the distribution of compliance reports according to their status.
- Red Hat Insights Actions
-
Red Hat Insights is a tool embedded in orcharhino that checks the environment and suggests actions you can take. The actions are divided into 4 categories: Availability, Stability, Performance, and Security.
- Red Hat Insights Risk Summary
-
A table shows the distribution of the actions according to the risk levels. Risk level represents how critical the action is and how likely it is to cause an actual issue. The possible risk levels are: Low, Medium, High, and Critical.
It is not possible to change the date format displayed in the orcharhino management UI.
Managing Tasks
orcharhino keeps a complete log of all planned or performed tasks, such as repositories synchronised, errata applied, and Content Views published. To review the log, navigate to Monitor > Tasks.
In the Task window, you can search for specific tasks, view their status, details, and elapsed time since they started. You can also cancel and resume one or more tasks.
The tasks are managed using the Dynflow engine. Remote tasks have a timeout which can be adjusted as needed.
-
In the orcharhino management UI, navigate to Administer > Settings.
-
Enter %_timeout in the search box and click Search. The search should return four settings, including a description.
-
In the Value column, click the icon next to a number to edit it.
-
Enter the desired value in seconds, and click Save.
|
Adjusting the %_finish_timeout values might help in case of low bandwidth. Adjusting the %_accept_timeout values might help in case of high latency. |
When a task is initialized, any back-end service that will be used in the task, such as Candlepin or Pulp, will be checked for correct functioning. If the check fails, you will receive an error similar to the following one:
There was an issue with the backend service candlepin: Connection refused – connect(2).
If the back-end service checking feature turns out to be causing any trouble, it can be disabled as follows.
-
In the orcharhino management UI, navigate to Administer > Settings.
-
Enter check_services_before_actions in the search box and click Search.
-
In the Value column, click the icon to edit the value.
-
From the drop-down menu, select false.
-
Click Save.
Configuring RSS Notifications
To view orcharhino event notification alerts, click the Notifications icon in the upper right of the screen.
By default, the Notifications area displays RSS feed events published in the orcharhino news.
The feed is refreshed every 12 hours and the Notifications area is updated whenever new events become available.
You can configure the RSS feed notifications by changing the URL feed. The supported feed format is RSS 2.0 and Atom.
-
In the orcharhino management UI, navigate to Administer > Settings and select the Notifications tab.
-
In the RSS URL row, click the edit icon in the Value column and type the required URL.
-
In the RSS enable row, click the edit icon in the Value column to enable or disable this feature.
Monitoring orcharhino Server
From the About page in orcharhino management UI, you can find an overview of the following:
-
System Status, including orcharhino Proxies, Available Providers, Compute Resources, and Plug-ins
-
Support Information
-
System Information
-
Backend System Status
-
Installed Packages
To navigate to the About page:
-
In the upper right corner of orcharhino management UI, click Administer > About.
|
After Pulp failure, the status of Pulp might show OK instead of Error for up to 10 minutes due to synchronization delay. |
Monitoring orcharhino Proxy
The following section shows how to use the orcharhino management UI to find orcharhino Proxy information valuable for maintenance and troubleshooting.
Viewing General orcharhino Proxy Information
In the orcharhino management UI, navigate to Infrastructure > orcharhino Proxies to view a table of orcharhino Proxys registered to orcharhino Server. The information contained in the table answers the following questions:
- Is orcharhino Proxy running?
-
This is indicated by a green icon in the Status column. A red icon indicates an inactive orcharhino Proxy, use the
service foreman-proxy restartcommand on orcharhino Proxy to activate it. - What services are enabled on orcharhino Proxy?
-
In the Features column you can verify if orcharhino Proxy for example provides a DHCP service or acts as a Pulp mirror. orcharhino Proxy features can be enabled during installation or configured in addition. For more information, see Installing orcharhino Proxy.
- What organizations and locations is orcharhino Proxy assigned to?
-
A orcharhino Proxy can be assigned to multiple organizations and locations, but only orcharhino Proxies belonging to the currently selected organization are displayed. To list all orcharhino Proxies, select Any Organization from the context menu in the top left corner.
After changing the orcharhino Proxy configuration, select Refresh from the drop-down menu in the Actions column to ensure the orcharhino Proxy table is up to date.
Click the orcharhino Proxy name to view further details. At the Overview tab, you can find the same information as in the orcharhino Proxy table. In addition, you can answer to the following questions:
- Which hosts are managed by orcharhino Proxy?
-
The number of associated hosts is displayed next to the Hosts managed label. Click the number to view the details of associated hosts.
- How much storage space is available on orcharhino Proxy?
-
The amount of storage space occupied by the Pulp content in
/var/lib/pulpis displayed. Also the remaining storage space available on the orcharhino Proxy can be ascertained.
Monitoring Services
In the orcharhino management UI, navigate to Infrastructure > orcharhino Proxies and click the name of the selected orcharhino Proxy. At the Services tab, you can find basic information on orcharhino Proxy services, such as the list of DNS domains, or the number of Pulp workers. The appearance of the page depends on what services are enabled on orcharhino Proxy. Services providing more detailed status information can have dedicated tabs at the orcharhino Proxy page. For more information, see Monitoring Puppet.
Monitoring Puppet
In the orcharhino management UI, navigate to Infrastructure > orcharhino Proxies and click the name of the selected orcharhino Proxy. At the Puppet tab you can find the following:
-
A summary of Puppet events, an overview of latest Puppet runs, and the synchronization status of associated hosts at the General sub-tab.
-
A list of Puppet environments at the Environments sub-tab.
At the Puppet CA tab you can find the following:
-
A certificate status overview and the number of autosign entries at the General sub-tab.
-
A table of CA certificates associated with the orcharhino Proxy at the Certificates sub-tab. Here you can inspect the certificate expiry data, or cancel the certificate by clicking Revoke.
-
A list of autosign entries at the Autosign entries sub-tab. Here you can create an entry by clicking New or delete one by clicking Delete.
Using Webhooks
A webhook is a way for a web page or web application to provide other applications with information in real time. Webhooks are only triggered after an event occurs. The request usually contains details of the event. An event triggers callbacks, such as sending an e-mail confirming a host has been provisioned. Webhooks enable you to define a call to an external API based on orcharhino internal event using a fire-and-forget message exchange pattern. The application sending the request does not wait for the response, or ignores it.
Payload of a webhook is created from webhook templates. Webhook templates use the same ERB syntax as Provisioning templates. Available variables:
-
@event_name: Name of an event. -
@webhook_id: Unique event ID. -
@payload: Payload data, different for each event type. To access individual fields, use@payload[:key_name]Ruby hash syntax. -
@payload[:object]: Database object for events triggered by database actions (create, update, delete). Not available for custom events. -
@payload[:context]: Additional information as hash like request and session UUID, remote IP address, user, organization and location.
Because webhooks use HTTP, no new infrastructure needs be added to existing web services.
The typical use case for webhooks in orcharhino is making a call to a monitoring system when a host is created or deleted.
Webhooks are useful where the action you want to perform in the external system can be achieved through its API. Where it is necessary to run additional commands or edit files, the shellhooks plugin for orcharhino Proxies is available. The shellhooks plugin enables you to define a shell script on the orcharhino Proxy that can be executed through the API.
You can use webhooks successfully without installing the shellhooks plugin.
For a list of available events, see Available webhook events.
Migrating to Webhooks
The legacy foreman_hooks plugin provided full access to model objects that the webhooks plugin does not intentionally provide.
The scope of what is available is limited by the safemode and all objects and macros are both subject to an API stability promise and are fully documented.
The number of events triggered by webhooks is substantially fewer than with foreman_hooks.
Webhooks are processed asynchronously so there is minimal risk of tampering with internals of the system.
It is not possible to migrate from foreman_hooks without creating payloads for each individual webhook script.
However, the webhooks plugin comes with several example payload templates.
You can also use the example payloads with shellhooks to simplify migration.
Both script and payload templates must be customized to achieve similar results.
Installing Webhooks
Use the following procedure to install webhooks. After installing webhooks, you can configure orcharhino Server to send webhook requests.
-
Install webhooks using the following command:
# foreman-installer --enable-foreman-plugin-webhooks
-
Optional: Install the webhooks CLI plugin using the following command:
# foreman-installer --enable-foreman-cli-webhooks
Creating a Webhook Template
Use the following procedure to create a webhook template in the orcharhino management UI.
-
In the orcharhino management UI, navigate to Administer > Webhooks Templates.
-
Click Clone an existing template or Create Template.
-
Enter a name for the template.
-
Use the editor to make changes to the template payload.
A webhook HTTP payload must be created using orcharhino template syntax. The webhook template can use a special variable called
@objectthat can represent the main object of the event.For more information, see Template Writing Reference in Managing Hosts and for available template macros and methods, visit
/templates_docon orcharhino Server. -
Optional: Enter the description and audit comment.
-
Assign organizations and locations.
-
Click Submit.
Creating a Webhook
You can customize events, payloads, HTTP authentication, content type, and headers through the orcharhino management UI.
Use the following procedure to create a webhook in the orcharhino management UI.
-
In the orcharhino management UI, click Administer > Webhooks.
-
Click Create Webhook.
-
Click Subscribe to to select an event.
-
Enter a name.
-
Enter a target URL. Webhooks make HTTP requests to pre-configured URLs. The target URL can be a dynamic URL. When using the shellhooks plugin, the URL should be in the form
https://orcharhino-proxy.network2.example.com:8443/shellhook/my_script. -
Click Template to select a template.
-
Enter an HTTP method.
-
Check the Enabled flag if you want to create an active webhook.
-
Click the Credentials tab.
-
Optional: If HTTP authentication is required, enter the username and password.
-
Select Verify SSL if the server certificate should be verified against the system certificate store or orcharhino CA.
-
Select Proxy Authorization when using shellhooks, otherwise clear this box.
-
On the Additional tab, enter the HTTP Content Type. For example,
application/json,application/xmlortext/plainon the payload you define. The application does not attempt to convert the content to match the specified content type. -
Optional: Provide HTTP headers as JSON. ERB is also allowed.
When configuring webhooks with endpoints with non-standard HTTP or HTTPS ports, an SELinux port must be assigned, see Configuring SELinux to Ensure Access to orcharhino on Custom Ports in Installing orcharhino Server.
Available Webhook Events
The following table contains a list of webhook events that are available from the orcharhino management UI.
Action events trigger webhooks only on success, so if an action fails, a webhook is not triggered.
For more information about payload, go to Administer > About > Support > Templates DSL. A list of available types is provided in the following table. Some events are marked as custom, in that case, the payload is an object object but a Ruby hash (key-value data structure) so syntax is different.
| Event name | Description | Payload |
|---|---|---|
Actions Katello Content View Promote Succeeded |
A Content View was successfully promoted. |
Actions::Katello::ContentView::Promote |
Actions Katello Content View Publish Succeeded |
A repository was successfully synchronized. |
Actions::Katello::ContentView::Publish |
Actions Remote Execution Run Host Job Succeeded |
A generic remote execution job succeeded for a host. This event is emitted for all Remote Execution jobs, when complete. |
Actions::RemoteExecution::RunHostJob |
Actions Remote Execution Run Host Job Katello Errata Install Succeeded |
Install errata using the Katello interface. |
Actions::RemoteExecution::RunHostJob |
Actions Remote Execution Run Host Job Katello Group Install Succeeded |
Install package group using the Katello interface. |
Actions::RemoteExecution::RunHostJob |
Actions Remote Execution Run Host Job Katello Package Install Succeeded |
Install package using the Katello interface. |
Actions::RemoteExecution::RunHostJob |
Actions Remote Execution Run Host Job Katello Group Remove |
Remove package group using the Katello interface. |
Actions::RemoteExecution::RunHostJob |
Actions Remote Execution Run Host Job Katello Package Remove Succeeded |
Remove package using the Katello interface. |
Actions::RemoteExecution::RunHostJob |
Actions Remote Execution Run Host Job Katello Service Restart Succeeded |
Restart Services using the Katello interface. |
Actions::RemoteExecution::RunHostJob |
Actions Remote Execution Run Host Job Katello Group Update Succeeded |
Update package group using the Katello interface. |
Actions::RemoteExecution::RunHostJob |
Actions Remote Execution Run Host Job Katello Package Update Succeeded |
Update package using the Katello interface. |
Actions::RemoteExecution::RunHostJob |
Actions Remote Execution Run Host Job Foreman OpenSCAP Run Scans Succeeded |
Run OpenSCAP scan. |
Actions::RemoteExecution::RunHostJob |
Actions Remote Execution Run Host Job Ansible Run Host Succeeded |
Runs an Ansible playbook containing all the roles defined for a host. |
Actions::RemoteExecution::RunHostJob |
Actions Remote Execution Run Host Job Ansible Run Capsule Upgrade Succeeded |
Upgrade Capsules on given Capsule server hosts. |
Actions::RemoteExecution::RunHostJob |
Actions Remote Execution Run Host Job Ansible Configure Cloud Connector Succeeded |
Configure Cloud Connector on given hosts. |
Actions::RemoteExecution::RunHostJob |
Actions Remote Execution Run Host Job Ansible Run Playbook Succeeded |
Run an Ansible playbook against given hosts. |
Actions::RemoteExecution::RunHostJob |
Actions Remote Execution Run Host Job Ansible Enable Web Console Succeeded |
Run an Ansible playbook to enable the web console on given hosts. |
Actions::RemoteExecution::RunHostJob |
Actions Remote Execution Run Host Job Puppet Run Host Succeeded |
Perform a single Puppet run. |
Actions::RemoteExecution::RunHostJob |
Actions Remote Execution Run Host Job Katello Module Stream Action Succeeded |
Perform a module stream action using the Katello interface. |
Actions::RemoteExecution::RunHostJob |
Actions Remote Execution Run Host Job Leapp Pre-upgrade Succeeded |
Upgradeability check for RHEL 7 host. |
Actions::RemoteExecution::RunHostJob |
Actions Remote Execution Run Host Job Leapp Remediation Plan Succeeded |
Run Remediation plan with Leapp. |
Actions::RemoteExecution::RunHostJob |
Actions Remote Execution Run Host Job Leapp Upgrade Succeeded |
Run Leapp upgrade job for RHEL 7 host. |
Actions::RemoteExecution::RunHostJob |
Build Entered |
A host entered the build mode. |
Custom event: |
Build Exited |
A host build mode was canceled, either it was successfully provisioned or the user canceled the build manually. |
Custom event: |
Content View Created/Updated/Destroyed |
Common database operations on a Content View. |
Katello::ContentView |
Domain Created/Updated/Destroyed |
Common database operations on a domain. |
Domain |
Host Created/Updated/Destroyed |
Common database operations on a host. |
Host |
Hostgroup Created/Updated/Destroyed |
Common database operations on a hostgroup. |
Hostgroup |
Model Created/Updated/Destroyed |
Common database operations on a model. |
Model |
Status Changed |
Global host status of a host changed. |
Custom event: |
Subnet Created/Updated/Destroyed |
Common database operations on a subnet. |
Subnet |
Template Render Performed |
A report template was rendered. |
Template |
User Created/Updated/Destroyed |
Common database operations on a user. |
User |
Shellhooks
With webhooks, one orcharhino event can only be mapped to one API call. For advanced integrations, where a single shell script can contain multiple commands, you can install a orcharhino Proxy shellhooks plugin that exposes executables using a REST HTTP API.
A webhook can then be configured to reach out to a orcharhino Proxy API to run a predefined shellhook, which, for example, can contain commands or edit files.
Scripts must be placed in /var/lib/foreman-proxy/shellhooks as executables with only alphanumeric characters and underscores in the name.
The HTTPS payload is passed using standard input, optional command line arguments can be provided using X-Shellhook-Arg-1 to N.
The HTTP method must be POST.
An example URL would be: https://orcharhino-proxy.network2.example.com:8443/shellhook/my_script.
You must enable Proxy Authorization for each webhook that is connected to a shellhook, to enable it to authorize a call.
Standard output and error are redirected to the orcharhino Proxy log as messages with debug or warning levels respectively.
There is no return value from shellhook HTTPS calls.
Installing the Shellhooks Plugin
Optionally, you can install and enable the shellhooks plugin on each orcharhino Proxy used for shellhooks, using the following command:
# foreman-installer --enable-foreman-proxy-plugin-shellhooks
Using Shellhook Arguments
To pass arguments into a shellhook script, create the following HTTP headers:
{
  "X-Shellhook-Arg-1": "<%= @object.content_view_version_id %>",
  "X-Shellhook-Arg-2": "<%= @object.content_view_name %>"
}
Ensure the content renders to a valid JSON. Also, only pass safe fields like database ID, name, or labels which do not include new lines or quote characters.
Searching and Bookmarking
orcharhino features powerful search functionality on most pages of the orcharhino management UI. It enables you to search all kinds of resources that orcharhino manages. Searches accept both free text and syntax-based queries, which can be built using extensive input prediction. Search queries can be saved as bookmarks for future reuse.
Building Search Queries
As you start typing a search query, a list of valid options to complete the current part of the query appears. You can either select an option from the list and keep building the query using the prediction, or continue typing. To learn how free text is interpreted by the search engine, see Using Free Text Search.
Query Syntax
parameter operator value
Available fields, resources to search, and the way the query is interpreted all depend on context, that is, the page where you perform the search. For example, the field "hostgroup" on the Hosts page is equivalent to the field "name" on the Host Groups page. The field type also determines available operators and accepted values.
Query Operators
All operators that can be used between parameter and value are listed in the following table. Other symbols and special characters that might appear in a prediction-built query, such as colons, do not have special meaning and are treated as free text.
| Operator | Short Name | Description | Example |
|---|---|---|---|
= |
EQUALS |
Accepts numerical, temporal, or text values. For text, exact case sensitive matches are returned. |
|
!= |
NOT EQUALS |
||
~ |
LIKE |
Accepts text or temporal values. Returns case insensitive matches. Accepts the following wildcards: _ for a single character, % or * for any number of characters including zero. If no wildcard is specified, the string is treated as if surrounded by wildcards: %rhel7% |
|
!~ |
NOT LIKE |
||
> |
GREATER THAN |
Accepts numerical or temporal values. For temporal values, the operator > is interpreted as "later than", and < as "earlier than". Both operators can be combined with EQUALS: >= <= |
|
< |
LESS THAN |
||
^ |
IN |
Compares an expression against a list of values, as in SQL. Returns matches that contain or not contain the values, respectively. |
|
!^ |
NOT IN |
||
HAS or set? |
|
Returns values that are present or not present, respectively. |
|
NOT HAS or null? |
|
Simple queries that follow the described syntax can be combined into more complex ones using logical operators AND, OR, and NOT. Alternative notations of the operators are also accepted:
| Operator | Alternative Notations | Example | ||
|---|---|---|---|---|
and |
& |
&& |
<whitespace> |
|
or |
| |
|| |
|
|
not |
– |
! |
|
|
Query Values
- Text Values
-
Text containing whitespaces must be enclosed in quotes. A whitespace is otherwise interpreted as the AND operator.
Examples:
hostgroup = "Web servers"The search will return hosts with assigned host group named "Web servers".
hostgroup = Web serversThe search will return hosts in the host group Web with any field matching %servers%.
- Temporal Values
-
Many date and time formats are accepted, including the following:
-
"10 January 2017"
-
"10 Jan 2017"
-
10-January-2017
-
10/January/2017
-
"January 10, 2017"
-
Today, Yesterday, and the like.
-
|
Avoid ambiguous date formats, such as 02/10/2017 or 10-02-2017. |
Using Free Text Search
When you enter free text, it will be searched for across multiple fields. For example, if you type "64", the search will return all hosts that have that number in their name, IP address, MAC address, and architecture.
|
Multi-word queries must be enclosed in quotes, otherwise the whitespace is interpreted as the AND operator. |
Because of searching across all fields, free text search results are not very accurate and searching can be slow, especially on a large number of hosts. For this reason, we recommend that you avoid free text and use more specific, syntax-based queries whenever possible.
Managing Bookmarks
You can save search queries as bookmarks for reuse. You can also delete or modify a bookmark.
Bookmarks appear only on the page on which they were created.
On some pages, there are default bookmarks available for the common searches, for example, all active or disabled hosts.
Creating Bookmarks
This section details how to save a search query as a bookmark. You must save the search query on the relevant page to create a bookmark for that page, for example, saving a host related search query on the Hosts page.
-
In the orcharhino management UI, navigate to the page where you want to create a bookmark.
-
In the Search field, enter the search query you want to save.
-
Select the arrow to the right of the Search button and then select Bookmark this search.
-
In the Name field, enter a name for the new bookmark.
-
In the Search query field, ensure your search query is correct.
-
Ensure the Public checkbox is set correctly:
-
Select the Public checkbox to set the bookmark as public and visible to all users.
-
Clear the Public checkbox to set the bookmark as private and only visible to the user who created it.
-
-
Click Submit.
To confirm the creation, either select the arrow to the right of the Search button to display the list of bookmarks, or navigate to Administer > Bookmarks and then check the Bookmarks list for the name of the bookmark.
Deleting Bookmarks
You can delete bookmarks on the Bookmarks page.
-
In the orcharhino management UI, navigate to Administer > Bookmarks.
-
On the Bookmarks page, click Delete for the Bookmark you want to delete.
-
When the confirmation window opens, click OK to confirm the deletion.
To confirm the deletion, check the Bookmarks list for the name of the bookmark.
orcharhino Settings
This section contains noteworthy information or known issues about settings that you can edit in the orcharhino management UI by navigating to Administer > Settings.
| Setting | Description |
|---|---|
Fix DB cache |
orcharhino maintains a cache of permissions and roles.
When set to |
| Setting | Description |
|---|---|
Type of name generator |
Specifies the method used to generate a host name when creating a new host. The default The The |
Safemode rendering |
Enables safe mode rendering of provisioning templates.
The default and recommended option When set to |
|
The text and illustrations on this page are licensed by ATIX AG under a Creative Commons Attribution–Share Alike 3.0 Unported ("CC-BY-SA") license. This page also contains text from the official Foreman documentation which uses the same license ("CC-BY-SA"). |