Microsoft Azure
Azure is a cloud computing service by Microsoft. It is one of the compute resource providers supported by orcharhino.
Installing Azure
Install the foreman-azure-rm package to attach an Azure compute resource provider to orcharhino.
This allows you to manage and deploy hosts to Azure.
To install the required package, run the following command on your orcharhino:
# foreman-installer --enable-foreman-plugin-azureThis will automatically restart the orcharhino services.
Go to Administer > About and select the compute resources tab in the orcharhino management UI to verify the installation of the Azure compute resource plugin.
Creating an Azure Compute Resource
The create compute resource page can be accessed via the Create Compute Resource button:
Infrastructure > Compute resources >> Create Compute Resource
|
Clicking the Create Compute Resource button does not actually create a new compute resource, rather it serves to attach a preexisting compute resource to the list of known compute resources to orcharhino. |
When adding a compute resource provider to orcharhino, you must provide a name, select the relevant provider, and enter any provider specific connection information:
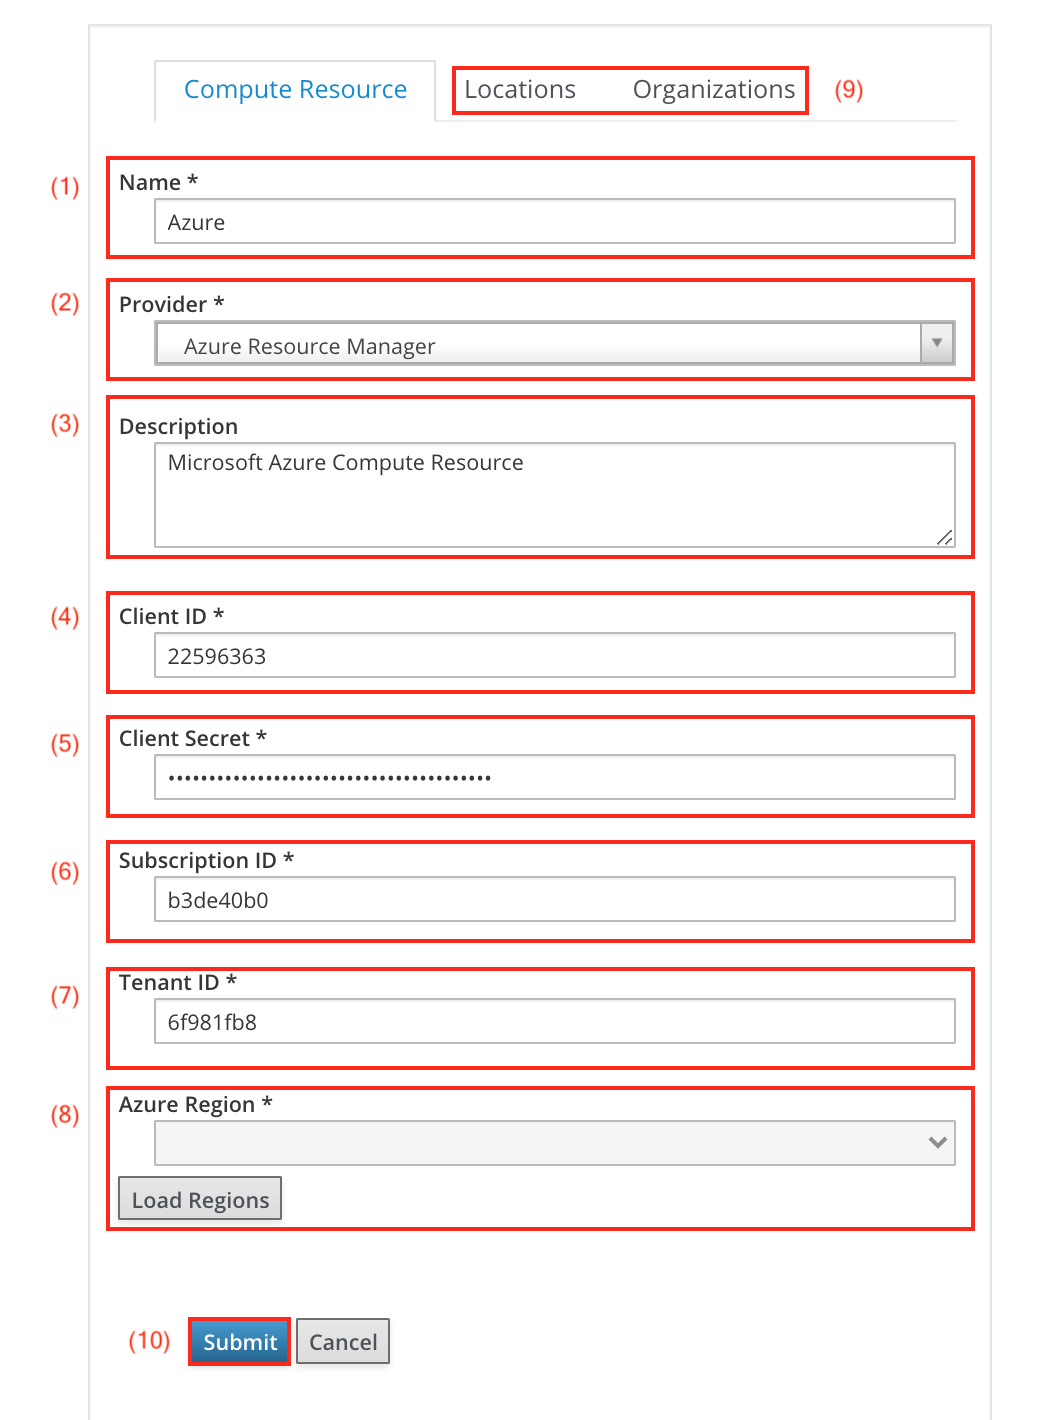
Enter the following information to attach Microsoft Azure as a compute resource provider to orcharhino:
-
Enter a name in the Name (1) field for the Microsoft Azure compute resource.
-
Select Azure Resource Manager from the Provider (2) drop down menu. Now, Azure specific additional provider fields appear.
-
You may also add an arbitrary Description (3) to your compute resource.
-
The Client ID (4), the Client Secret (5), the Subscription ID (6), and the Tenant ID (7) can be obtained from within your Microsoft Azure account.
-
The Azure Region (8) lets you select the geographical region your Azure compute resource will be located in. Use the load button to load available Azure regions after entering your Microsoft Azure account credentials.
-
Remember to assign a Location and Organization (9) context on the corresponding tabs.
-
Click Submit (10) to save your Azure configuration to orcharhino.
Editing an Azure Compute Resource
The edit compute resource page can be accessed via the list of compute resources:
Infrastructure > Compute resources >> list of compute resources > Actions column > Edit
The edit compute resource page is essentially the same as the create compute resource page, with the difference that fields will be prefilled with the settings of the compute resource being edited.
Viewing an Azure Compute Resource
-
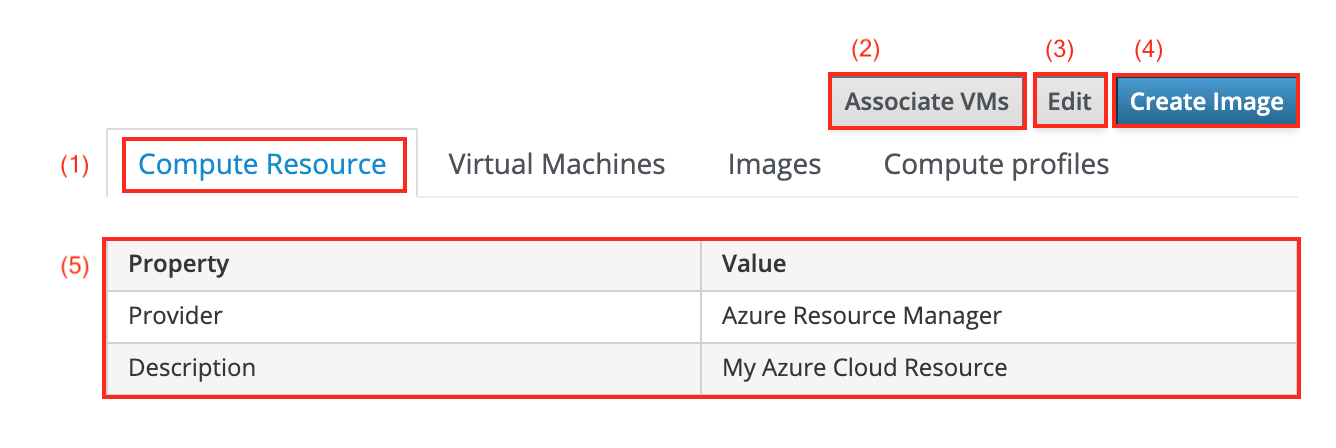
The Compute Resource tab (1) shows some basic information about the compute resource in question.
-
The Associate VMs button (2) will reassociate hosts that exist in a disassociated state. This mostly happens when hosts are manually disassociated via the all hosts page.
-
The Edit button (3) takes you to the edit compute resource page for the compute resource being viewed.
-
The Create Image button (4) takes you to the create compute resource image page.
-
You can view general details of the selected compute resource in a table (5).
-
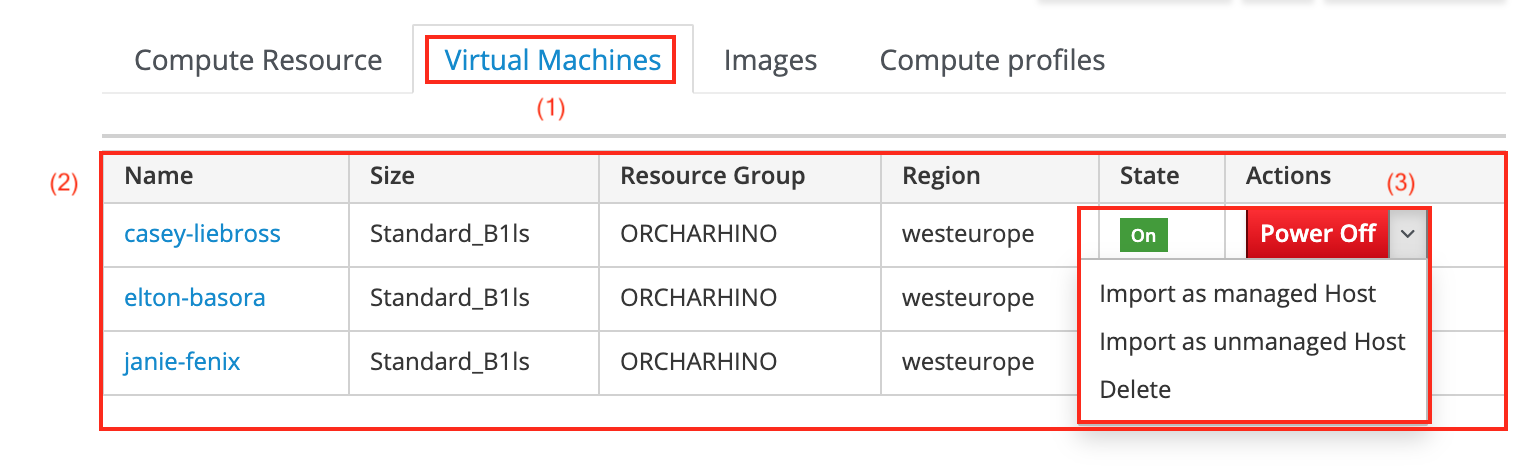
Selecting the Virtual Machines tab (1) displays all virtual machines running on the selected Azure compute resource provider, irrespective of whether they are associated with an orcharhino host or not.
-
The Name column (2) lists all machines with additional information such as size, region, and whether they are currently powered on or not.
-
Selecting Power On or Power Off in the Actions column (3) will change the power state of the virtual machine in question.
-
Selecting Import as managed Host will import the virtual machines to orcharhino. Managed indicates that hosts will receive provisioning and configuration management as well as return reports to orcharhino.
-
Selecting Import as unmanaged Host lets you also import a virtual machine to orcharhino. Unmanaged indicates that orcharhino will only handle configuration management and receive reports from hosts.
-
Click Delete to delete the virtual machine in question.
-
-
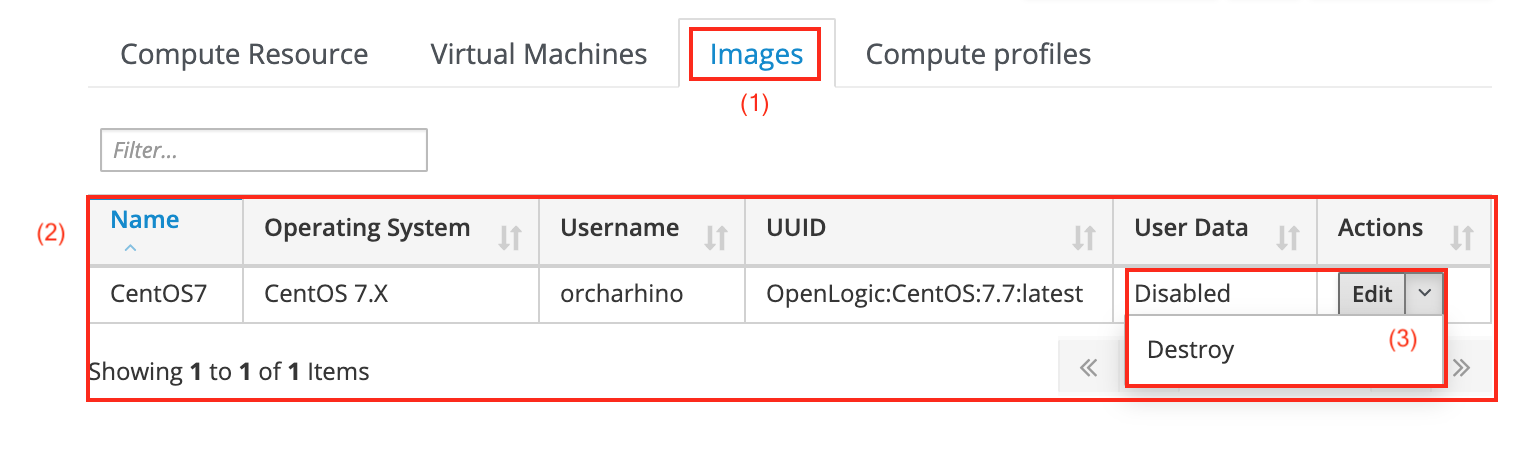
Navigating to the Images tab (1) takes you to the list of Azure images.
-
The list of images contains the Name (2) and operating system amongst other information.
-
The Action menu (3) lets you edit and destroy images from orcharhino, but not from the underlying hypervisor.
-
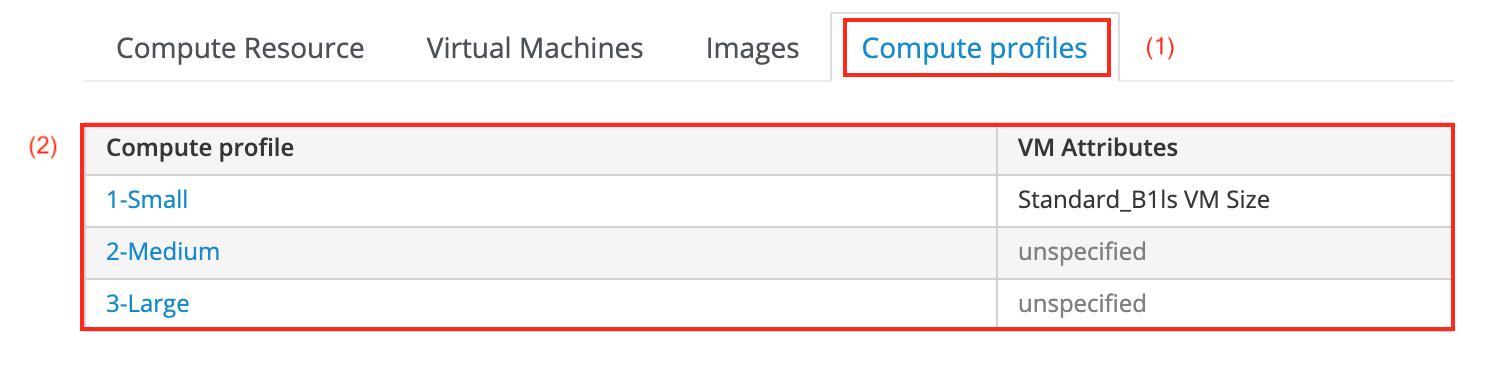
Selecting the Compute profiles tab (1) lists all available compute profiles for Azure.
-
The table displays the names of existing compute profiles for Azure and the corresponding VM Attributes (3) such as type of the VM, which are unspecified for medium and large in the screenshot above.
Viewing an Azure Virtual Machine
The virtual machine overview page can be accessed via the Virtual Machines tab on the compute resource overview page running the virtual machine:
Infrastructure > Compute resources >> list of compute resources > name of a compute resource > Virtual Machines tab > name of a virtual machine
The virtual machine overview page displays information about the relevant virtual machine and includes a number of buttons to perform actions relating to it:
-
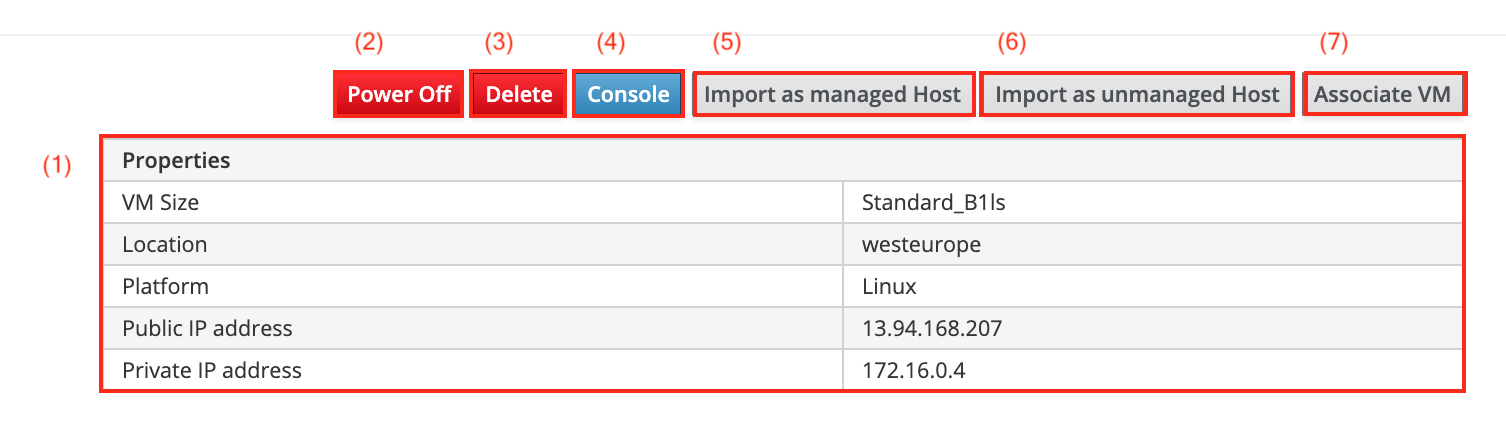
The list of Properties (1) displays various properties of the Azure virtual machine.
-
The Power Off button (2), or, for that matter, Power On button, will change the power state of the virtual machine in question.
-
The Delete button (3) will delete the virtual machine from the Azure compute resource while retaining any associated orcharhino hosts. If you want to delete the orphaned host, navigate to Hosts > All Hosts and delete the host manually.
-
There is currently no way to gain browser based console access by clicking the Console button (4) for the Azure compute resource.
-
The Import as managed Host button (5) lets you import a virtual machine to orcharhino. Managed indicates that hosts will receive provisioning and configuration management as well as return reports to orcharhino.
-
The Import as unmanaged Host button (6) lets you import a virtual machine to orcharhino. Unmanaged indicates that orcharhino will only handle configuration management and receive reports from hosts.
-
The Associate VM button (7) will solely add the host to the list of hosts.
Creating an Azure Image
The create image page can be accessed via the compute resource overview page:
Infrastructure > Compute resources >> list of compute resources > name of a compute resource > Create Image button
The create image page looks as follows:
-
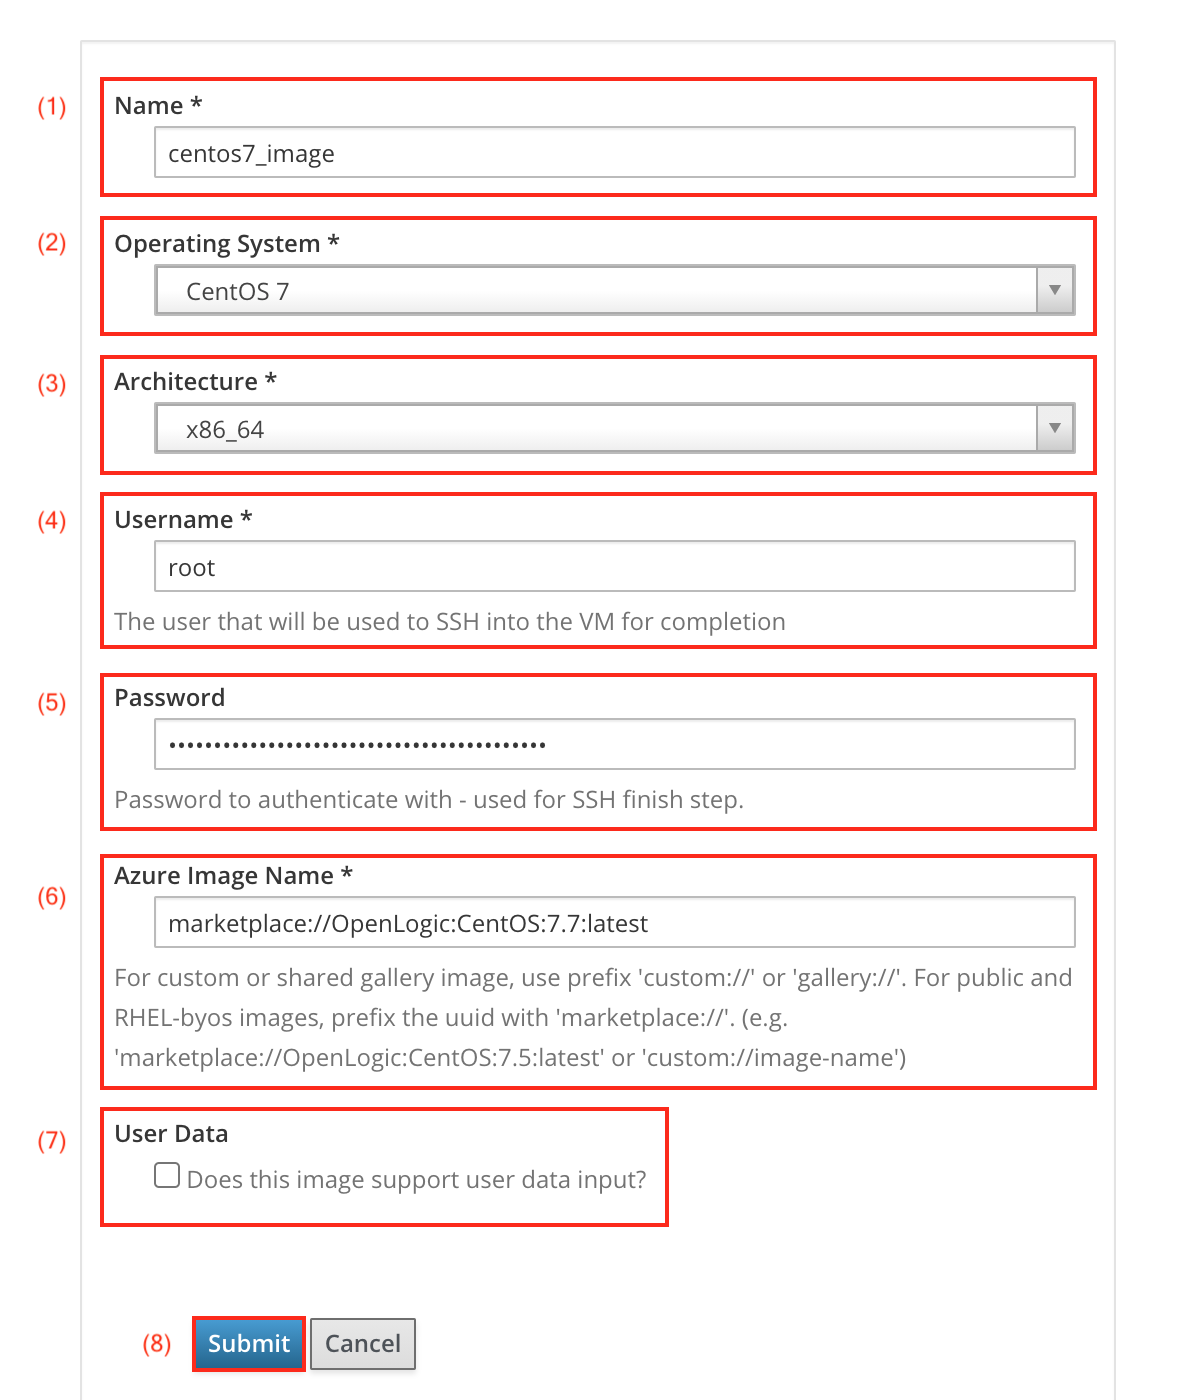
The Name (1) field lets you assign the new Azure image a meaningful and unique name, that is describing the kind of host that is to be provisioned from the image.
-
The Operating System drop down menu (2) lets you associate the image to an orcharhino operating system.
-
Associate the architecture of the image to orcharhino in the Architecture drop down menu (3).
-
The Username field (4) refers to the user needed to SSH into the machine. The default user name is
root. This is only necessary if the image has an inbuilt user account. -
The Password (5) is necessary to authenticate the above mentioned user via SSH. This is only necessary if the image has an inbuilt user account.
-
Specify the Azure Image Name (6). This name can be found within Azure.
-
Optional: Enable support for user data input by checking the User Data checkbox (7).
-
Click Submit (8) to save your changes.
Ensure the operating system and architecture fields match the operating system and architecture found in the template being created.
Editing an Azure Image
The edit image page can be accessed via the Images tab on the compute resource overview page:
Infrastructure > Compute resources >> list of compute resources > name of a compute resource > Images tab > Actions column > Edit
The edit image page is essentially the same as the creating an image page, with the difference that fields will be prefilled with the settings of the image being edited.
Editing an Azure Compute Profile
The edit compute profile page can be accessed via the list of compute profiles:
Infrastructure > Compute profiles >> list of compute profiles > name of a compute profile
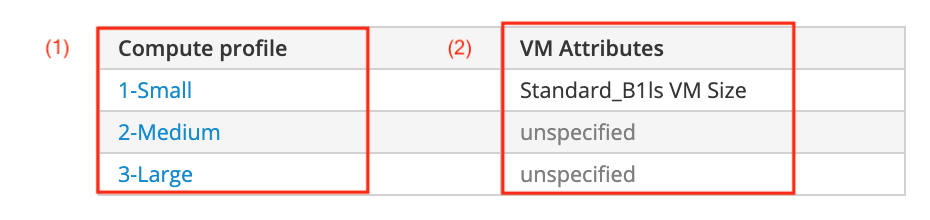
This page displays a list of compute attribute sets (one for each compute resource known to orcharhino):
-
The Compute profile column (1) lists all available compute profiles.
-
The VM Attributes column (2) will read unspecified for a new compute profile.
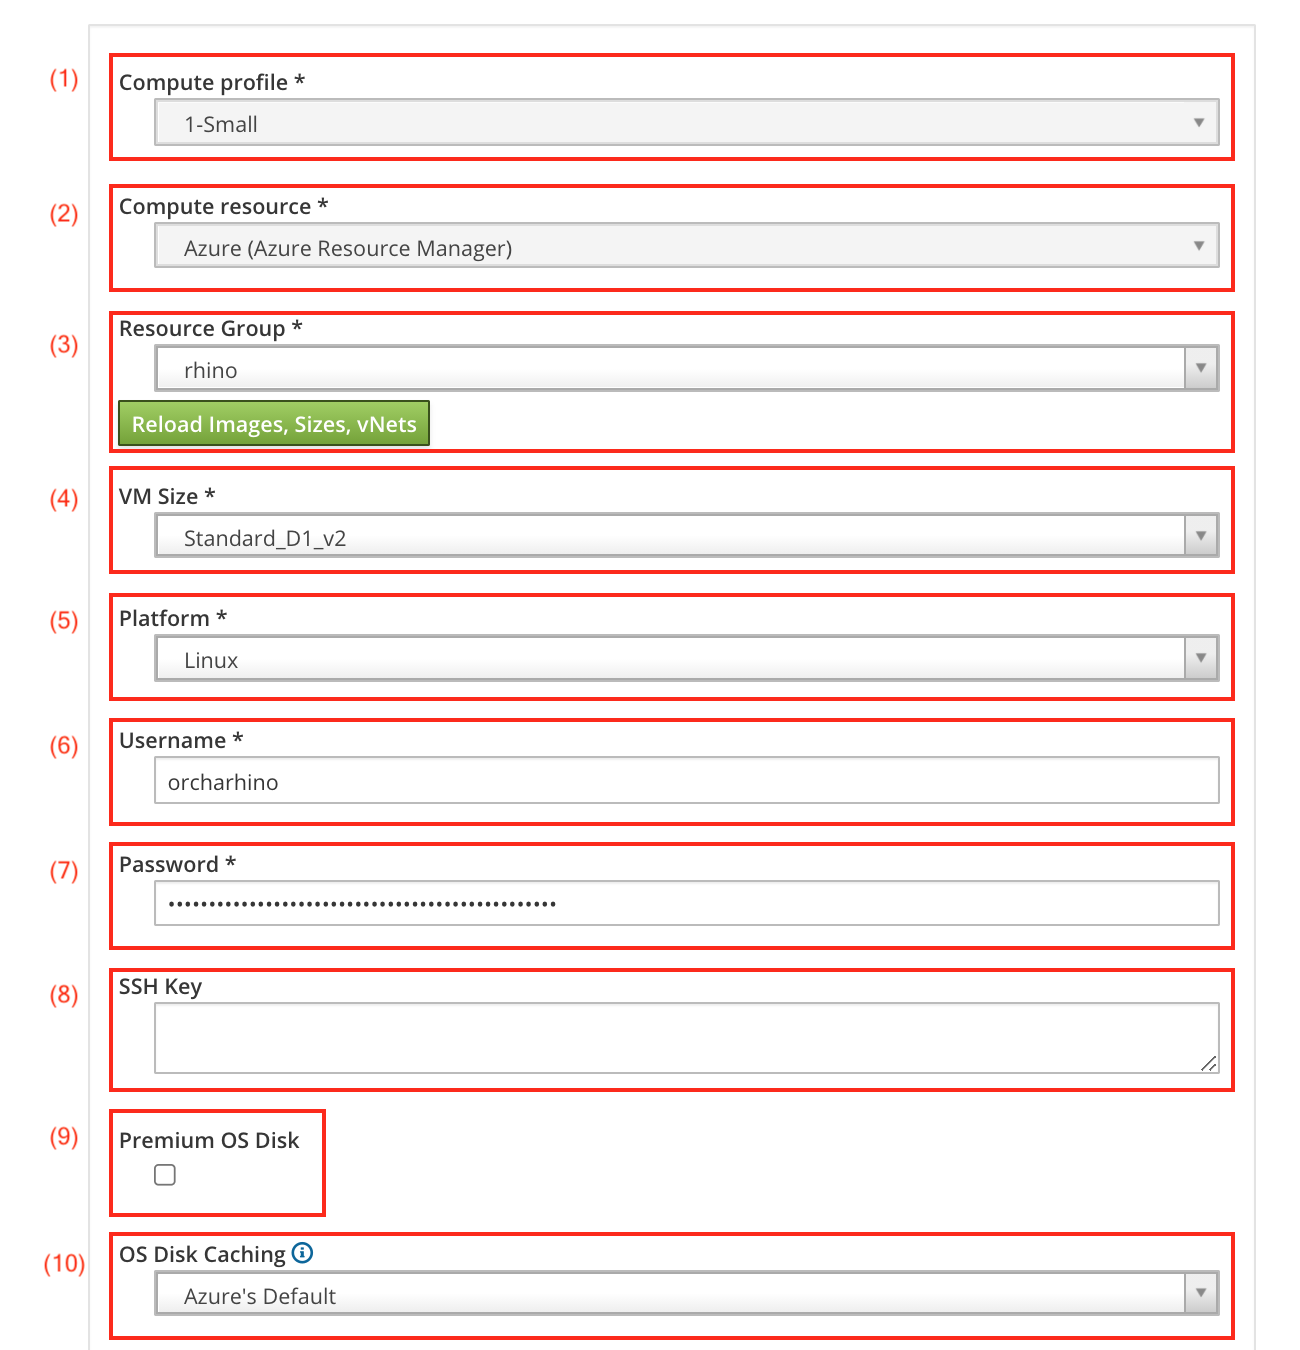
Clicking on the name of a compute resource in the left column of the list will open the edit compute attributes page for that compute resource:
-
The selected compute profile will show in the Compute Profile drop down menu (1). This cannot be changed.
-
The selected compute resource will show in the Compute resource drop down menu (2). This cannot be changed.
-
The selected resource group will show in the Resource Group drop down menu (3). Clicking the Reload Images, Sizes, vNets button allows you to reload the corresponding information from Azure into orcharhino. This is necessary after changing the resource group.
-
Select a virtual machine type in the VM Size drop down menu (4). There are various sizes including different CPU, memory, and disk options available.
-
The Platform drop down menu (5) lets you choose between Linux or Microsoft Windows as the operating system.
-
The Username (6) is needed to SSH into the machine.
-
The Password (7) is also needed to SSH into the machine.
-
The SSH Key (8) can optionally be used to SSH into the machine.
-
The Premium OS Disk checkbox (9) allows for the usage of faster disks for the operating system.
-
The OS Disk Caching drop down menu (10) allows for optional caching of the used disks. The default value enables caching for reading and writing, but this may also be read or write only.
-
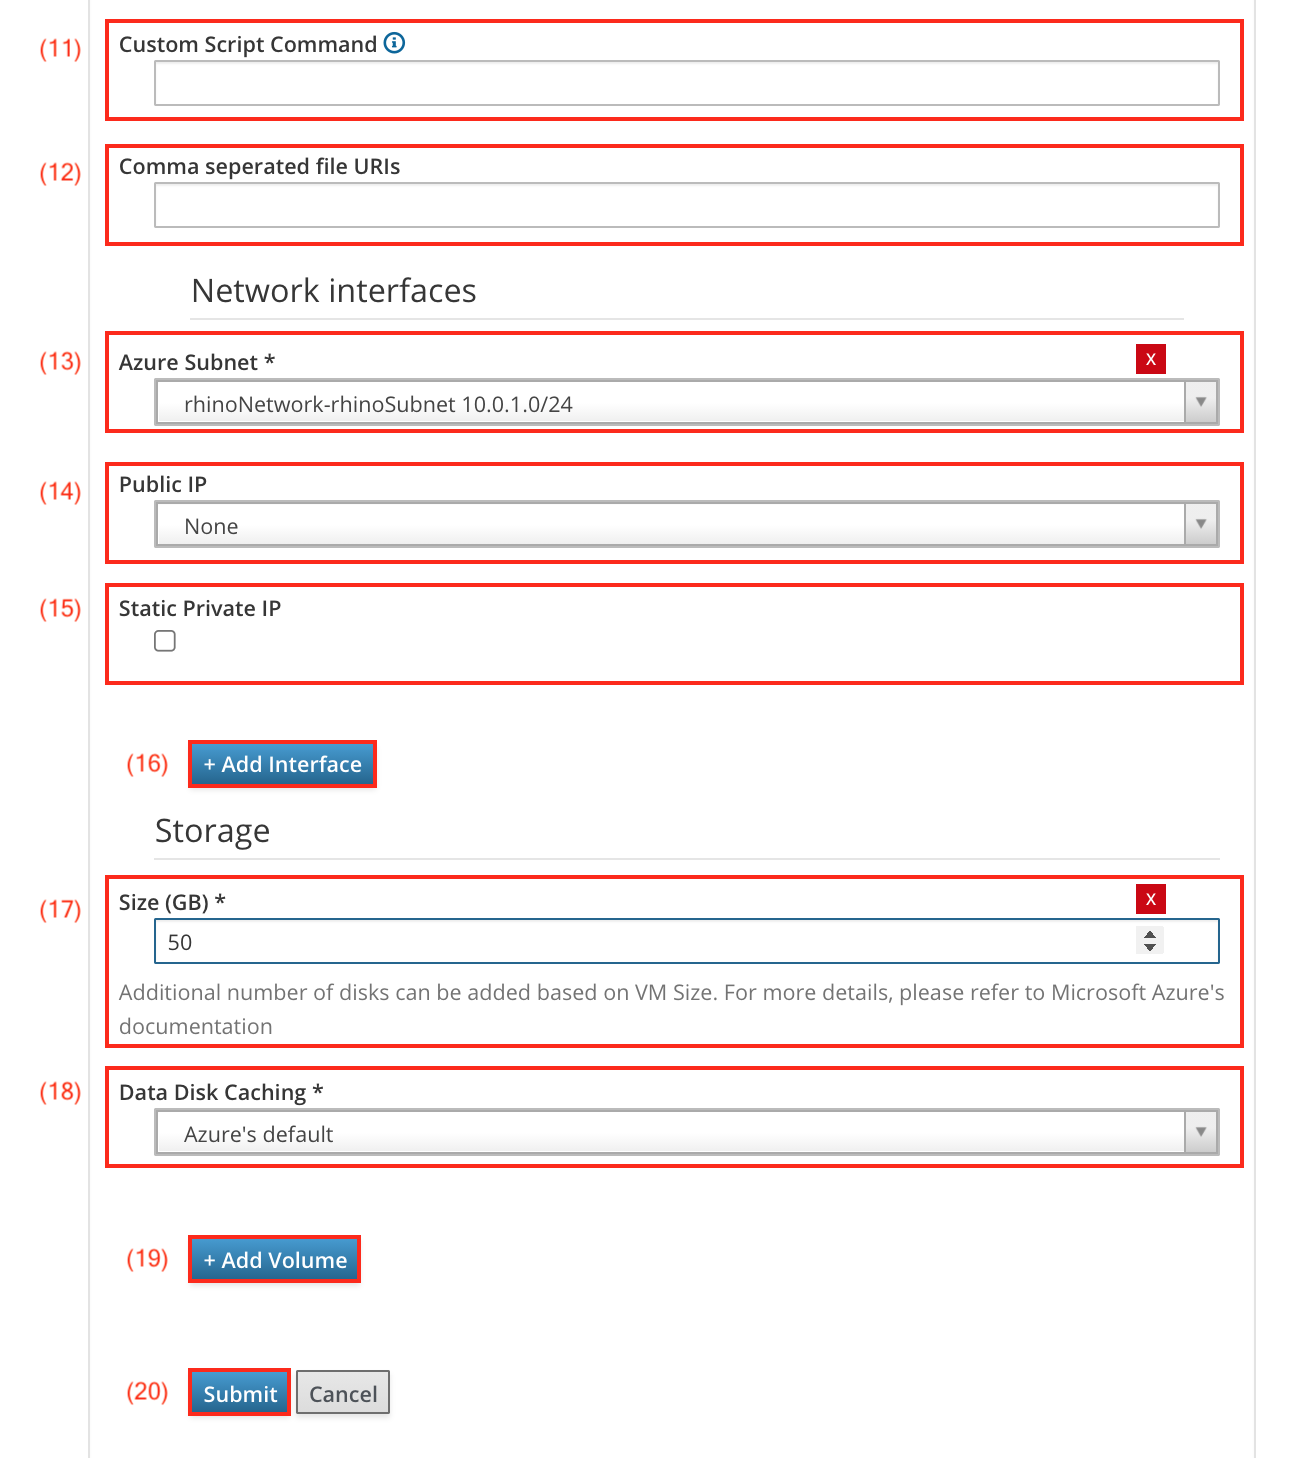
The Custom Script Command field (11) allows for custom scripts to be run after creating the host. Remember to prefix it with
sudoto run commands as root user. -
The Comma separated file URIs field (12) defines the location of the custom script from the field above.
-
The Azure Subnet drop down menu (13) lets you choose the proper subnet on Azure the hosts will be in.
-
The Public IP drop down menu (14) lets you optionally choose to use a static or dynamic IP address.
-
The Static Private IP checkbox (15) allows for static private IP addresses.
-
Click the Add Interface button (16) to add another network interface. Its configuration options are identical to 13, 14, and 15 as seen above.
-
The Size field (17) allows you to specify the size of the disk of the virtual machine. Click the red icon to remove a storage device.
-
The Data Disk Caching drop down menu (18) allows you to choose between no, read only, or write only disk caching.
-
Click the Add Volume button (19) to add another disk.
-
Click the Submit button (20) to save your changes to orcharhino.