Ansible
Ansible is an automation engine and configuration management tool. It works without client and daemon and solely relies on Python and SSH. Ansible consists of a control node (e.g. a notebook, a workstation, or a server) and managed nodes (that is the hosts in its inventory).
|
ATIX offers Ansible trainings for beginners and advanced users on how to use Ansible as a configuration management tool. This helps you manage your infrastructure more efficiently using Ansible roles. It communicates how to create, use, and maintain Ansible roles, inventories, and playbooks based on best practices. Refer to the Ansible trainings website for more information or contact us. |
This guide describes orcharhino’s Ansible support. It shows the installation process on orcharhino, supported features, and its usage.
|
The Ansible plugin for configuration management relies on Ansible roles, which are assigned to each host or host group. If you want to use Ansible playbooks, have a look at the application centric deployment guide. ACD helps you deploy and configure multi host applications using an Ansible playbook and application definition. |
Ansible Installation
When installing a new orcharhino, it is possible to select Ansible as a configuration management tool during step five of the main orcharhino installation steps. Choosing this option will install and configure the Ansible plugin on your orcharhino.
To install the Ansible Plugin, run the following command on the existing orcharhino:
# foreman-installer --enable-foreman-plugin-ansible --enable-foreman-proxy-plugin-ansibleThis installs the Ansible plugin as well as the orcharhino proxy features for the bundled orcharhino proxy which is always included in your orcharhino.
The remote execution plugin is required to run Ansible playbooks as job templates. Install this plugin by running the following command on your orcharhino:
# foreman-installer --enable-foreman-plugin-remote-execution --enable-foreman-proxy-plugin-remote-execution-sshAnsible Basics
Ansible terms consist of playbooks, plays, tasks, modules, roles, facts, and inventories:
-
A Playbook is a collection of plays. Ansible playbooks are idempotent, that means Ansible only acts if the current state differs from the wanted state. Running them multiple times will not result in any different outcomes than running them just once.
-
A Play contains one or more tasks and connects them to individual hosts.
-
A task is a single instruction and calls a single module. It has a name and module parameters, and runs sequentially as listed in roles. Tasks may optionally trigger handlers, which are tasks run once if at all at the end of a playbook.
-
A module is the actual code pushed to and executed on the managed node and usually has some form of abstraction inbuilt. The package module for example can install and uninstall packages independently of the operating system and package manager. There are lots of public modules available (e.g. service) and you can optionally write your own custom modules. Refer to the Ansible plugin index for a list of available modules.
-
A role is a collection of playbooks including all variable files and configuration templates needed.
-
A fact is a variable which is derived from system information. Facts are gathered at the beginning of each run by default and can be accessed in playbooks.
-
An inventory is a YAML file which describes the existing infrastructure, that is a list of hosts and host groups. Inventories are often used to create subsets of hosts which allow for execution of specific tasks on predefined hosts. Refer to the Ansible inventory documentation for more information.
To read and write Ansible playbooks, roles, and inventories, one first has to be familiar with YAML syntax:
YAML (.yaml files) is a markup language which strongly relies on indentation with two spaces and no tabs.
YAML files always start with three hyphens and optionally end with three dots.
Refer to the Ansible YAML syntax documentation for more information.
Ansible ad-hoc commands are a great way of testing single tasks. They are generally one liners not worthy being saved in a playbook. The following example will run the setup module on the local machine:
# ansible localhost -m setupRunning this command will execute the setup module and automatically return information which is collected at the beginning of every playbook. It gathers hardware information like storage, network interfaces, and free system resources as well as the operating system, environment variables, available python versions, and the running kernel version. Refer to the Ansible ad-hoc command documentation for more information.
Ansible Role Example
This Ansible role configures hosts to run an nginx server with a static web page that shows different system information about the server by rendering a Jinja template. The following code block displays the Ansible role structure:
|
You can find the Ansible role example on the ATIX github page. |
$ tree nginx_sysinfo
nginx_sysinfo
├── defaults
│   └── main.yaml
├── files
│   └── stylesheet.css
├── handlers
│   └── main.yaml
├── tasks
│   └── main.yaml
├── templates
│   └── index.html.j2
└── vars
    └── main.yaml

6 directories, 6 files|
This Ansible role structure has to be available on the orcharhino or orcharhino proxy in |
The following code block displays the content of the defaults/main.yaml file:
---
full_info: false
...
It shows one variable called full_info which is set to false.
The following code block displays the content of the files/stylesheet.css file:
body {
    width: 100%;
    font-family:Arial,Verdana,Calibri,sans-serif;
    font-size:11pt;
    margin-top:0px;
    margin-left:0px;
    margin-right:250px;
    margin-left:200px;
    text-align:left;
    padding-left: 0px;
}

a:link, a:visited {
      color: inherit;
  text-decoration:none;
  }

a:active, a:hover {
  color:#000;
  text-decoration:underline;
        background-color:lightblue;
        text-decoration:none;
  }

h1 {
    font-family:Calibri,Arial,Verdana,sans-serif;
    font-size:30pt;
    text-align:left;
    font-weight:bold;
}

h2 {
    font-family:Calibri,Arial,Verdana,sans-serif;
    clear:both;
    font-size:25pt;
    font-weight:bold;
    margin-top:2em;
}

br {
    clear:both;
}

td {
  padding:5px;
  padding-right:30px;
}

table {
    padding:0px;
    empty-cells:show;
    border-spacing:0px;
    margin-top:50px;
    max-width:50%;
}

th {
    text-align:left;
    border-bottom: solid 1px black;
}

tr:nth-child(even)  {
    background-color: lightblue;
}

tr:nth-child(odd)  {
    background-color: white;
}
This CSS file optionally styles the web page.
The following code block displays the content of the handlers/main.yaml file:
---
- name: Restart nginx
  become: true
  service:
    name: "{{ nginx_service_name }}"
    state: restarted
...
It contains one task called Restart nginx which is only executed once at the end of the playbook if the handler is triggered once or multiple times.
The following code block displays the content of the tasks/main.yaml file:
---
- name: Add epel-repository for CentOS
  become: true
  yum:
    name: epel-release
    state: present
  when: ansible_distribution == 'CentOS'

- name: Install required packages
  become: true
  package:
    name: "{{ packages }}"
    state: present

- name: Start nginx service and make it persistent
  become: true
  service:
    name: "{{ nginx_service_name }}"
    state: started
    enabled: true

- name: Set www root for nginx
  set_fact:
    nginx_www_root: "{{ nginx_www_root[ansible_os_family] }}"

- name: Create default page
  become: true
  template:
    src: index.html.j2
    dest: "{{ nginx_www_root }}/index.html"
    validate: tidy %s
  notify: restart nginx

- name: Copy css
  become: true
  copy:
    src: stylesheet.css
    dest: "{{ nginx_www_root }}/stylesheet.css"
  notify: restart nginx

- name: Stop firewall
  become: true
  service:
    name: firewalld
    state: stopped
...
This playbook contains 7 tasks which are executed sequentially. They are run as root user if necessary and automate the steps of installing an nginx web server, displaying the system information, and stopping the firewall.
The following code block displays the content of the templates/index.html.j2 file:
<!DOCTYPE html>
<html>
<head>
<title>Information page: {{ ansible_hostname }}</title>
<style type="text/css">@import url('./stylesheet.css') all;</style>
</head>
<body>
<h1>Information about running host</h1>

<table style='float:left;margin-right:50px'>
  <tr> <th colspan='2'>Network information</th> </tr>
  <tr> <td>Host name</td> <td>{{ ansible_nodename }}</td> </tr>
  <tr> <td>IPv4 addresses</td> <td>{{ ", ".join(ansible_all_ipv4_addresses) }}</td> </tr>
  <tr> <td>IPv6 addresses</td> <td>{{ ", ".join(ansible_all_ipv6_addresses) }}</td> </tr>
  {% for key, value in ansible_default_ipv4.items() %}
  <tr> <td>Default IPv4 interface -- {{ key }}</td> <td>{{ value }}</td> </tr>
  {% endfor %}
  {% for key, value in ansible_default_ipv6.items() %}
  <tr> <td>Default IPv6 interface -- {{ key }}</td> <td>{{ value }}</td> </tr>
  {% endfor %}
  <tr> <td>Host name</td> <td>{{ ansible_hostname }}</td> </tr>
  <tr> <td>FQDN</td> <td>{{ ansible_fqdn }}</td> </tr>
</table>

{% if full_info %}
<table>
  <tr> <th colspan='2'>OS Facts</th> </tr>
  <tr> <td>This system is running on</td> <td>{{ ansible_distribution }}</td> </tr>
  <tr> <td>Version</td> <td>{{ ansible_distribution_version }}</td> </tr>
  <tr> <td>OS Family</td> <td>{{ ansible_os_family}}</td> </tr>
  <tr> <td>Used package manager</td> <td>{{ ansible_pkg_mgr }}</td> </tr>
  <tr> <td>AppArmor</td> <td>{{ ansible_apparmor['status'] }}</td> </tr>
  <tr> <td>Selinux</td> <td>{{ ansible_selinux['status'] }}</td> </tr>
  <tr> <td>Python Version</td> <td>{{ ansible_python_version }}</td> </tr>
</table>

<table>
  <tr> <th colspan='2'>Environment variables</th> </tr>
  {% for key, value in ansible_env.items() %}
  <tr> <td>{{ key }}</td><td>{{ value }}</td> </tr>
  {% endfor %}
</table>
{% endif %}

</body>
</html>
This template contains standard html code as well as instructions for Jinja. Jinja will render this file and fill out its variables.
The following code block displays the content of the vars/main.yaml file:
---
nginx_package_name: nginx
nginx_service_name: nginx
nginx_www_root:
  Debian: "/var/www/html/"
  RedHat: "/usr/share/nginx/html/"

packages:
  - tidy
  - "{{ nginx_service_name }}"
...
This file contains all necessary variables, e.g. the nginx www root directory, which depends on the Linux distribution nginx is running on.
Ansible Usage
This section describes how to use an Ansible role for configuration management within orcharhino. We use the example shown above to install and configure an nginx web server to multiple hosts managed by orcharhino. Alternatively, you can download an Ansible role of your choice from the Ansible galaxy.
You can run Ansible roles and verify their results within five steps in orcharhino:
-
Transfer Ansible role to orcharhino
You can either download a role from the Ansible galaxy directly to the orcharhino or transfer your own role from any machine to the orcharhino via
scp.-
Download the role from Ansible galaxy
To download a role from the Ansible galaxy, run the following command on your orcharhino:
# sudo ansible-galaxy install geerlingguy.nginx -p /etc/ansible/roles/This automatically downloads the role and places it in the correct directory for orcharhino to import it.
-
Copy your own role
To copy your own role, transfer it to orcharhino via
scp:# scp /path/to/local_role/ root@orcharhino.example.com:/etc/ansible/roles/
-
-
Import Ansible role into orcharhino
To import the newly downloaded Ansible role into orcharhino, go to Configure > Ansible Roles.
-
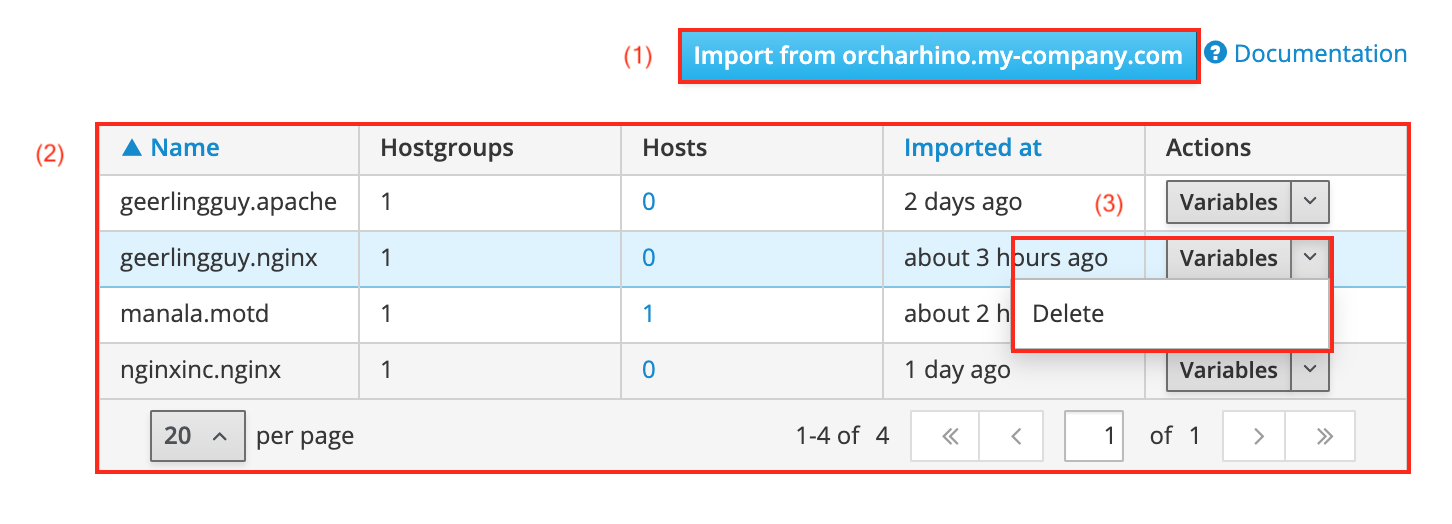
Click the Import from <fqdn> button (1) to open a drop down menu with a list of your orcharhino and any attached orcharhino proxies. This lets you select which machine the role will be imported from. Ensure to choose the one on which you previously downloaded the Ansible role.
-
You are also presented a table (2) listing available Ansible roles.
-
You can delete Ansible roles by clicking delete from the Actions menu (3).
-
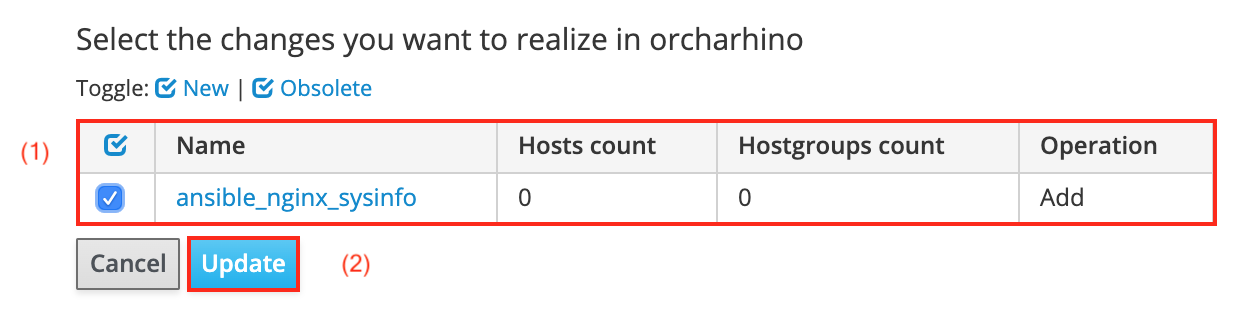
You will be presented with a list (1) of Ansible roles which have either been added or removed.
This example adds the Ansible role ansible_nginx_sysinfo as described above.
-
Select the one you want to add and click Update (2) to import the Ansible role to orcharhino.
-
-
Add Ansible role to host groups or individual hosts
You can either make the Ansible role available for individual hosts or host groups:
-
Individual hosts
To make an Ansible role available to individual hosts, navigate to Hosts > All Hosts and click Edit in the action menu on the right side of a host. Navigate to the Ansible Roles tab to add the Ansible role by clicking the blue plus sign.
-
Host groups
Navigate to Configure > Host Groups and select a host group. Add the imported Ansible role on the Ansible roles tab. Remember to click Submit to save your changes to orcharhino.
-
-
Run Ansible role
To run your Ansible role, you can either run it immediately, once in the future, or have it setup to be executed periodically. Go to Hosts > All Hosts and select one or multiple hosts by ticking the checkbox on the left.
Select Schedule Remote Job from the Select Action drop down menu. This takes you to the job invocations page:
-
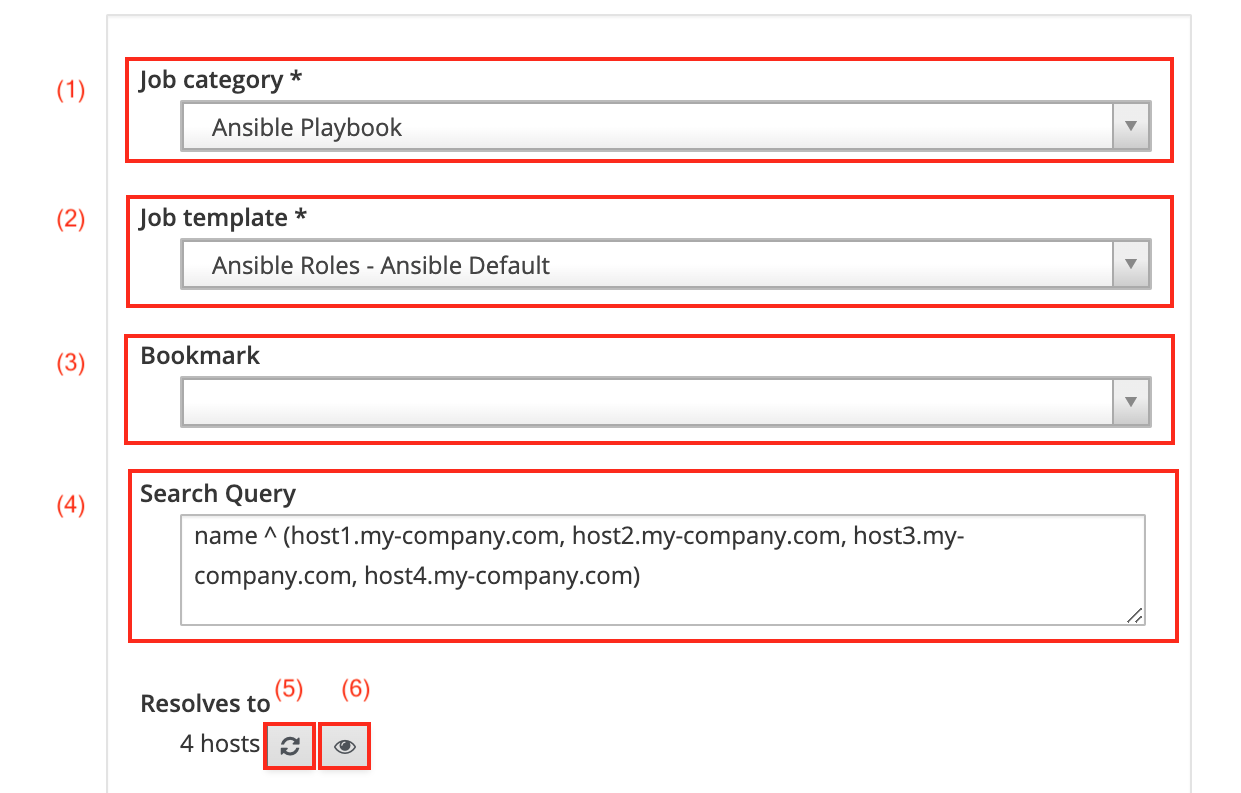
Select Ansible Playbook as Job category (1).
-
Select Ansible Roles - Ansible Default as Job template (2).
-
You may also use a bookmark for predefined host selections.
-
The Search query field (4) contains the names of the selected hosts.
-
Clicking the reload button (5) recalculates the number of hosts your search query finds and your Ansible role will be run against.
-
Clicking the preview button (6) displays all hosts the Ansible role will be run against.
-
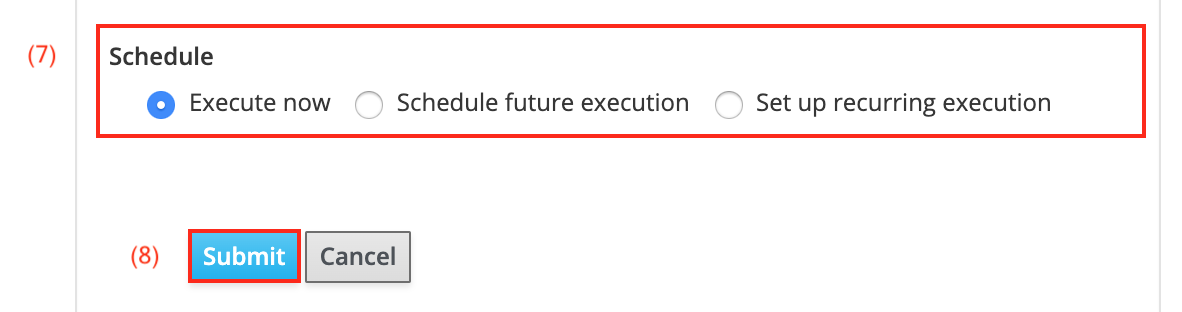
To run it immediately, select Execute now from the Schedule checkboxes (7).
-
Click Submit (8) to execute the Ansible role immediately.
-
-
To schedule an execution for the future, select Schedule future execution from the Schedule checkboxes (7).
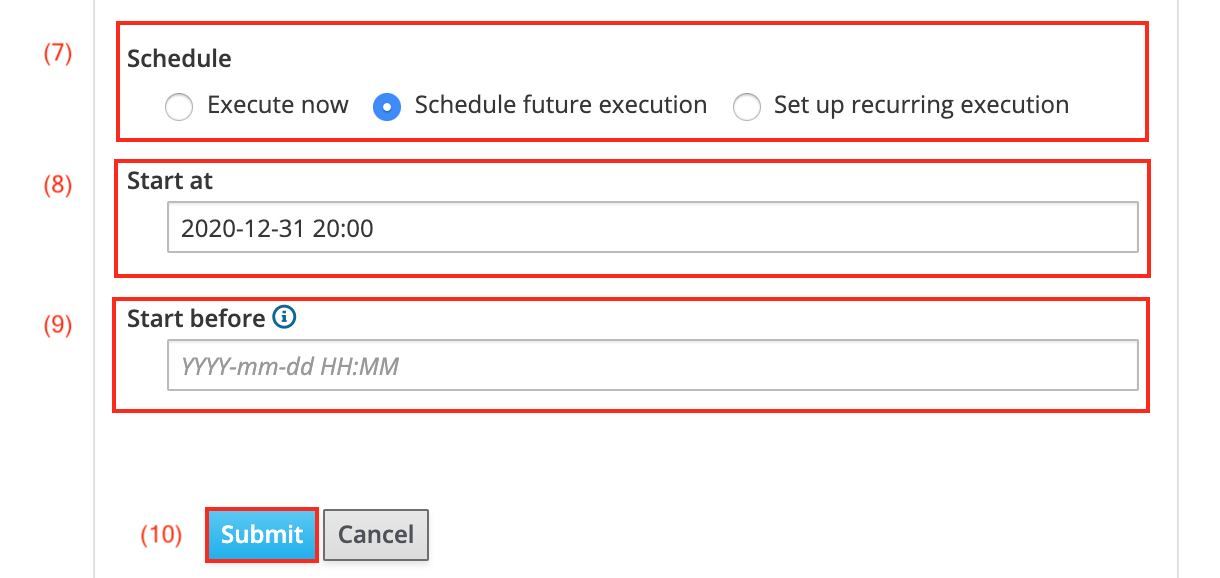
-
Select a Start Date (8) the Ansible role will be executed at.
-
Optionally a second date can be added in the Start before field (9) to cancel the scheduled execution if the run cannot be started before a certain date.
-
Click Submit (10) to schedule the Ansible role execution.
-
-
To run it periodically, select Set up recurring execution from the Schedule checkboxes (7).
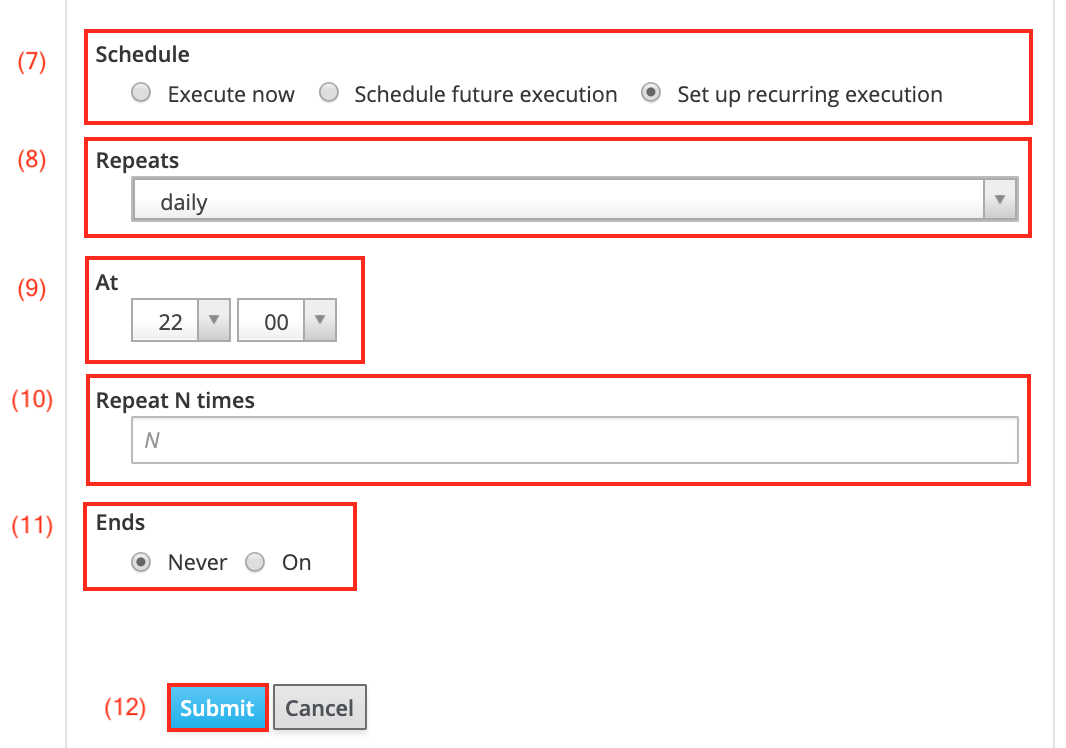
-
The Repeats drop down menu (8) allows you to select the frequency. This can be hourly, daily, weekly, or monthly as well as cronline. The last option allows for a precise input similar to Unix cron jobs.
-
When selecting daily in the drop down menu above, the At field (9) allows you to define the hour and minute the Ansible role is executed on.
-
You may choose to only have the Ansible role run a certain amount of times by entering a value in the Repeat N times field (10).
-
The Ansible role can also be halted on a certain date by selecting on on the Ends checkbox (11). The example chooses to not end the scheduled execution.
-
Click Submit (12) to start the recurring execution of the Ansible role.
-
-
Alternatively, you can also select Play Ansible roles from the Select Action drop down menu. This executes all available Ansible roles and directly takes you to the jobs page.
This equals in the same result as choosing execute now in step 4 a as outlined above.
-
-
View the results
After starting the Ansible roles in the step above, you will automatically be taken to the corresponding jobs page.
If you want to verify other already run or scheduled tasks, go to the jobs page:
Monitor > Jobs
Select the appropriate job in the list of all run jobs.
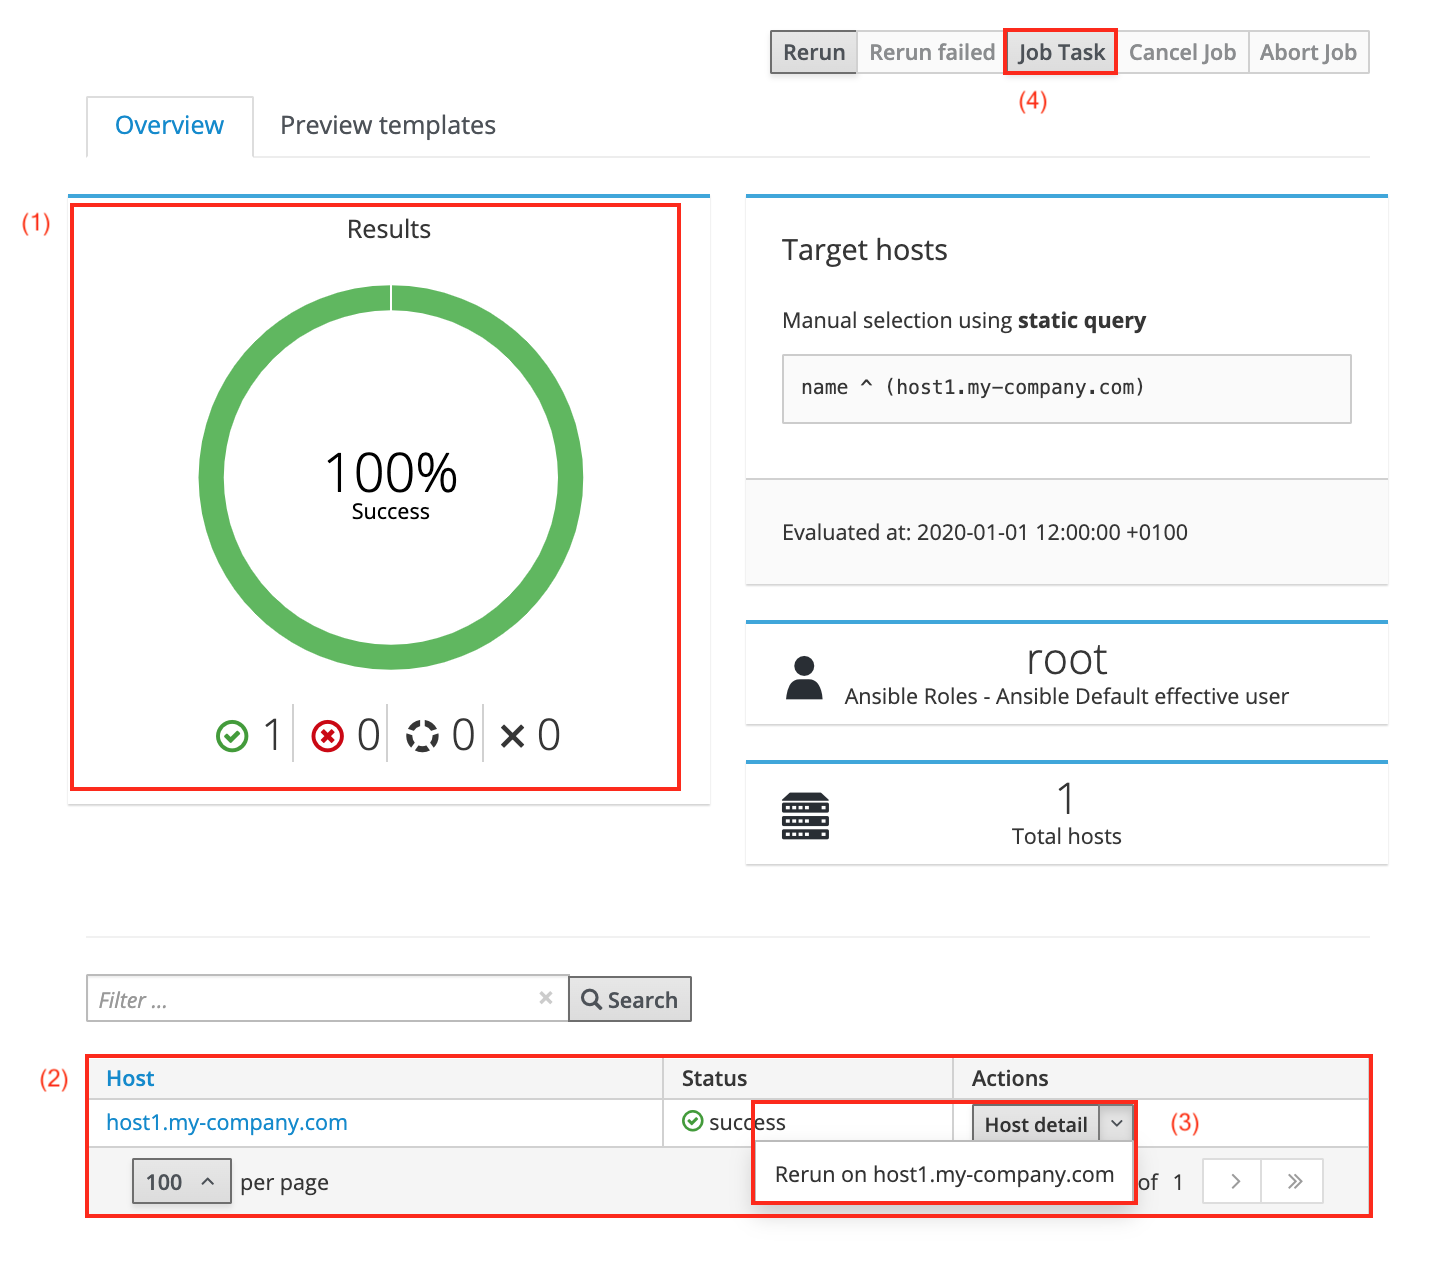
-
The pie chart (1) visualises the result of the run Ansible role. It displays the overall status (e.g. 100% success in the example shown) as well as the number of successful, failed, still running and aborted tasks indicated by the icons below the chart.
-
The bottom table (2) displays all hosts the task was run on. Clicking on the name of a host takes you to its Ansible result page.
-
The Actions drop down menu (3) allows you to rerun a task on an individual host. Clicking on the host details button takes you to the hosts page.
-
Clicking the Job Task button (4) takes you to the task page as shown below.
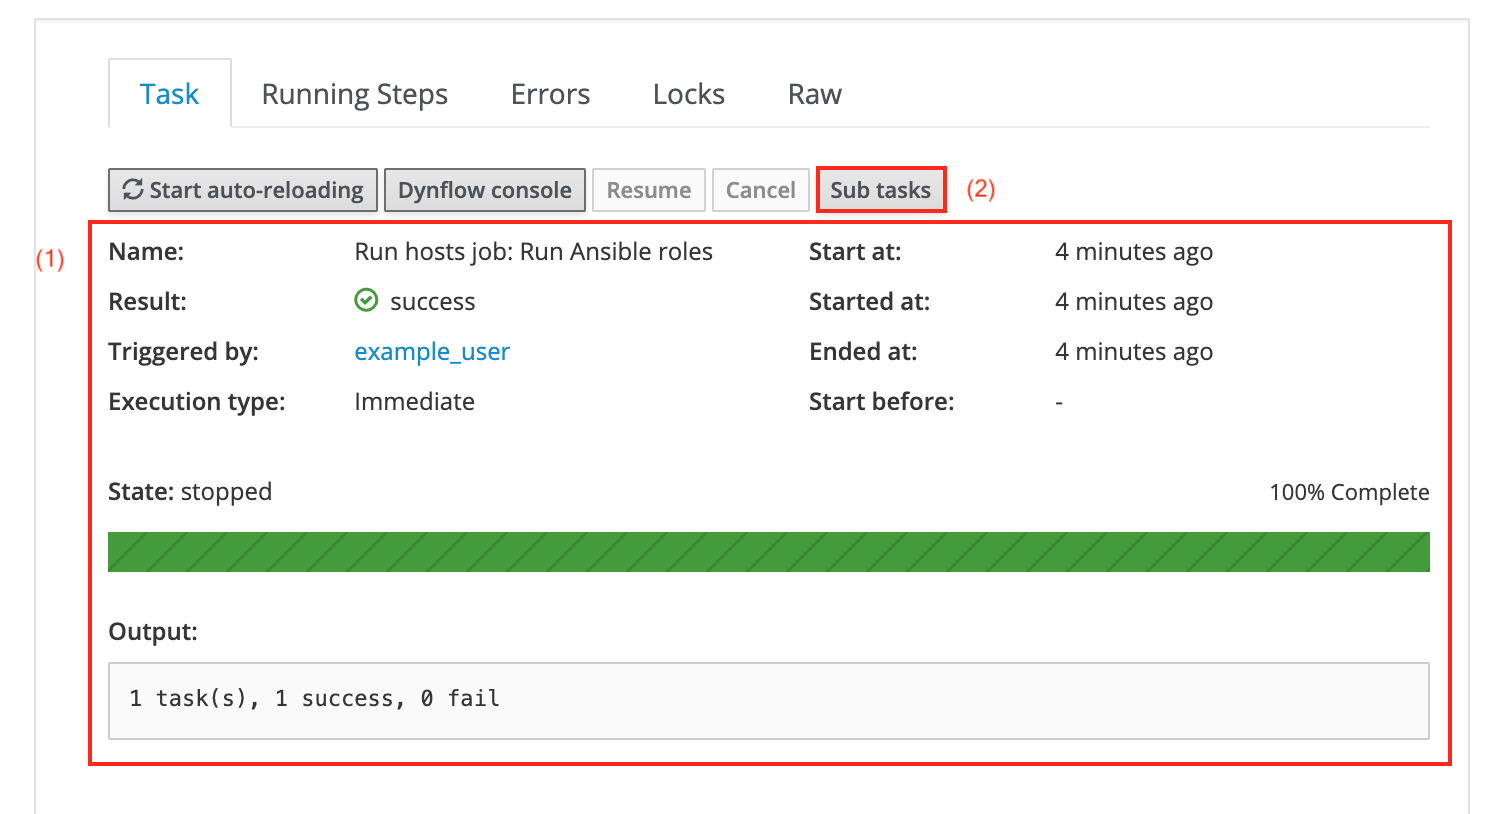
-
The tasks page displays various information such as the user name and start and end date of the task in a table (1). There is also a short summary of the number of tasks that have been run successfully which is visualised by the green bar.
-
The Sub tasks button (2) takes you to the following page:
-
The page shows details of all Ansible roles which have been run.
-
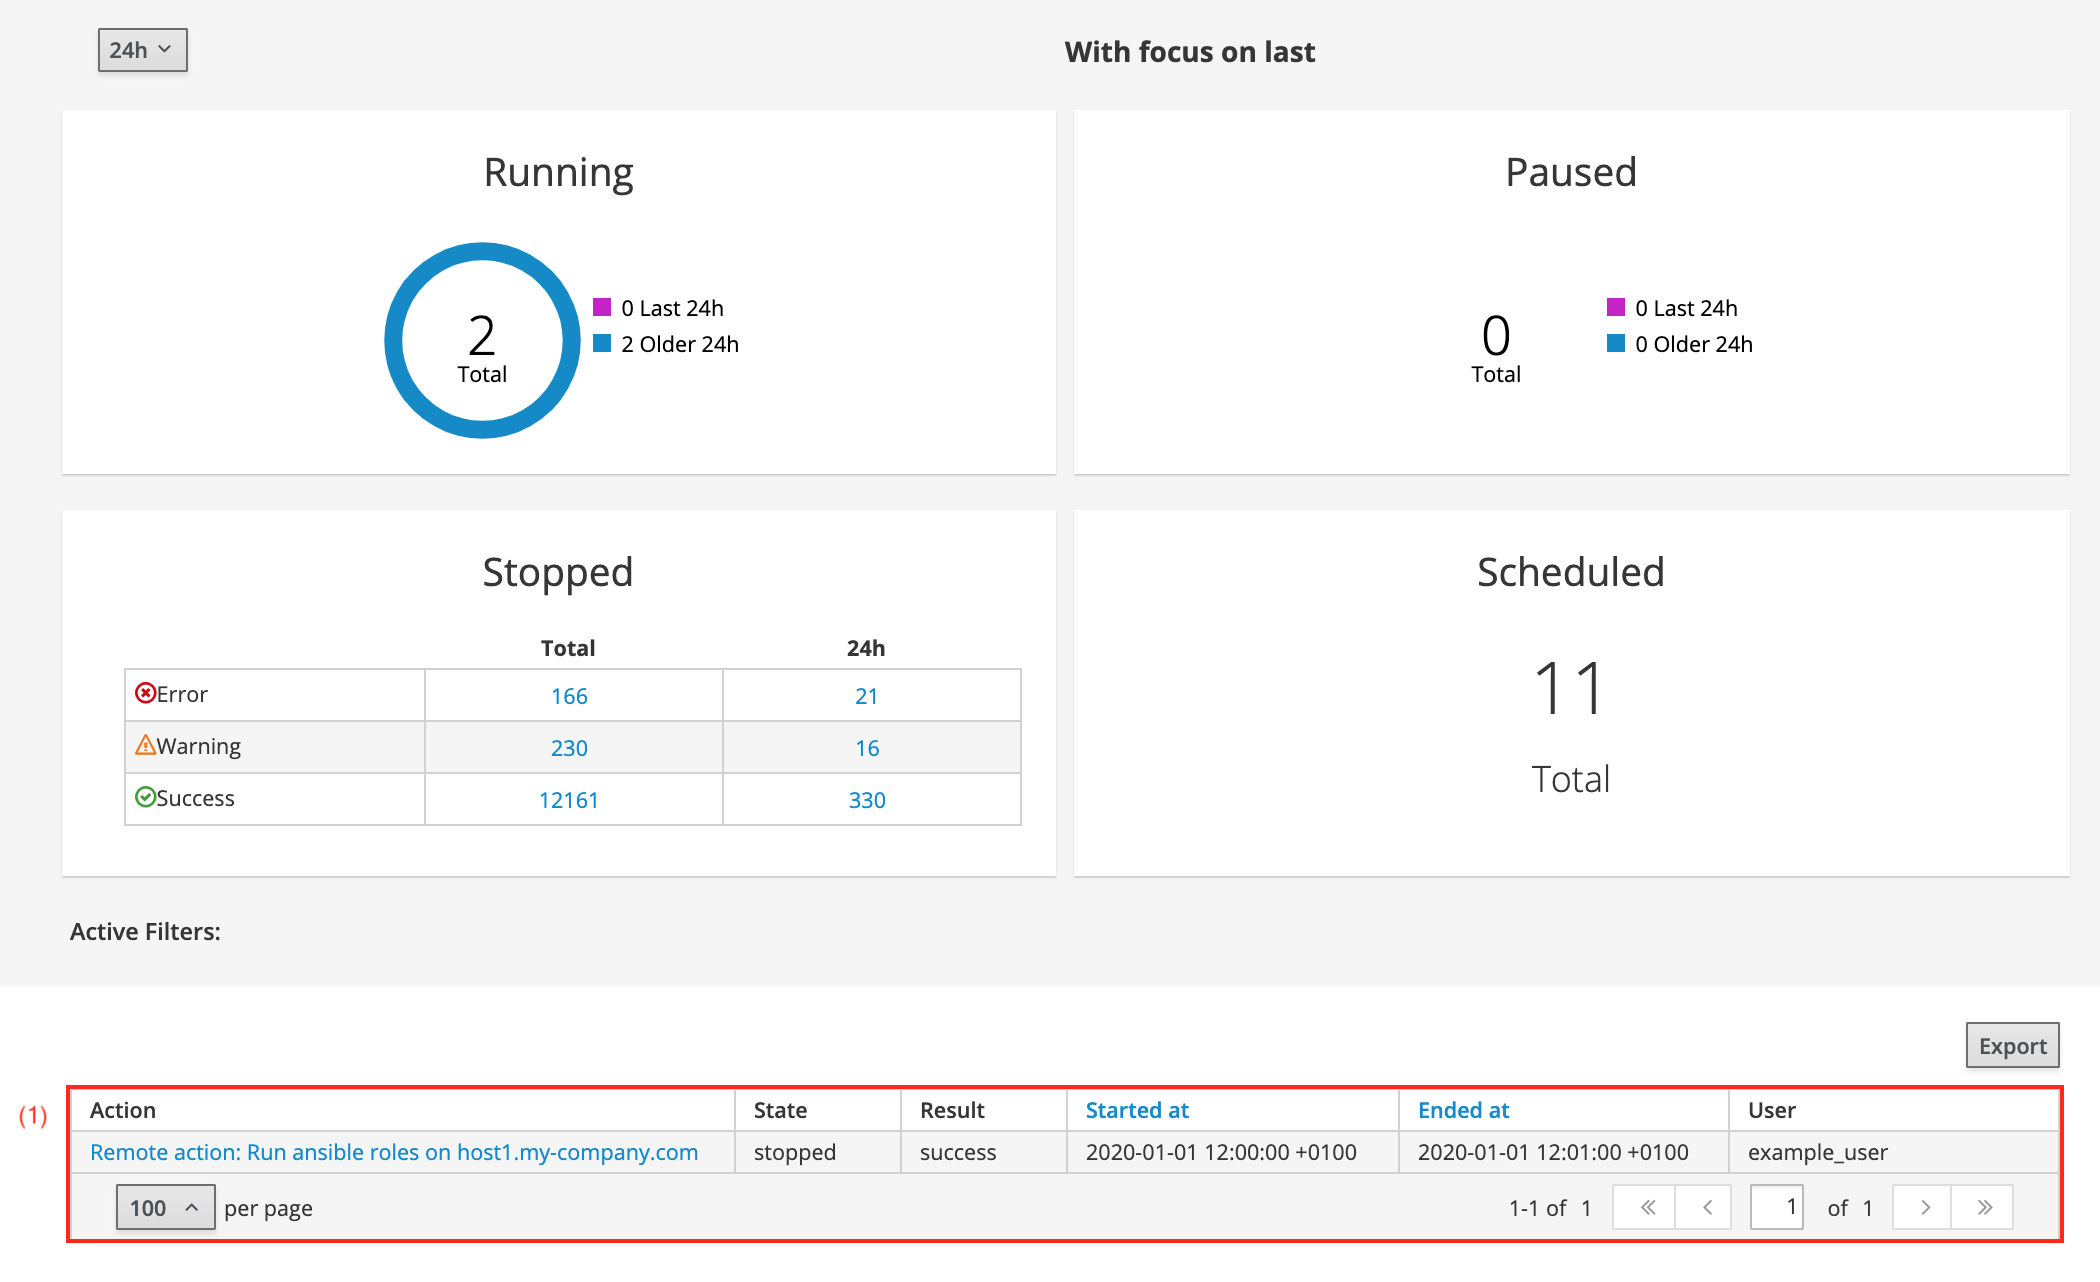
The bottom table (1) lists the run Ansible role as well as its state and result. Clicking the task in the screenshot above will present you with the following output:
PLAY [all] *********************************************************************

TASK [Gathering Facts] *********************************************************

ok: [host1.example.com]

TASK [nginx_sysinfo : Add epel-repository for CentOS] **************************

changed: [host1.example.com]

TASK [nginx_sysinfo : Install required packages] *******************************

changed: [host1.example.com]

TASK [nginx_sysinfo : Start nginx service and make it persistent] **************

changed: [host1.example.com]

TASK [nginx_sysinfo : Set www root for nginx] **********************************
ok: [host1.example.com]

TASK [nginx_sysinfo : create default page] *************************************

changed: [host1.example.com]

TASK [nginx_sysinfo : copy css] ************************************************

changed: [host1.example.com]

RUNNING HANDLER [nginx_sysinfo : restart nginx] ********************************

changed: [host1.example.com]

PLAY RECAP *********************************************************************
host1.example.com : ok=8   changed=6    unreachable=0    failed=0    skipped=0    rescued=0    ignored=0

Exit status: 0
-
Other Resources
-
The official Ansible documentation is a good resource for all things Ansible.
-
Ansible is available from EPEL and releases.ansible.com. Note that both links refer to the EL version 7 repositories for x86_64 machines.
-
Refer to the Ansible roles page for more information.