VMware
VMware (sometimes referred to as VMware vSphere) is a virtualization platform that enables creating virtual machines and managing their infrastructure. It is also called a cloud operating system or virtualised data centre platform. These features provide IT departments to transport flexible and reliable services.
Installing the VMware Compute Resource Plugin
Install the VMware plugin to manage hosts on and deploy to VMware:
# foreman-installer --enable-foreman-compute-vmwareNavigate to Administer > About and select the compute resources tab to verify the installation of the VMware compute resource plugin.
VMware Permissions
The table below shows the minimum permissions for the orcharhino role in VMware. It is recommended you add this role only on the necessary VMware vCenter objects. A new role is created and assigned to appropriate users with the permissions below for communicating with the VMware vSphere server.
| Object | Privileges |
|---|---|
Datastore |
Allocate space, browse datastore, update virtual machine files, low level file operations |
Global |
Log event |
Network |
Assign network |
Resource |
Assign virtual machine to resource pool |
Virtual Machine - Provisioning |
All |
Virtual Machine - Inventory |
All |
Virtual Machine - Interaction |
All |
Virtual Machine - Configuration |
All |
Virtual Machine - Snapshot Management |
All |
|
If your orcharhino uses boot disk based deployment, it is necessary to add the orcharhino role directly to your vCenter object. |
Viewing a VMware Compute Resource
The compute resource tab can be accessed via the list of compute resources:
Infrastructure > Compute resources >> list of compute resources > name of a compute resource
-
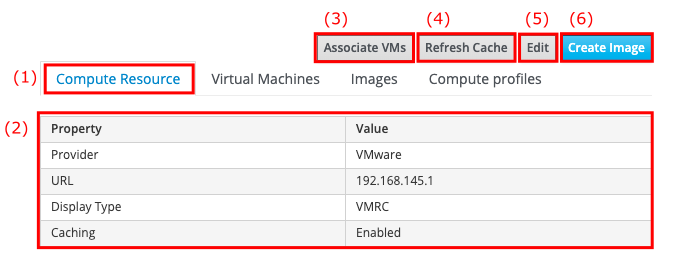
The Compute Resource tab (1) shows basic information about the compute resource in question.
-
You can view general details of the selected compute resource in a table (5).
-
The Associate VMs button (3) will reassociate any hosts that currently are in a disassociated state. This mostly happens when hosts are manually disassociated via the all hosts page.
-
The Refresh Cache button (4) will update the list of virtual machines (in the Virtual Machines tab) in case any new virtual machines were created or deleted directly within VMware since the cache was last refreshed.
-
The Edit button (5) will take you to the edit compute resource page for the compute resource being viewed.
-
The Create Image button (6) will take you to the create image page.
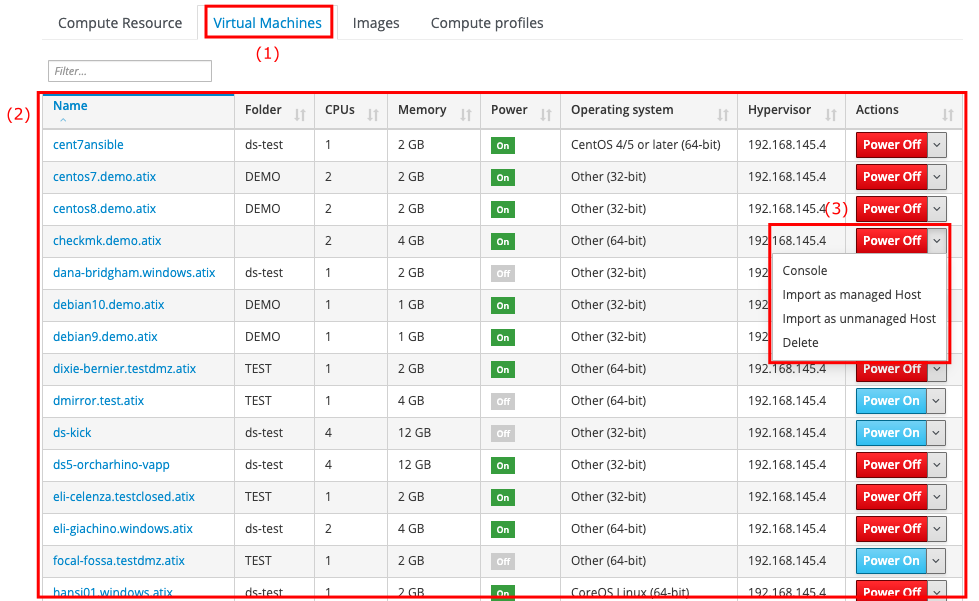
The Virtual Machines tab of the compute resource overview page for a VMware compute resource looks as follows:
-
Selecting the Virtual Machines tab (1) displays all virtual machines running on the selected VMware compute resource provider, irrespective of whether they are associated with an orcharhino host or not.
-
The Name column (2) will list all machines with additional information such as CPUs, memory, and whether they are currently powered on or not.
-
Selecting Power On or Power Off in the Actions column (3) will change the power state of the virtual machine in question.
-
Selecting Console (only available if the virtual machine is currently turned on) will open an SSH connection to the virtual machine in question.
-
Selecting Import (only available if the virtual machine is not associated with any orcharhino host) will take you to the import virtual machine page.
-
Selecting Delete will delete the virtual machine from the VMware compute resource while retaining any associated orcharhino hosts. If you want to delete the orphaned host, navigate to Hosts > All Hosts and delete the host manually.
-
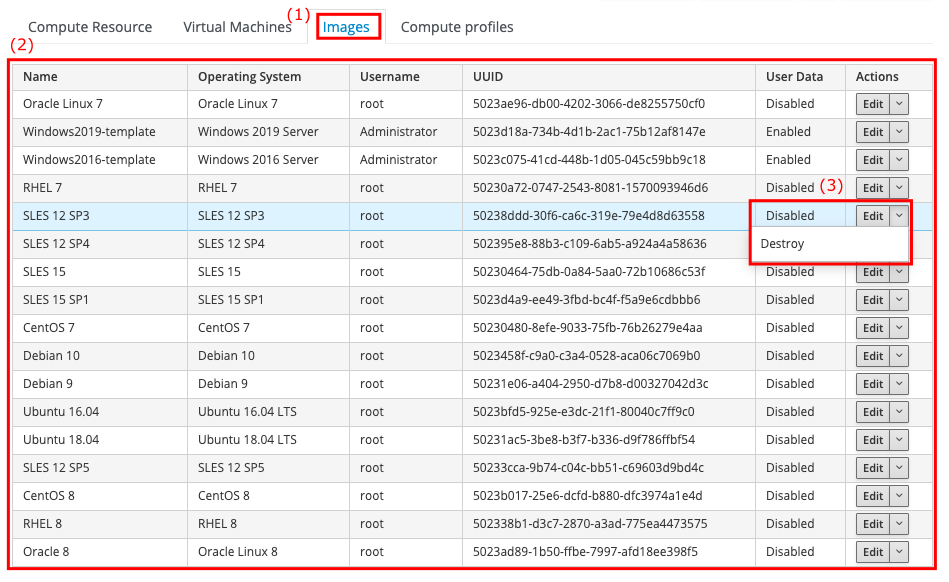
The Images tab of the compute resource overview page for a VMware compute resource looks as follows:
-
Navigating to the Images tab (1) will take you to the list of VMware images.
-
The list of images contains the Name (2) and operating system amongst other information.
-
The Action menu (3) lets you edit and destroy images from orcharhino, but not the underlying hypervisor.
The Compute Profiles tab of the compute resource overview page for a VMware compute resource looks as follows:

-
Selecting the Compute profiles tab (1) displays a list of compute profiles available on VMware.
-
The list of Compute Profiles (2) lists the name and attributes such as number of CPUs and assigned memory.
Viewing a VMware Virtual Machine
The virtual machine overview page can be accessed via the Virtual Machines tab on the compute resource overview page running the virtual machine:
Infrastructure > Compute resources >> list of compute resources > name of a compute resource > Virtual Machines tab > name of a virtual machine
The virtual machine overview page displays information about the relevant virtual machine and includes a number of buttons to perform actions relating to it:

-
The list of Properties (1) displays various properties of the VMware virtual machine.
-
The Power Off button (2), or, for that matter, Power On button, will change the power state of the virtual machine in question.
-
The Delete button (3) will delete the virtual machine from the VMware compute resource while retaining any associated orcharhino hosts. If you want to delete the orphaned host, navigate to Hosts > All Hosts and delete the host manually.
-
The Console button (4) is only available if the virtual machine is currently turned on. It will open an SSH connection to the virtual machine in question.
-
The Host button (5) will take you to the host overview page.
Creating a VMware Compute Resource
The create compute resource page can be accessed via the Create Compute Resource button:
Infrastructure > Compute resources >> Create Compute Resource
|
Clicking the Create Compute Resource button does not actually create a new compute resource, rather it serves to attach a preexisting compute resource to the list of known compute resources to orcharhino. |
-
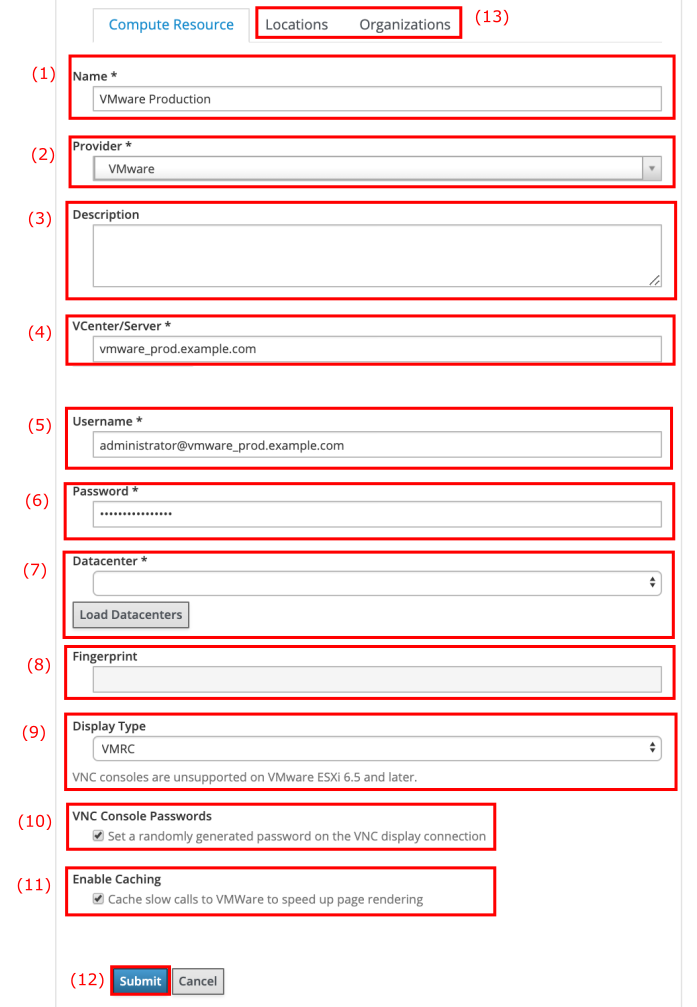
Choose a meaningful Name (1), for example
vmware.example.com. -
Selecting VMware from the Provider drop down menu (2) displays VMware specific additional provider fields.
-
You may also add an arbitrary Description (3) to your compute resource.
-
Enter the FQDN in the vCenter/Server field (4).
-
A Username (5) is required to connect to the VMware vCenter. This user needs access to the VMware vCenter resources.
-
The corresponding Password (6) is also necessary to connect to the VMware vCenter.
-
The Datacenter drop down menu (7) lists all available data centres available to your VMware vCenter.
-
Once connected to the VMware vCenter, its Fingerprint (8) will show. This is helpful to validate the integrity of the connection to the VMware vCenter.
-
The Display Type drop down menu (9) lets you select the type of graphical connection from the orcharhino management UI to the VMware host.
-
The VNC Console Passwords checkout box (10) lets you set a random password to encrypt the VNC connection.
-
The Enable Caching checkbox (11) allows you to enable caching of slow VMware sites. This speeds up rendering time.
-
Click the Submit button (12) to save your new compute resource provider information to orcharhino.
-
The Locations and Organization tabs (13) allow you to set a context for the new compute resource.
Creating a VMware Compute Resource via CLI
CLI users may use the hammer compute-resource create command to create a compute resource.
VMware is selected as --provider and the instance UUID of the data center is set as --uuid.
# hammer compute-resource create \
    --name "${name}" \
    --provider "Vmware" \
    --description "${description}" \
    --server "${server}" \
    --user "${username}" \
    --password "${password}" \
    --locations "${location}" \
    --organizations "${organization}" \
    --uuid "${uuid}"
Editing a VMware Compute Resource
The edit compute resource page can be accessed via the list of compute resources:
Infrastructure > Compute Resources >> list of compute resources > Actions column > Edit
This page is essentially the same as the create compute resource page with all fields being prefilled with the settings of the compute resource being edited.
Importing a VMware Virtual Machine
The import virtual machine page can be accessed via the Virtual Machines tab on the compute resource overview page running the virtual machine:
Infrastructure > Compute resources >> list of compute resources > name of a compute resource > Virtual Machines tab > Actions column > Import
|
This does not actually move the virtual machine. It solely associates the machine with orcharhino, that is only meta data is actually being imported. |
The import virtual machine page looks as follows:
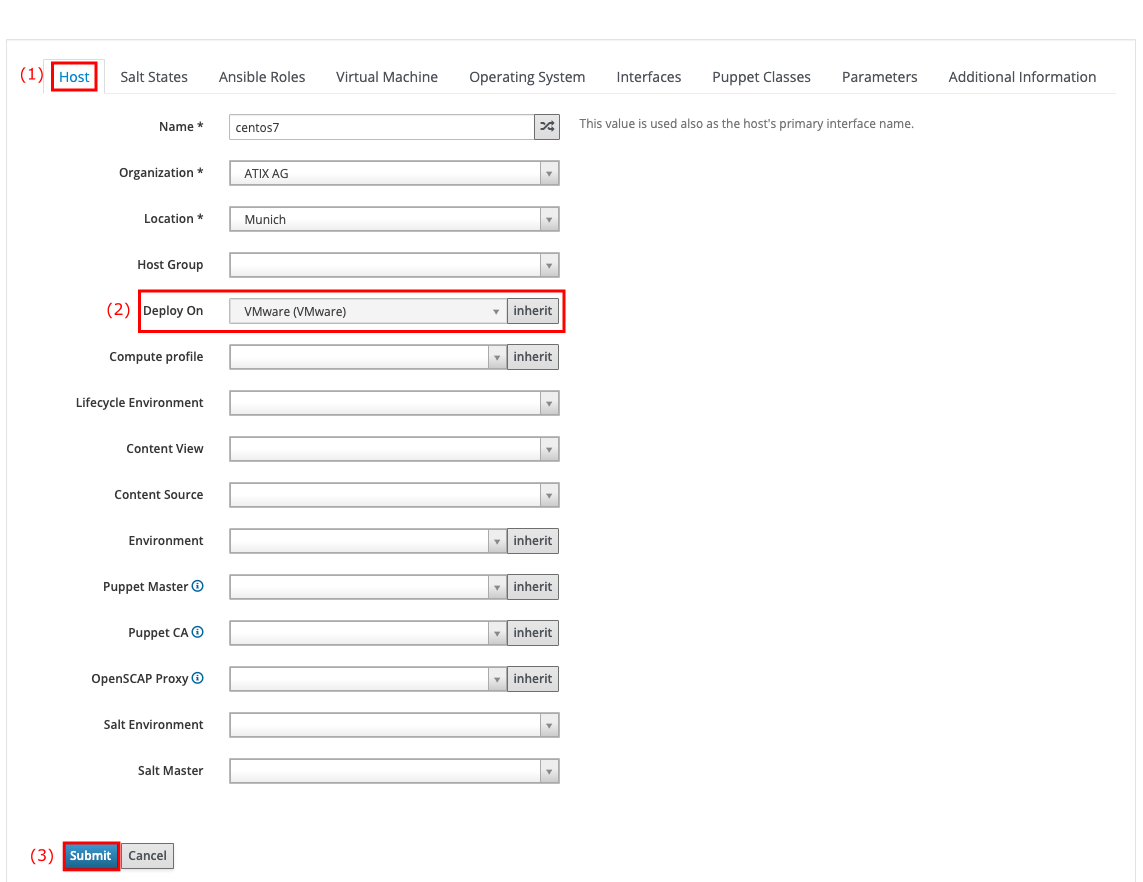
-
Selecting the Host tab (1) displays the same information as if you were to create a host.
-
Only the Deploy to field (2) is prefilled with the VMware resource provider you are importing the VMware virtual machine on.
-
Remember to click Submit (2) to save your changes.
This will create an orcharhino host using the settings provided and take you to the host overview page for that host. If the settings provided do not match those actually present on the virtual machine being imported, you may want to click the Build button to trigger a rebuild of the host on the next boot.
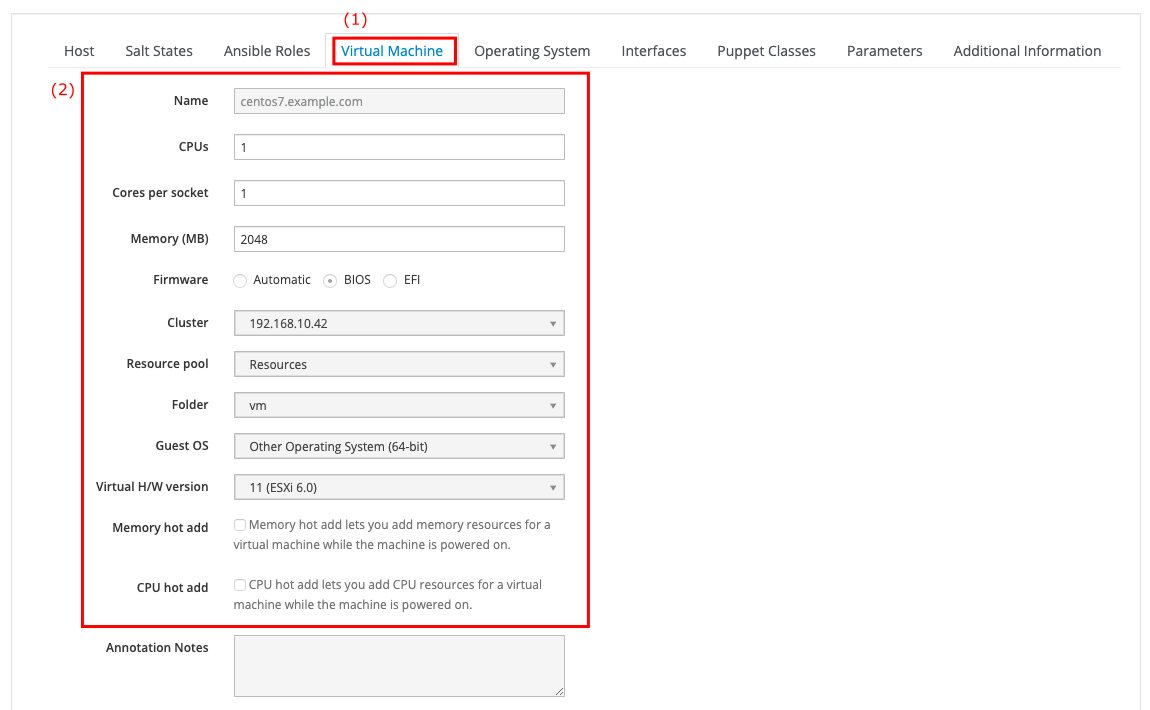
-
Select the Virtual Machine tab (1) to view details of the virtual machine you want to import.
-
The list of virtual machine options (2) lets you adjust various settings such as CPUs and Memory. Other options are prefilled and cannot be changed.
Note that there are more fields than shown in the screenshots above.
An import virtual machine page is essentially identical to the create host page.
Creating a VMware network based host via CLI
Use the hammer host create command to create a host.
The --provision-method build is needed for network based provisioning.
The following code snippet shows the full hammer command:
# hammer host create \
    --name "${host_name}" \
    --organization "${organization}" \
    --location "${location}" \
    --hostgroup "${host_group}" \
    --compute-resource "${compute_resource}" \
    --provision-method build \
    --build true \
    --enabled true \
    --managed true \
    --interface "managed=true,primary=true,provision=true,compute_type=${compute_type},compute_network=${compute_network}" \
    --compute-attributes="cpus=${cpus},corespersocket=${corespersocket},memory_mb=${memory},cluster=${cluster},path=${path},start=true" \
    --volume="size_gb=${size_gb},datastore=${datastore},name=${name},thin=true"
You can change --provision-method build to --provision-method image in order to use image based provisioning.
Creating a VMware Image
The create image page can be accessed via the compute resource overview page:
Infrastructure > Compute resources >> list of compute resources > name of a compute resource > Create Image button
|
What is referred to as an image within orcharhino is referred to as a template within VMware. This difference in terminology is necessary since the term template is already widely used with a definite meaning within orcharhino. The two terms may be used interchangeably within this section. |
The create image page looks as follows:
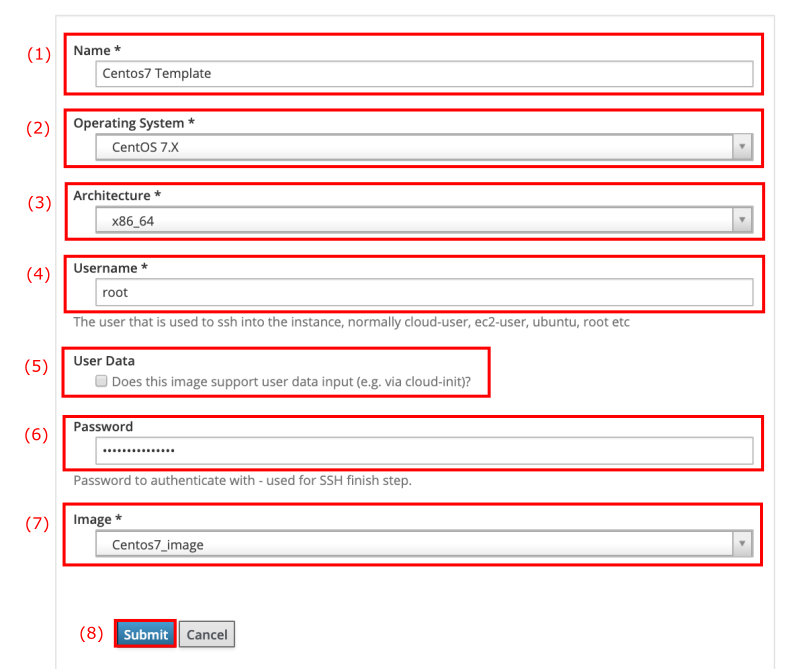
-
In the Name (1) field you can assign the new VMware image a meaningful and unique name, that is describing the kind of host that is to be provisioned from the image. We recommend adding the term template to clarify that the image references a template within orcharhino.
-
The Operating System drop down menu (2) lets you associate the image to an operating system present in orcharhino.
-
Associate the image to the correct Architecture (3).
-
The Username field (4) refers to the user needed to SSH into the machine. The default user name is
root. This is only necessary if the image has an inbuilt user account. -
With the User Data checkbox (5) you may enable support for user data input.
-
The Password (6) is necessary to authenticate the above mentioned user via SSH. This is only necessary if the image has an inbuilt user account.
-
Select the Image (7) from the drop down menu to tell orcharhino the relative path of the template on the VMware machine. This path can be found within the VMware vSphere client.
-
Click the Submit (8) button to save your changes.
Ensure the operating system and architecture fields match the operating system and architecture found in the template being imported.
Creating a VMware Image via CLI
The hammer compute-resource image create command is used for creating an image.
Store the relative template path on the vSphere environment using the --uuid option.
# hammer compute-resource image create \
    --name "${compute_resource_image_name}" \
    --operatingsystem "${operating_system}" \
    --architecture "${architecture}" \
    --username "${username}" \
    --uuid "${uuid}" \
    --compute-resource "${compute_resource_name}"
Editing a VMware Image
The edit image page can be accessed via the Images tab on the compute resource overview page:
Infrastructure > Compute resources >> list of compute resources > name of a compute resource > Images tab > Actions column > Edit

The edit image page is essentially the same as the creating an image subsection, with the difference that fields will be prefilled with the settings of the image being edited.
-
Remember to click Submit (8) to save your changes.
Editing a VMware Compute Profile
The edit compute profile page can be accessed via the list of compute profiles:
Infrastructure > Compute profiles >> list of compute profiles > name of a compute profile
This page displays a list of compute attribute sets (one for each compute resource known to orcharhino):
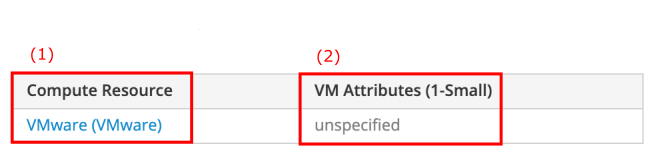
-
The Compute Resource column (1) lists all available compute resource providers.
-
The VM Attributes column (2) will read unspecified for a new compute profile.
-
Clicking on the name of a compute resource in the left column will open the edit compute attributes page for that compute resource.
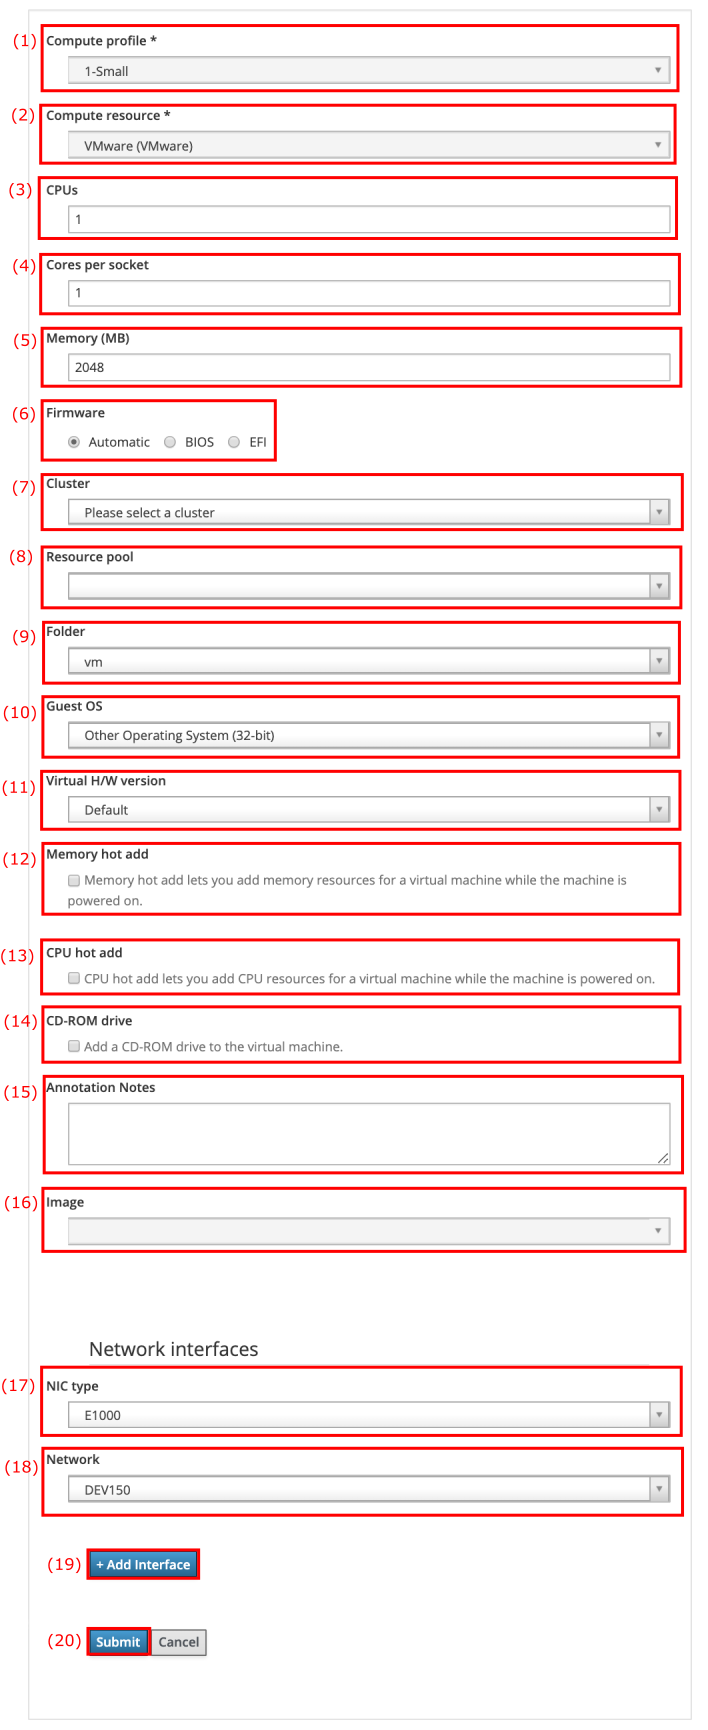
The following screenshot shows of the edit compute attributes page:
-
The Compute Profile drop down menu (1) shows the selected compute profile.
-
The Compute Resource drop down menu (2) displays the compute resource provider of the selected compute profile.
-
The CPUs field (3) lets you adjust the number of CPUs for the selected compute profile.
-
The Cores per socket field (4) allows for more fine tuning when dealing with multi socket systems.
-
The Memory (MB) field (5) lets you define the size of the system memory in MB.
-
The Firmware checkboxes (6) let you choose between two types of motherboard firmware: BIOS is the legacy option, whereas EFI is the more up to date version. Leaving it on automatic is mostly fine unless you know what you are doing.
-
The Cluster drop down menu (7) allows you to choose from different clusters of the VMware compute resource. For example, you can create two identical compute profiles but only change this option to have one running in a data center in Munich and one located in Berlin.
-
The Resource Pool drop down menu (8) allows you to select a VMware resource pool. VMware resource pools are a logical abstraction to manage available resources in VMware more efficiently.
-
The Folder drop down menu (9) lets you specify the path of the image on the VMware server.
-
The Guest OS drop down menu (10) lets you define an operating system in advance.
-
The Virtual H/W Version drop down menu (11) lets you select the software version of the VMware vSphere.
-
If checked, the Memory hot add checkbox (12) allows for adding system memory while the machine is powered on.
-
The CPU hot add checkbox (13) allows for assigning more CPU resources while the machine is running.
-
The CD-ROM drive checkbox (14) lets you add a CD-ROM drive.
-
The Annotation Notes field (15) lets you add an arbitrary description to the compute profile.
-
The Image drop down menu (16) allows you to select an image for image based provisioning.
-
The NIC type drop down menu (17) lets you choose a network interface card from all available ones to the VMware compute resource provider.
-
The Network drop down menu (18) lets you select the network new hosts with this compute profile will be in.
-
Click the Add Interface button (19) to add another network interface to the compute profile.
-
Click the Submit (20) button to save your changes.
Most fields will come prefilled with reasonable default values, even for new compute profiles.