Microsoft Windows
You can use orcharhino to provision, configure, and manage hosts running Microsoft Windows. orcharhino supports hosts running Microsoft Windows 10, Windows 11, Windows Server 2016, Windows Server 2019, Windows Server 2022, and Windows Server 2025.
Provisioning Hosts Running Microsoft Windows
You can use orcharhino to provision hosts running Microsoft Windows.
Prerequisites and Used Tools
You require the following tools and files to create an installation media for Windows:
-
Local machine running Microsoft Windows with PowerShell 5.1 or newer
-
Windows ISO
-
WIMan from github.com/UXabre/WIMan
-
VMware Drivers which can be extracted from the VMware Tools
-
Proxmox Drivers which you can download from fedorapeople.org.
-
Configured compute resource
-
Configured compute profile
Extracting VMware Drivers
-
Download the VMware tools.
-
Create a directory, for example
C:\Extract, where you want to extract the VMware tools into. -
Open a PowerShell.
-
Run
.\VMware-tools-My_VMware_Tools_Version.exe /P C:\Extractwith the last parameter being the directory you have extracted the VMware tools into. -
Follow the installation through the GUI and set the installation path to the second path. You find the required drivers in
C:\Extract\VMware\VMware Tools\VMware\Driversas defined in the second step.
Extracting Proxmox Drivers
-
Download the Proxmox VirtIO drivers.
-
Create a directory, for example
C:\Extract, where you want to extract the Proxmox drivers into. -
Open a PowerShell.
-
Run
msiexec /a "virtio-win-gt-x64.msi" TARGETDIR="C:\Extract"with the last parameter being the directory you have extracted the Proxmox drivers into.Running the
.msifile usingmsiexec /aonly extracts the Proxmox drivers for the version of Windows of your host. For example, if you run the.msifile on Windows Server 2025, it will only extract Proxmox drivers for Windows Server 2025 and not for earlier versions such as 2022, 2019, or 2016. If you require Proxmox drivers for other operating systems than the version of Windows of your host, you must download the complete ISO image containing the VirtIO drivers and manually copy the required folders. -
Follow the installation through the GUI and set the installation path to the second path. You find the required drivers in
C:\Extract\Virtio-Winas defined in the second step.
Creating a Windows Image
-
Clone the
https://github.com/UXabre/WIMan.gitrepository to your Windows host. -
Navigate to the local git repository and create a folder under
sources\amd64\for each operating system. There is already a directory for Windows Server 2016. -
Copy the
.isofile of the operating system to the corresponding folder. -
Create a directory called
driversunderwinpeand copy the VMware drivers into it. -
Open a PowerShell with administrator privileges and navigate to the local git repository.
-
Create Windows image using the following command:
.\GenerateWIM.ps1
TFTP Extension
orcharhino requires ipxe.lkrn to be present in the TFTP directory to boot hosts running Microsoft Windows.
-
Install the
ipxe-bootimgspackage on your orcharhino Proxy:$ dnf install ipxe-bootimgs -
Copy iPXE firmware to the TFTP directory:
$ cp /usr/share/ipxe/ipxe.lkrn /var/lib/tftpboot/
Uploading ISO File
To create an installation media, you must first upload the .iso file to your orcharhino Server and then create an installation media entry.
-
Copy the directory
{local git repository}\finalized\amd64\{version}to your orcharhino Server to/var/www/html/pub/installation_media/windows/{version}. -
Copy the directory
{local git repository}\winpe\driversto your orcharhino Server to/var/www/html/pub/installation_media/windows/{version}.You can freely choose the directory structure after
/var/www/html/pub/.
You can now reach the files over HTTP, for example http://orcharhino.example.com/pub/installation_media/windows/2016/.
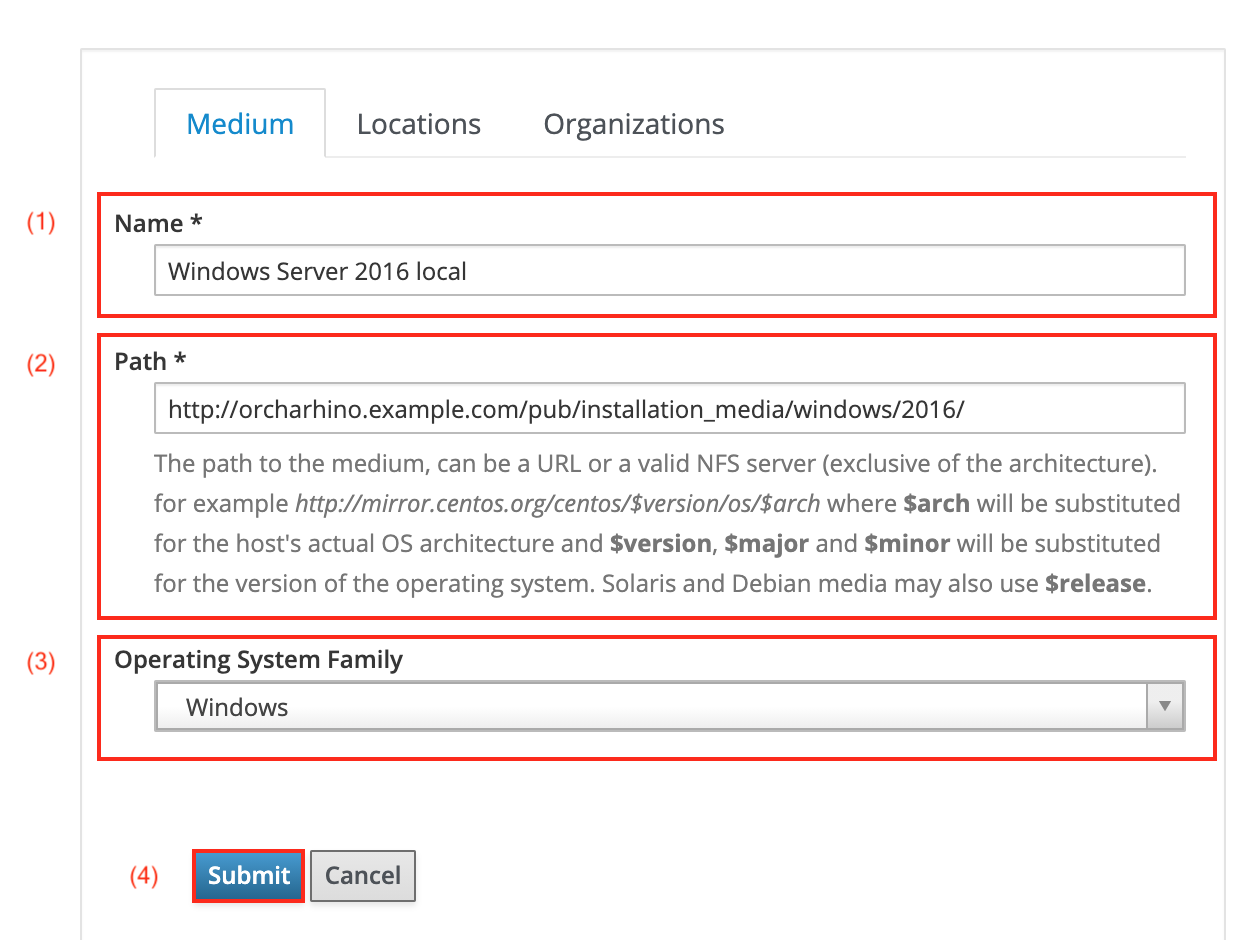
Creating an Installation Medium Entry
-
In the orcharhino management UI, navigate to Hosts > Installation Media.
-
Click Create Medium.
-
Enter a Name.
-
Enter the Path to the installation media on your orcharhino Server.
The path must start with
http. Provisioning over HTTPS is not supported.
-
-
Select
Windowsfrom the Operating System Family drop down menu. -
Optional: Select an organization and location context.
-
Click Submit to save your input to orcharhino.
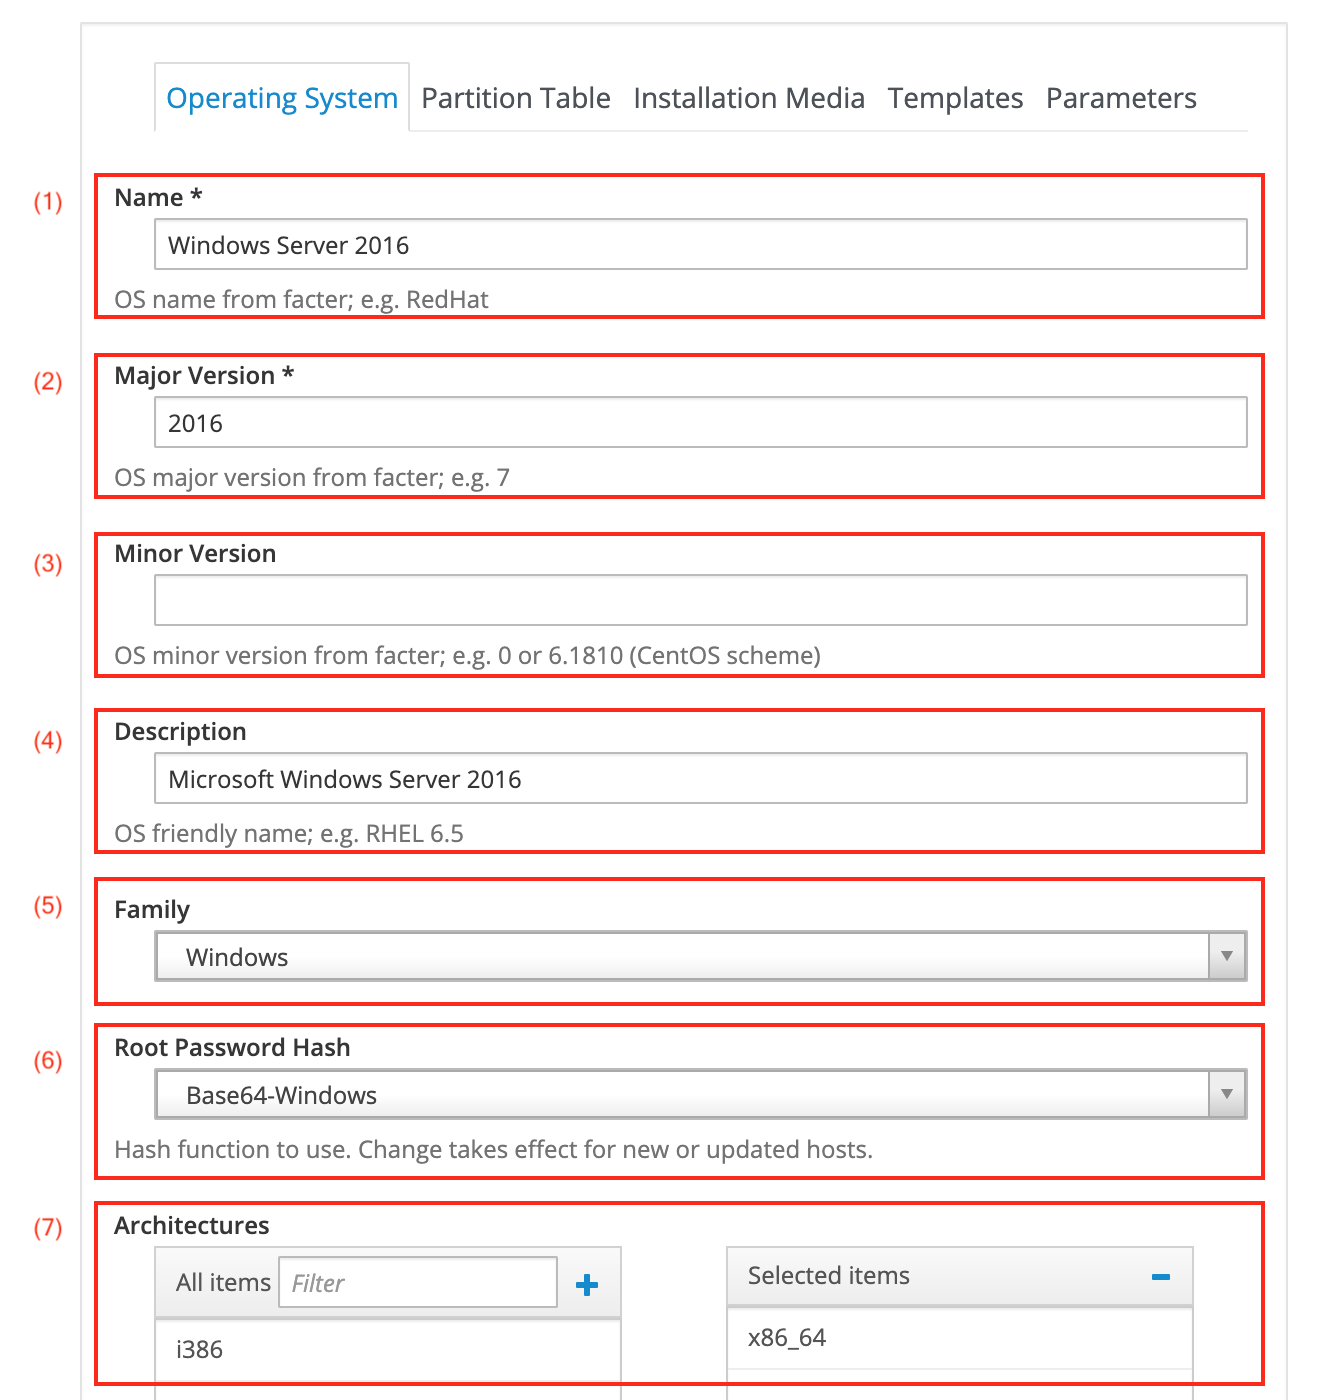
Creating an Operating System Entry
-
In the orcharhino management UI, navigate to Hosts > Operating Systems.
-
Click Create Operating System.
-
Enter a Name.
-
Enter the Major Version for your Windows host. This example uses Windows Server 2016, which makes the major version
2016. -
Leave the Minor Version field empty.
-
Optional: Add a Description.
-
Select the Family of the operating system, that is Windows.
-
Select the Root Password Hash, that is Base64-Windows.
-
Select the Architectures.
-
-
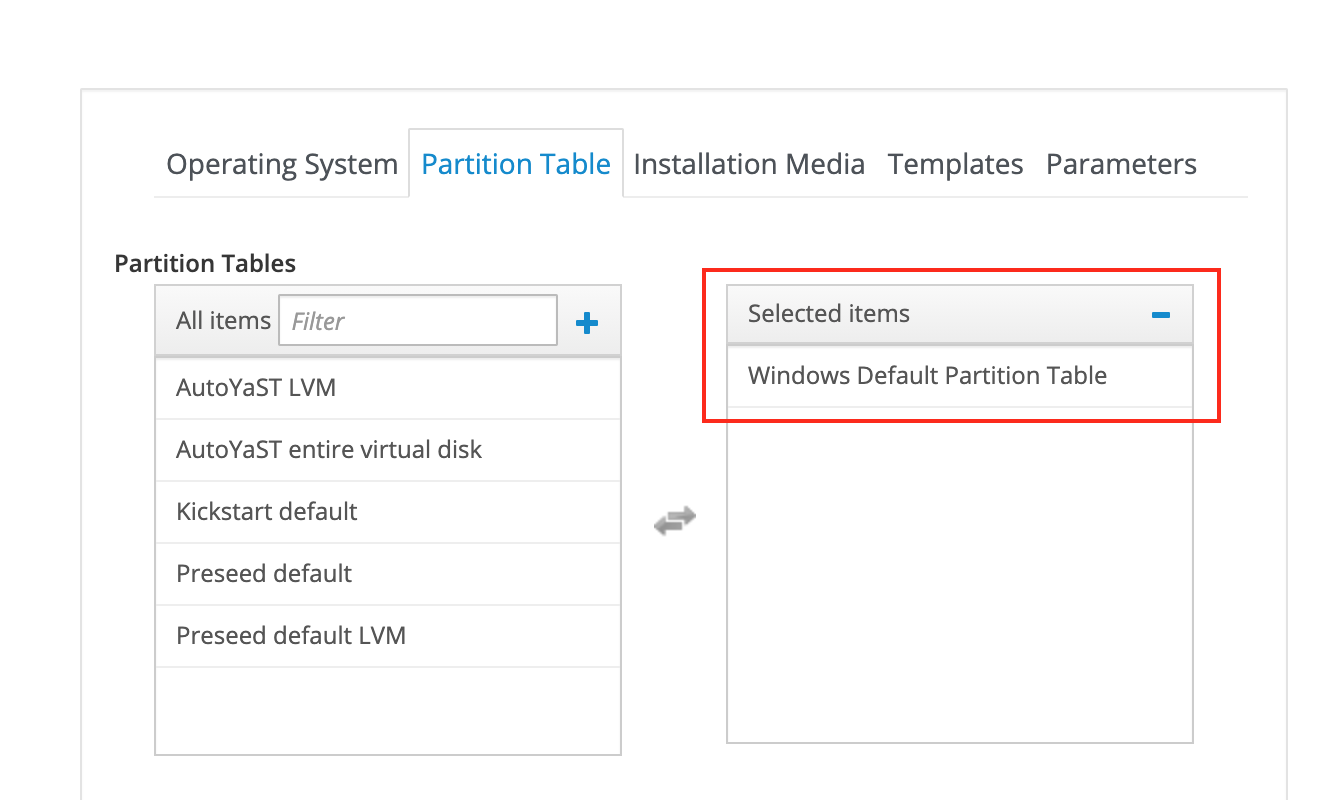
Associate the partition table on the Partition Table tab:
-
Select the Windows Default Partition Table.
If the partition table does not appear in the list, ensure it is associated to the proper organization and location context.
-
-
Add the previously created installation media entry for
Windows Server 2016 localin the Installation Media tab: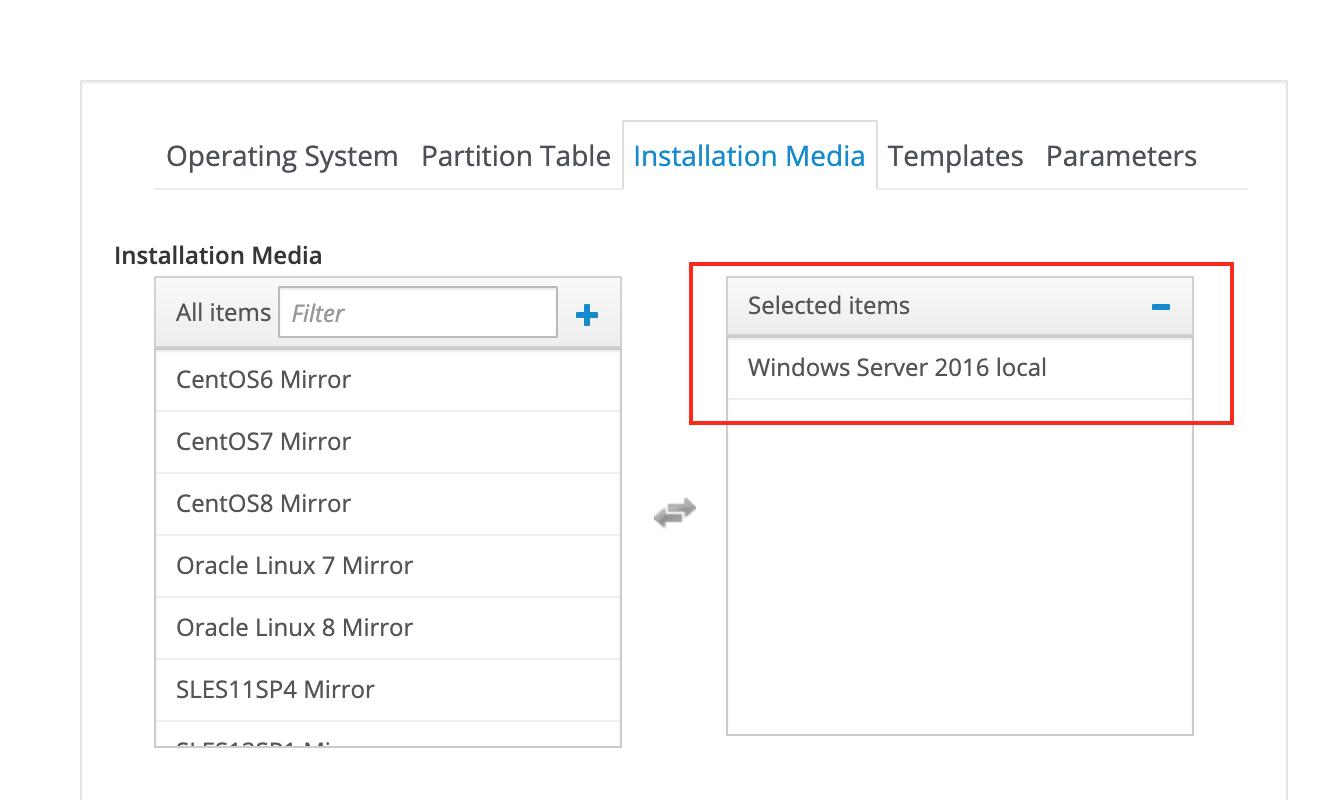
-
Select the Windows Server 2016 local installation media.
-
-
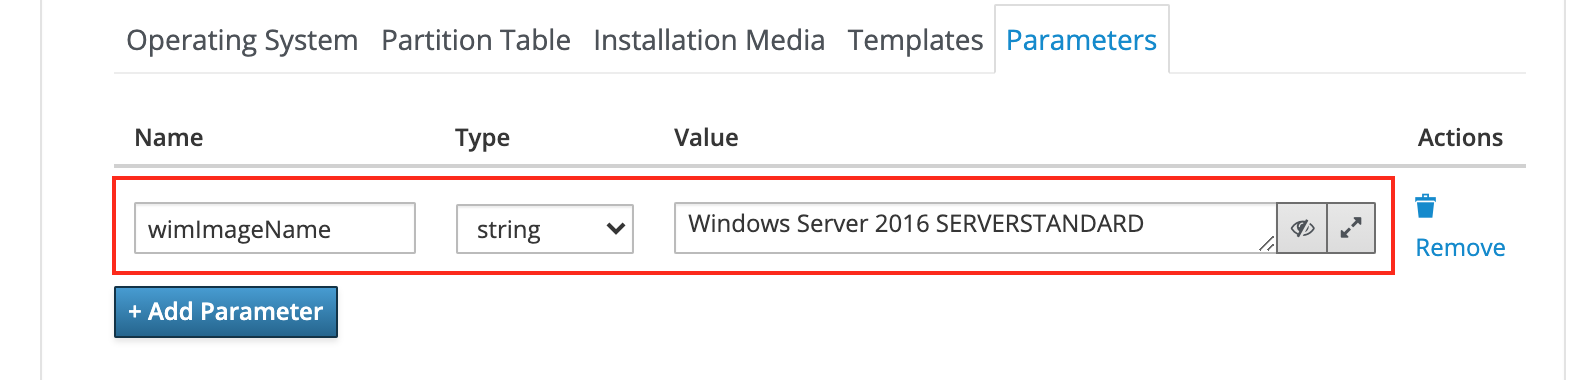
Create the following parameters on the Parameters tab:
-
Add the
wimImageNameparameter of typestringand valueWindows Server 2016 SERVERSTANDARD.You can find the proper
ImageNamefor each operating system in theimages.inifile. The file is located at{local git repository}\finalized\amd64\2016\sources\.
-
-
Click Submit to save the operating system entry to orcharhino.
Creating an Architecture Entry
Create an architecture with the name x86_64 if it is not already present.
-
In the orcharhino management UI, navigate to Hosts > Architectures.
-
Click Create Architecture.
-
Enter the name
x86_64. -
Associate it to the previously created operating system entry.
Associating Provisioning Templates
Associate the provisioning templates to the newly created operating system entry for Windows.
-
In the orcharhino management UI, navigate to Hosts > Provisioning Templates.
-
Repeat the following procedure for each template:
-
Select the
Windows default finishtemplate and navigate to the Association tab. -
Select the newly created operating system entry for Windows and associate it with the provisioning template.
If a template does not appear in the list of provisioning template, ensure it is associated to the proper organization and location context.
-
Creating a Host Group
-
In the orcharhino management UI, navigate to Configure > Host Groups.
-
Click Create Host Group.
-
Enter a name and set the deploy on and compute profile options.

-
Select the Architecture.
-
Select the previously created Operating System.
-
Choose All Media from the Media Selection menu.
-
Select the previously created Media.
-
Select the
Windows Default Partition TablePartition Table. -
In the PXE loader drop down menu, select the
PXELinux BIOSitem. -
Optional: Set a Root Password. If empty, each host must receive a root password ahead of provisioning.
-
Click Submit to create a host group. Settings on other tabs are optional.
-
Provisioning Windows Hosts
-
In the orcharhino management UI, navigate to Hosts > Create Hosts.
-
Click Create Host.
-
Select the previously created host group for Windows
-
Adjust other settings as necessary.
-
Click Submit.
You can now provision virtual machines running Microsoft Windows both boot disk based as well as network based. You can use static IP addresses when provisioning hosts using boot disk.
Additionally, you can provision image based hosts on VMware for which you need to create an image using the VMware tools and the Windows user data template.
Provisioning Windows Hosts network-based with UEFI
You can use orcharhino to provision Windows hosts with UEFI.
-
Provisioning Windows hosts with UEFI is limited to network-based provisioning. You cannot use bootdisk-based provisioning workflows.
-
The provisioning process requires orcharhino Proxy to act as DHCP server.
-
You cannot provision Windows hosts with Secure Boot.
-
You cannot use an HTTP proxy on your orcharhino Server.
Create the iPXE boot file for each orcharhino Proxy that you use to provision Windows hosts with UEFI.
-
Create a custom
ipxe.efifile on your orcharhino Server:$ /opt/orcharhino/automation/play_setup_win_efi_deployment.shFor orcharhino Proxy Servers only: Set
SKIP_MOVING_IPXE_TO_TFTPtotrueto place the builtipxe.efifile to/tmp/to copy it to your orcharhino Proxy Server. -
For orcharhino Proxy Servers only:
-
Copy your custom
ipxe.efifile from your orcharhino Server to your orcharhino Proxy Server:$ scp root@orcharhino.example.com:/tmp/ipxe.efi root@orcharhino-proxy.network2.example.com:/var/lib/tftpboot/ -
Restore the SELinux context of your custom
ipxe.efifile on your orcharhino Proxy Server:$ restorecon -RvF /var/lib/tftpboot
-
-
In the orcharhino management UI, navigate to Hosts > Create Hosts.
-
Click Create Host.
-
Select the previously created host group for Windows
-
On the Operating System tab, select
iPXE Chain UEFIas PXE loader. -
Adjust other settings as necessary.
-
Click Submit to provision your host.
-
Windows UEFI Deployments (network-based) in the ATIX Service Portal
Optional Host Parameters
You can optionally set the following parameters when provisioning hosts:
| Variable | Default Value | Note |
|---|---|---|
ansible_become |
boolean set to false |
|
ansible_become_method |
string set to |
|
ansible_connection |
string set to |
|
ansible_port |
Ports to access hosts through Ansible ( |
|
ansible_ssh_pass |
Password to access hosts through Ansible |
|
ansible_user |
User account to access hosts through Ansible; defaults to |
|
ansible_winrm_enable_http |
If you use ansible_port |
|
ansible_winrm_enable_unencrypted |
If you use ansible_port |
|
ansible_winrm_server_cert_validation |
Set this to ignore if you use Ansible with self-signed certificates. |
|
ansible_winrm_transport |
You can use the following auth_methods to connect to the host using Ansible: basic, ntlm, kerberos, and credssp. |
|
computerDomain |
Domain if domain join is required |
|
computerOU |
Organization Unit if domain join is executed; defaults to the default OU of the connected AD if empty; must use |
|
create_ansible_user |
Create the |
|
domainAdminAccount |
Administrator user account for joining a domain; must use pre-Windows 2000 login ( |
|
domainAdminAccountPasswd |
Administrator account password for joining a domain; non alphanumeric characters are known to cause issues |
|
EnableFirewall |
Enable the firewall? |
|
foremanDebug |
false |
Save log files on the host after provisioning |
hide_server_manager |
Show server manager when logging in to Windows Server? |
|
http-proxy |
Global HTTP proxy if required |
|
http-proxy-port |
global HTTP proxy port; is required if HTTP proxy is set |
|
inputLocale |
de-DE |
Keyboard layout after booting the host; popular alternatives are |
localAdminAccountDisabled |
false |
Disabling the default local administrator account? |
machinePassword |
Password for unsafe domain join |
|
network_location |
private |
Network profile association; required if there is no domain join, else there are issues with |
noupdates |
New hosts will try to patch during the installation. If you do not want to patch hosts, set this parameter to false. |
|
ntpServer |
NTP server; required if the host cannot access the internet or the DNS or DHCP server does not provide NTP |
|
ping |
Create a firewall rule to allow ICMP? |
|
remote_desktop |
Create a firewall rule to allow remote_desktop? |
|
systemLocale |
en-US |
Language of the host |
systemTimeZone |
GMT Standard Time |
Time zone of the host |
systemUILanguage |
en-US |
System UI language |
win_puppet_source |
Path to the Puppet |
|
windowsLicenseKey |
Windows license key |
|
windowsLicenseOwner |
Windows license key owner |
Configuring Hosts Running Microsoft Windows
You can use orcharhino to configure hosts running Microsoft Windows using Ansible, Puppet, or Salt.
Configuring Windows Hosts Using Ansible
You can use Ansible to configure managed hosts running Microsoft Windows.
-
Ensure that the Ansible plug-in in installed on your orcharhino Server. For more information, see Enabling Ansible Integration with orcharhino in Ansible.
-
Enable the Windows Remote Management (WinRM) service on your Windows host. In PowerShell, run the following command:
Enable-PSRemoting -Force -
Configure the Windows Firewall to allow WinRM access. In PowerShell, run the following command:
netsh advfirewall firewall set rule name="Windows Remote Management (HTTP-In)" new enable=yes -
Set the following security settings for WinRM on your Windows host. In PowerShell, run the following command:
winrm set winrm/config/service '@{AllowUnencrypted="true"}' winrm set winrm/config/client/auth '@{Basic="true"}' winrm set winrm/config/service/auth '@{Basic="true"}' -
Create an Ansible user to connect to your Windows host. In PowerShell, run the following command:
New-LocalUser -Name "ansibleuser" -PasswordNeverExpires 1 -
In the orcharhino management UI, navigate to Hosts > All Hosts.
-
Select your Windows host and click Edit.
-
On the Parameters tab, add the following parameters:
-
ansible_connection–winrm -
ansible_port–5985or5986 -
ansible_ssh_pass– the password of the Ansible user -
ansible_user– the username of the Ansible user -
ansible_winrm_transport–ntlm
-
Configuring Windows Hosts Using Puppet
You can use Puppet to configure managed hosts running Microsoft Windows.
-
Download the latest Puppet Agent from downloads.puppetlabs.com
-
Follow the installer instructions to install the Puppet Agent on your Windows host.
Configuring Windows Hosts Using Salt
You can use Salt to configure managed hosts running Microsoft Windows.
-
Download the Salt Minion. For more information, see docs.saltproject.io.
-
Follow the installer instructions to install the Salt Minion on your Windows host. Provide the following information during the installation process:
-
Master IP or Hostname: orcharhino.example.com
-
Minion Name: The FQDN of your Windows host
-
-
Configure the Salt Minion in
C:\ProgramData\Salt Project\Salt\conf\minion.d\schedule.conf:schedule: highstate: function: state.highstate minutes: 60This configures the Salt minion to run a highstate every 60 minutes.
Managing Hosts Running Microsoft Windows
Registering Windows Hosts
Use this procedure to register hosts running Microsoft Windows to orcharhino.
-
In the orcharhino management UI, navigate to Infrastructure > Compute Resources.
-
Select the compute resource that your Windows host runs on.
-
On the Virtual Machines tab, locate your VM.
-
In the Actions menu, click Import as Managed Host.
-
Select your organization context, location context, and host group.
-
Ensure that the network interface to which the virtual machine is connected is configured in orcharhino. If not, select a network interface that differs from the one already configured in the virtual machine’s operating system. Note that this may result in a change of IP address and other network settings.
-
-
Click Submit to register your Windows host.
Updating Windows Hosts
Use this procedure to update managed hosts running Microsoft Windows.
orcharhino contains a job template Manage Windows Updates – Ansible Default to update Windows hosts using Ansible.
You can configure it using various parameters to control the update process.
-
blacklist: Exclude a list of update titles or KB numbers from installation. -
category_names: Categories of updates to be installed (defaults include Critical Updates, Security Updates, and Update Rollups). -
log_path: Path to a file for logging the update process. -
reboot_timeout: The time to wait for the host to recover after a reboot. -
reboot: Indicates whether to reboot the remote host if necessary. -
server_selection: Selection of the Windows Update source catalog. -
state: Controls the update process (download, install, list of updates). -
use_scheduled_task: Use scheduled tasks for privilege elevation. -
whitelist: Include a list of update titles or KB numbers for installation.
-
In the orcharhino management UI, navigate to Monitor > Jobs.
-
Click Run Job.
-
Select
Ansible Playbookas Job category andManage Windows Updates – Ansible Defaultas Job template. For more information, see the list of input parameters above and Executing a remote job by using orcharhino management UI in Ansible.