Deploying an Internal Application
This guide explains how to manage packages that are not part of the base operating system repositories and how to deploy an internally packaged application.
orcharhino manages arbitrary .deb and .rpm packages the same way it handles any upstream repositories.
This example deploys Prosody, an open source XMPP server, to a host running Ubuntu 20.04.
|
For a better understanding of provisioning hosts using orcharhino, see our glossary for terminology and key terms. Key terms include provisioning, compute resource, provisioning template, and virtualization. |
This usage guide is structured into five sections:
-
Installing orcharhino references the orcharhino installation guide and is the base for using orcharhino. Selecting Ubuntu 20.04 during the main installation allows you to skip parts of this guide.
-
Preparing infrastructure incorporates your orcharhino server into your existing infrastructure. The first two steps are only necessary when starting with orcharhino.
-
Preparing the operating system entry bundles all necessary information to set up your orcharhino to manage hosts running Ubuntu 20.04. You can skip this step if your orcharhino is already configured to deploy hosts running Ubuntu 20.04.
-
Managing content demonstrates how to set up your orcharhino to synchronize and distribute content. You can synchronize and distribute any internal software packaged as
.deband.rpmpackage.Synchronized repositories are organized in products. Use content views which bundle and version lists of repositories to make the correct content available to your content hosts. This guide chooses Prosody as an example for custom content.
-
Provisioning a host demonstrates how to automatically deploy hosts based on host groups. Host groups are blueprints bundling provisioning and configuration details to deploy hosts with the click of a button.
This usage guide chooses Ansible to configure hosts. You can attach Ansible roles to individual hosts or group of hosts to limit your configuration efforts.
Following this usage guide, you can deploy any .deb package to managed hosts using orcharhino.
If your organization is using an internal artifact store such as GitLab, JFrog Artifactory, nexus repository oss, Pulp, or just plain repositories on an HTTP server, orcharhino is just the right tool to fetch content and distribute it to managed hosts in an automated and versioned way.
orcharhino fetches software packages from any valid repository with content for CentOS, Debian, Oracle Linux, Red Hat Enterprise Linux, SUSE Linux Enterprise Server, and Ubuntu.
Once synchronized to orcharhino, you can deploy and configure hosts to run arbitrary .deb and .rpm packages.
You can use orcharhino to test internally developed software. Once software gets built and pushed to an artifact store, you can either automatically trigger a sync using the orcharhino API or Hammer CLI; or wait until a sync plan runs to fetch content to orcharhino. Once synchronized, you can make content available to managed hosts, for example nightly builds to your Development environment.
Pushing content to quality assurance is as simple as promoting a content view from Development to Test. Once the quality assurance team declares software stable, it can simply be released to Production or in turn be fetched by your customers.
If you are running internally written software in production, simply promote versioned and tested content from the Test to the Production lifecycle environment. All managed hosts attached to this content can then be upgraded using a job template. Refer to deploying multiple versions on how to deploy multiple versions of content to hosts in different lifecycles.
The same applies if you depend on external software to be run in your data center. You can use orcharhino to version this content, too.
Installing orcharhino
Follow the installation guide to install orcharhino:
-
Perform an orcharhino appliance installation if you are using a VMware environment.
-
Perform a manual installation using the
install_orcharhino.shscript to install orcharhino Server on an existing host running AlmaLinux 9, Oracle Linux 9, Red Hat Enterprise Linux 9, and Rocky Linux 9. -
Perform an orcharhino Kickstart installation to install orcharhino on a host running AlmaLinux 9, Oracle Linux 9, Red Hat Enterprise Linux 9, and Rocky Linux 9.
This guide assumes you have orcharhino manage DHCP, DNS, and TFTP in its network.
|
Select Ubuntu 20.04 on the fourth step of the main installation to skip setting up a partition table, provisioning templates, and the orcharhino Client for Ubuntu 20.04. |
Preparing Infrastructure
Integrate orcharhino with your existing infrastructure.
Creating a Subnet
Set up a subnet.
|
This procedure assumes orcharhino manages DHCP and DNS for its network. |
-
Navigate to Infrastructure > Subnets.
-
Click Create Subnet.
-
Enter all relevant details of the subnet orcharhino manages. Ensure to select your orcharhino as remote execution proxy and its domain on the corresponding tabs.
-
Click Submit to save your subnet.
Setting the DNS Proxy for a Domain
Your orcharhino installation automatically sets up a domain based on the hostname of your orcharhino.
-
Navigate to Infrastructure > Domains.
-
Select the existing domain.
-
Enter your DNS proxy, which is either your orcharhino server or any attached orcharhino proxy.
-
Click Submit to save your changes.
Installing a Compute Resource Plugin
Install a compute resource plugin to manage hosts on and deploy to a compute resource provider.
Attaching a Compute Resource
Attach a compute resource to orcharhino.
-
Adding an Amazon EC2 connection to orcharhino Server by using orcharhino management UI
-
Adding a GCE connection to orcharhino Server by using orcharhino management UI
-
Adding a Microsoft Azure connection by using orcharhino management UI
-
Adding a VMware connection to orcharhino Server by using orcharhino management UI
Creating a Compute Profile
Set up a compute profile.
-
Navigate to Infrastructure > Compute Profiles.
-
Click Create Compute Profile.
-
Enter a Name for the compute profile.
-
Click Submit to save your compute profile.
-
Select your previously attached compute resource provider.
-
Define various settings for new virtual machines depending on the compute resource provider.
Preparing the Operating System Entry
Set up orcharhino to provision hosts running Ubuntu 20.04.
Preparing the Installation Medium
Extract the installation media for Ubuntu 20.04 on your orcharhino to perform offline installations.
|
Instead of extracting the installation media manually, you can synchronize a file repository from ATIX which you can use as local installation media. |
-
Connect to your orcharhino Server using SSH:
$ ssh root@orcharhino.example.com -
Download the
Ubuntu 20.04 server legacyinstallation media from ubuntu.com usingwget:$ cd /tmp $ wget http://cdimage.ubuntu.com/ubuntu-legacy-server/releases/20.04/release/ubuntu-20.04.1-legacy-server-amd64.iso -
Verify the integrity and authenticity of the
.isoimage using GPG public keys:$ gpg --keyserver keys.gnupg.net --recv-key 3B4FE6ACC0B21F32 D94AA3F0EFE21092 871920D1991BC93C $ wget http://cdimage.ubuntu.com/ubuntu-legacy-server/releases/20.04/release/SHA256SUMS $ wget http://cdimage.ubuntu.com/ubuntu-legacy-server/releases/20.04/release/SHA256SUMS.gpg $ gpg --verify SHA256SUMS.gpg SHA256SUMS $ echo 'f11bda2f2caed8f420802b59f382c25160b114ccc665dbac9c5046e7fceaced2 *ubuntu-20.04.1-legacy-server-amd64.iso' | sha256sum --check -
Mount the
.isoimage:$ mount ubuntu-20.04.1-legacy-server-amd64.iso /mnt -
Copy the content of the mounted installation media to the
pubdirectory:$ mkdir -p /var/www/html/pub/installation_media/ubuntu_20_04 $ cp -a /mnt/* /var/www/html/pub/installation_media/ubuntu_20_04/ -
Create the required directory structure:
$ cd /var/www/html/pub/installation_media/ubuntu_20_04 $ mkdir -p dists/focal/main/installer-amd64/current/legacy-images/ $ cd dists/focal/main/installer-amd64/current/legacy-images/ $ ln -s ../../../../../../install/netboot -
Unmount and delete the
.isoimage:$ cd $ umount /mnt $ rm -rf /tmp/ubuntu-20.04.1-legacy-server-amd64.iso
Use the path to the local installation media files when creating an installation medium, for example, http://orcharhino.example.com/pub/installation_media/ubuntu_20_04/.
This allows for offline installations of hosts running Ubuntu 20.04.
Creating the Operating System Entry
Create an installation medium and operating system for Ubuntu 20.04.
|
You can use a script to add operating system entries to your orcharhino Server. On your orcharhino Server, uncomment the operating systems and orcharhino Client that you want to add in |
-
In the orcharhino management UI, navigate to Hosts > Installation Media.
-
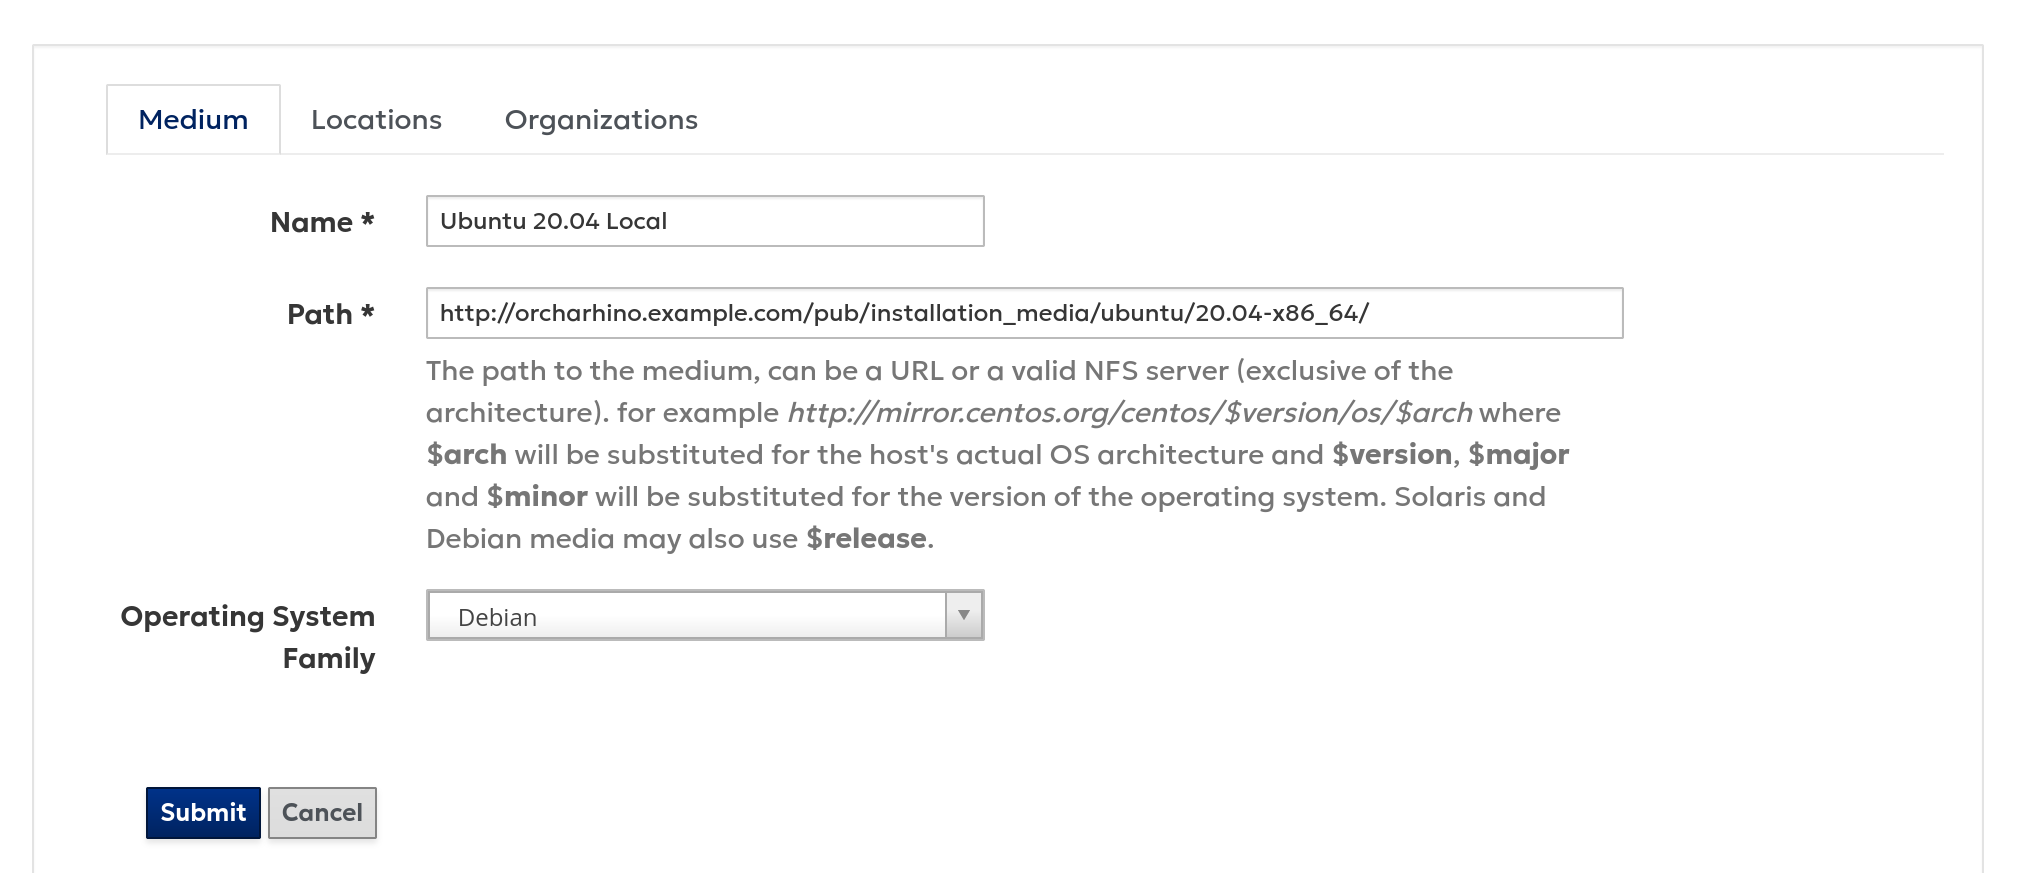
Click Create Medium.
-
The Name field identifies the installation media for Ubuntu 20.04. We recommend adding
localto the name as the path of the extracted.isoimage points to the orcharhino. Use a locally available installation medium to perform offline installations. -
The Path field defines the path to the extracted
.isoimage. The content of/var/www/html/pub/is publicly available onhttp://orcharhino.example.com/pub/. If you extract the.isoimage to/var/www/html/pub/installation_media/ubuntu_20_04/, the path ishttp://orcharhino.example.com/pub/installation_media/ubuntu_20_04/.ATIX AG provides file-type repositories for installation media. You can synchronize them to provision hosts in disconnected environments by using local installation media. For a list of upstream URLs, see Using file repositories for installation media for Debian/Ubuntu in the ATIX Service Portal.
ATIX AG provides the following installation media as file-type repository:
-
Debian 13
-
Debian 12
-
Debian 11
-
Debian 10
-
Ubuntu 24.04
-
Ubuntu 22.04
-
Ubuntu 20.04
-
Ubuntu 18.04
-
-
Set the Operating System Family drop down menu to
Debianfor all Debian and Ubuntu systems. -
Set a location and organization context for the installation media.
-
Click Submit to save the installation media entry for Ubuntu 20.04.
-
-
In the orcharhino management UI, navigate to Hosts > Provisioning Setup > Operating Systems.
-
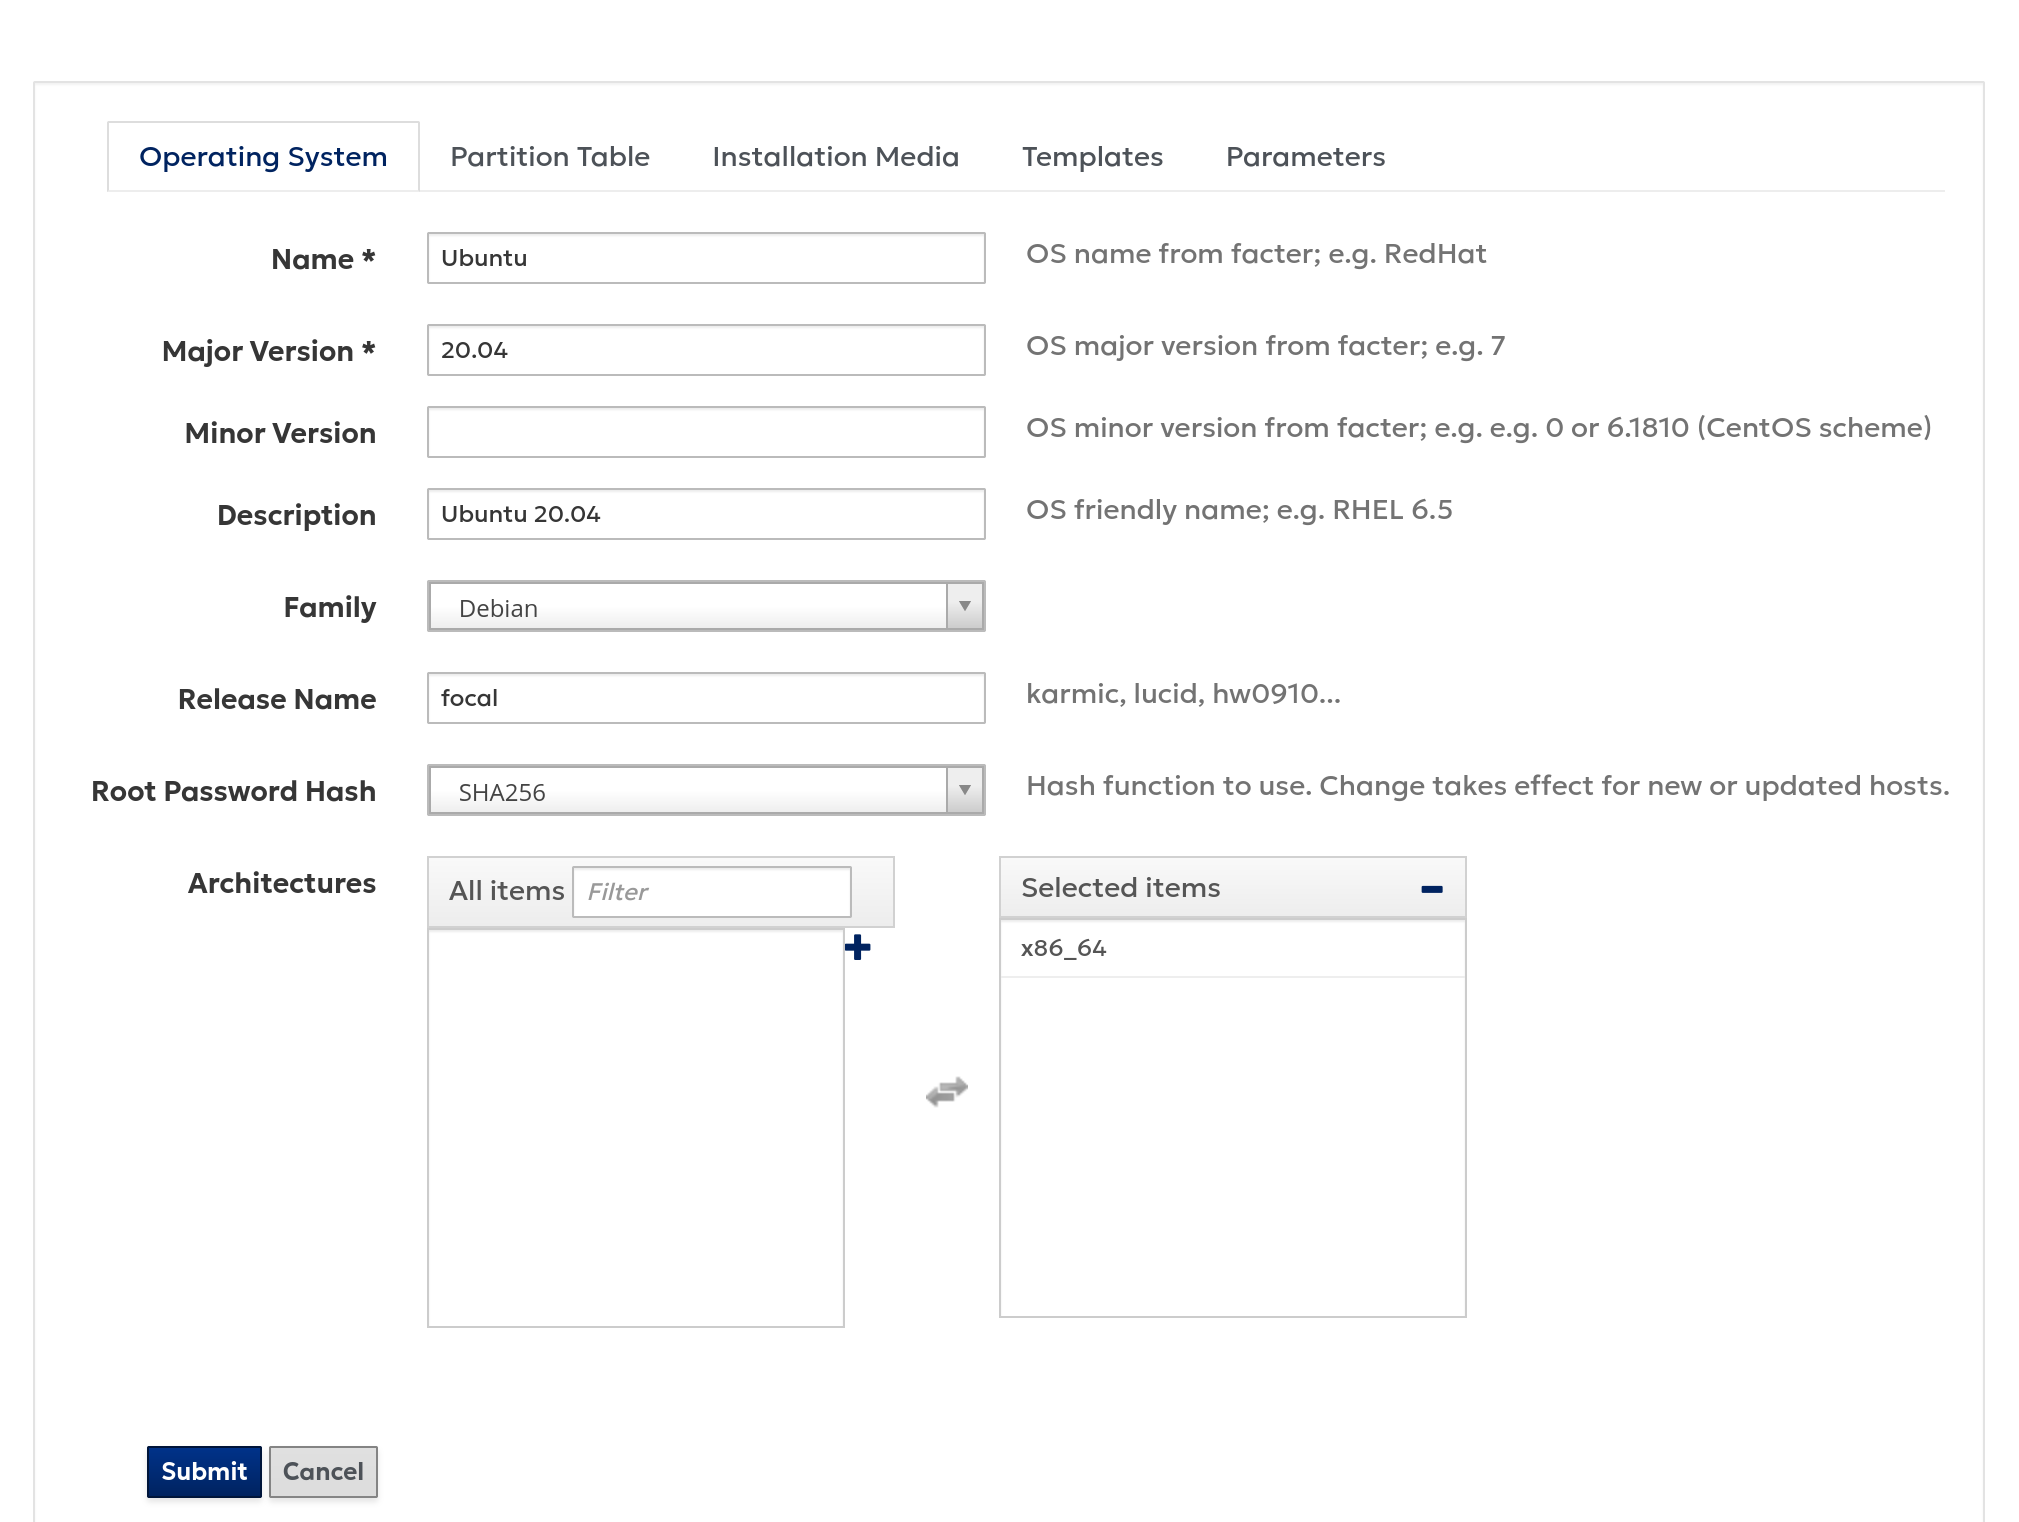
Click Create Operating System.
-
Set the Name of the operating system. Choose a name as reported by Ansible, Puppet, or Salt as fact.
-
Set the Major Version of Ubuntu, for example
20.04. -
Omit the Minor Version for Ubuntu.
-
Optional: Add an arbitrary Description.
-
Assign Ubuntu 20.04 to the Family to the Debian family.
-
Set the Release Name for Ubuntu, for example
focalfor Ubuntu 20.04. -
Set the Root Password Hash to
SHA256for Ubuntu. -
Assign the Architectures to Ubuntu.
-
The other tabs require associations to the newly created operating system. Select a partition table, an installation media, templates, and optionally parameters.
On a basic orcharhino installation, you are not able to select any partition tables and templates when creating the operating system. Instead, save the
Ubuntu 20.04operating system entry by clicking Submit as shown above and navigate to Hosts > Templates > Partition Tables and Hosts > Templates > Provisioning Templates to associate the default templates with the operating system. Return to the operating system and select those templates using the drop down menu. -
Click Submit to save the operating system entry.
-
Using Custom Templates
|
Your orcharhino installation comes with all required templates. We do not recommend to manually create new or edit locked templates. Custom templates and unlocked templates do not receive any updates during an orcharhino upgrade. Use the clone function to customize templates. Note, that cloned or manually created templates are not updated during an orcharhino upgrade. In case you know what you are doing, and template editing is desirable, the management UI provides extensive tools to do so, including inbuilt documentation on template syntax at |
Creating a Partition Table
Create a partition table for Ubuntu 20.04.
-
Navigate to Hosts > Partition Tables.
-
Click Create Partition Table.
-
Enter a Name for your partition table. We recommend adding
Preseedto the name of the partition table for Debian and Ubuntu to differentiate withAutoYaSTfor SUSE Linux Enterprise Linux andKickstartfor CentOS, Oracle Linux, and Red Hat Enterprise Linux. -
Optional: Check the Default checkbox to assign the partition table to all organization and location contexts.
-
Select
Debianfrom the Operating System Family list. -
In the Editor field, enter the
Preseed Defaultpartition table from your orcharhino:$ cat /usr/share/foreman/app/views/unattended/partition_tables_templates/preseed_default.erb -
Ensure the partition table is assigned to the correct organization and location context.
-
Click Submit to save your partition table.
Creating a Finish Template
Create a finish template for Ubuntu 20.04.
-
Navigate to Hosts > Provisioning Templates.
-
Click Create Template.
-
Enter a Name for the provisioning template. We recommend adding
Preseedto the name of the provisioning template for Debian and Ubuntu to differentiate withAutoYaSTfor SUSE Linux Enterprise Linux andKickstartfor CentOS, Oracle Linux, and Red Hat Enterprise Linux. -
Optional: Check the Default checkbox to assign the provisioning template to all organization and location contexts.
-
In the Editor field, enter the
Preseed Default Finishprovisioning template from your orcharhino:$ cat /usr/share/foreman/app/views/unattended/provisioning_templates/finish/preseed_default_finish.erb -
Click the Type tab.
-
Select
Finish templatefrom the Type list. -
On the Association tab, select
Ubuntu 20.04in the Applicable Operating Systems field. -
Ensure the provisioning template is assigned to the correct organization and location context.
-
Click Submit to save your finish template.
Creating a Provisioning Template
Create a provisioning template for Ubuntu 20.04.
-
Navigate to Hosts > Provisioning Templates.
-
Click Create Template.
-
Enter a Name for the provisioning template. We recommend adding
Preseedto the name of the partition table for Debian and Ubuntu to differentiate withAutoYaSTfor SUSE Linux Enterprise Linux andKickstartfor CentOS, Oracle Linux, and Red Hat Enterprise Linux. -
Optional: Check the Default checkbox to assign the provisioning template to all organization and location contexts.
-
In the Editor field, enter the
Preseed Defaultprovisioning template from your orcharhino:$ cat /usr/share/foreman/app/views/unattended/provisioning_templates/provision/preseed_default.erb -
Click the Type tab.
-
Select
Provisioning templatefrom the Type list. -
On the Association tab, select
Ubuntu 20.04in the Applicable Operating Systems field. -
Ensure the provisioning template is assigned to the correct organization and location context.
-
Click Submit to save your provisioning template.
Creating a PXELinux Template
Create a PXELinux template for Ubuntu 20.04.
-
Navigate to Hosts > Provisioning Templates.
-
Click Create Template.
-
Enter a Name for the provisioning template. We recommend adding
Preseedto the name of the partition table for Debian and Ubuntu to differentiate withAutoYaSTfor SUSE Linux Enterprise Linux andKickstartfor CentOS, Oracle Linux, and Red Hat Enterprise Linux. -
Optional: Check the Default checkbox to assign the provisioning template to all organization and location contexts.
-
In the Editor field, enter the
Preseed Default PXELinuxprovisioning template from your orcharhino:$ cat /usr/share/foreman/app/views/unattended/provisioning_templates/PXELinux/preseed_default_pxelinux.erb -
Click the Type tab.
-
Select
PXELinux templatefrom the Type list. -
On the Association tab, select
Ubuntu 20.04in the Applicable Operating Systems field. -
Ensure the provisioning template is assigned to the correct organization and location context.
-
Click Submit to save your PXELinux template.
Associating templates to an operating system
Associate the previously created partition table and provisioning templates with the Ubuntu 20.04 operating system.
-
In the orcharhino management UI, navigate to Hosts > Provisioning Setup > Operating Systems.
-
Select the
Ubuntu 20.04operating system. -
On the Partition Table tab, select your previously created
Preseedpartition table as Partition Table. -
On the Templates tab, select your previously created
Preseed Finishtemplate as Finish template,Preseedtemplate as Provisioning Template, andPreseed PXELinuxtemplate as PXELinux template. -
Click Submit to associate the partition table and provisioning templates with Ubuntu 20.04.
Managing Content
Synchronize content to orcharhino to supply hosts running Ubuntu 20.04.
|
For a better understanding of content management in orcharhino, see our glossary for terminology and key terms. Key terms include product, repository, content view, lifecycle environment, and activation key. |
Creating Content Credentials
orcharhino uses GPG public keys to verify signatures as a security measure to ensure the authenticity and integrity of remote content sources.
-
Add content credentials for the Ubuntu operating system repositories.
-
Add the GPG public key for the orcharhino Client repository. You can find them on your orcharhino Server under
/opt/orcharhino/keys/. -
Add the GPG public key for your custom content repository.
orcharhino only accepts ascii-armored GPG public keys. You can convert binary GPG public keys using
gpg:$ cd /tmp/ $ wget --quiet https://prosody.im/files/prosody-debian-packages.key $ gpg --import prosody-debian-packages.key $ gpg --armor --export 7393D7E674D9DBB5 > prosody.txtAdd the
prosody.txtGPG public key as content credential to orcharhino.
Creating a Sync Plan
Create a sync plan to periodically fetch new packages from synchronized repositories.
-
Navigate to Content > Sync Plans.
-
Click Create Sync Plan.
-
Choose a Name, Interval, Start Date, and Start Time for your sync plan.
-
Click Submit to save your sync plan.
Synchronizing Upstream Repositories
Synchronize the default Ubuntu 20.04 repositories.
-
Create a product called
Ubuntu 20.04 OS.Navigate to Content > Products and click Create Product.
-
Create the default Ubuntu 20.04 repositories.
Navigate to Content > Products and select the
Ubuntu 20.04 OSproduct. Click New Repository and create repositories of typedeb:-
focal main restricted universe-
Upstream URL:
http://archive.ubuntu.com/ubuntu/ -
Releases:
focal -
Components:
main,restricted,universe -
Architectures:
amd64
-
-
focal-security main restricted universe-
Upstream URL:
http://archive.ubuntu.com/ubuntu/ -
Releases:
focal-security -
Components:
main,restricted,universe -
Architectures:
amd64
-
-
focal-updates main restricted universe-
Upstream URL:
http://archive.ubuntu.com/ubuntu/ -
Releases:
focal-updates -
Components:
main,restricted,universe -
Architectures:
amd64
-
-
-
Use to previously created sync plan to periodically fetch content from the upstream sources.
-
Add the corresponding GPG public keys as a content credential to verify the authenticity of the meta data of the Ubuntu repositories.
-
Synchronize the repositories.
Synchronize all repositories using the Select Action > Sync Now button on the products page.
|
Check the dependencies of your custom content.
This example installs Prosody which has a dependency to Otherwise, it is much faster to only synchronize components |
Synchronizing orcharhino Client Repositories
Synchronize the orcharhino Client for Ubuntu 20.04.
Refer to adding orcharhino Clients on how to synchronize the orcharhino Client for Ubuntu 20.04. Navigate to the orcharhino Clients gen3 in the ATIX Service Portal for the upstream URL of the orcharhino Client repository for Ubuntu 20.04. The procedure is analogue to adding upstream Ubuntu repositories.
Synchronizing Custom Content
orcharhino can synchronize any valid APT and Yum repository.
This guide deploys Prosody, a .deb package that is not available in the default Ubuntu 20.04 repositories.
Instead, built .deb packages are available on prosody.im.
-
Create a product called
Prosody.Navigate to Content > Products and click Create Product.
-
Create a repository.
Navigate to Content > Products and select the
Prosodyproduct. Click New Repository and create a repository of typedeb.-
Prosody-
Upstream URL:
https://packages.prosody.im/debian -
Releases:
focal -
Components:
main -
Architectures:
amd64
-
-
-
Use to previously created sync plan to periodically fetch content from the upstream source.
-
Add the corresponding GPG public keys as a content credential to verify the authenticity of the meta data of the Prosody repository.
-
Synchronize the repository.
Synchronize the repository using the Select Action > Sync Now button on the products page.
-
On your orcharhino Server, create a product:
$ hammer product create \ --description "Prosody XMPP Server" \ --name "Prosody" \ --organization-id 1 \ --sync-plan-id 2 -
Create a repository:
$ hammer repository create \ --content-type "deb" \ --deb-architectures "amd64" \ --deb-components "main" \ --deb-releases "focal" \ --gpg-key-id 21 \ --name "hammer_prosody" \ --organization-id 1 \ --product-id 5 \ --publish-via-http true \ --url "https://packages.prosody.im/debian" -
Synchronize the repository:
$ hammer product synchronize \
    --id 5 \
    --organization-id 1
Use the
--asyncflag to synchronize the not wait until the products has been synchronized. Instead,hammerreturns a task id.
Creating Lifecycle Environments
Lifecycle environments are part of content management in orcharhino. They restrict access to content and allow you to run different versions of the same software. Use lifecycle environments to create versions of software packages and errata.
-
Navigate to Content > Lifecycle Environments.
-
Click Create Environment Path.
-
Click Add New Environment to create environments inside your path. Ensure to create a sequence by setting the Prior Environment accordingly.
|
You can use one lifecycle path with three sequential lifecycle environments: Development, Testing, and Production. By default, all content is automatically part of the Library lifecycle environment. |
Creating Content Views
A content view is a named list of repositories. Publishing a content view freezes the current state. Synchronizing content into a repository that is part of a content view does not update an already published content view.
Create two content views to separate the operating system plus client and your custom content.
-
Navigate to Content > Content Views.
-
Click Create New View.
-
Enter a Name and click Save.
-
On the Deb Content tab, select Repositories.
-
On the Add tab, select the three previously created repositories for Ubuntu 20.04 and the orcharhino Client repository.
-
Click Add Repositories to save your changes.
-
Click on Publish New Version and optionally add a description.
-
Click Save to publish a new version of the content view.
Rerun this procedure for your custom content repositories.
Creating a Composite Content View
A composite content view is a named list of content views.
|
Creating a composite content view allows you to combine two versioned content views. You can update your operating system and client at a different pace than your internal application. |
-
Navigate to Content > Content Views.
-
Click Create Content View.
-
Enter a Name, preferably containing either
CompositeorCCV(short for Composite Content View), and select the Composite View checkbox. -
Click Save to save your composite content view.
-
On the Add tab, select both previously created content views and click Add Content Views.
You can optionally add further content views. For example, if you want to configure your hosts using Puppet, add a content view containing the necessary repositories for the Puppet agent.
-
Click Publish New Version and optionally add a description.
-
Click Save to publish your composite content view.
-
Promote the composite content view to the lifecycle environment of your choice by clicking the Promote button.
-
Select one of the previously created lifecycle environments and click Save to promote your composite content view.
Creating an Activation Key
Create an activation key to define the content available to hosts.
Activation keys are used by the subscription-manager to register hosts with orcharhino and consist of three parts: a lifecycle environment, a content view, and multiple subscriptions, which generally correspond to products.
-
Navigate to Content > Activation Keys.
-
Click Create Activation Key.
-
Choose a Name, Environment, and Content View.
-
Click Save to save your activation key.
-
On the Subscriptions tab, select the Add tab and assign the necessary subscriptions, for example
Ubuntu 20.04andProsody.
Provisioning a Host
After configuring orcharhino and synchronizing all necessary content, create a host group to simplify deploying hosts running your custom application.
Creating a Host Group
Host groups bundle provisioning and configuration settings.
-
Navigate to Configure > Host Groups.
-
Click Create Host Group.
-
On the Host Group tab, enter a Name, for example
Ubuntu 20.04, and assign the previously created Lifecycle Environment, Content View, Content Source, Deploy on, and Compute Profile. -
On the Network tab, assign the Domain and Subnet.
-
On the Operating System tab, assign the Architecture, Operating System, Media, Partition Table, PXE-Loader, and enter a default root password.
-
On the Locations tab, assign a location.
-
On the Organizations tab, assign an organization.
-
On the Activation Keys tab, assign the previously created activation key.
-
Click Submit to save your host group.
You can now comfortably deploy hosts running Ubuntu 20.04 using the Ubuntu 20.04 host group.
Installing the Ansible Plugin
Install the Ansible plugin for configuration management.
-
Connect to your orcharhino using SSH.
-
Install the Ansible plugin:
$ orcharhino-installer --enable-foreman-plugin-ansible --enable-foreman-proxy-plugin-ansible
Using Ansible to Configure Hosts
Use an Ansible role to install your custom application.
github.com/ATIX-AG/ansible-role-prosody is based on an Ansible role by systemli.
Based on the master branch, the atix-master branch removes the dependency to the systemli.apt_repositories Ansible role because orcharhino provides the necessary software packages.
It also adds Ubuntu 20.04 to the list of supported systems.
-
Place your Ansible role on orcharhino.
$ cd /etc/ansible/roles/
$ git clone https://github.com/ATIX-AG/ansible-role-prosody.git
$ cd ansible-role-prosody
$ git checkout origin/atix-master
Alternatively, you can transfer the Ansible role to your orcharhino using
scpor download Ansible roles and collections directly from Ansible Galaxy:$ scp /path/to/local_role/ root@orcharhino.example.com:/etc/ansible/roles/ $ ansible-galaxy install --roles-path /etc/ansible/roles/ Namespace.Ansible_Role $ ansible-galaxy collection install --collections-path /usr/share/ansible/collections/ansible_collections/ community.general -
Import your Ansible role into orcharhino.
-
Navigate to Configure > Ansible Roles.
-
Click Import from FQDN to open a drop down menu with a list of your orcharhino and any attached orcharhino proxies. Select the machine on which you previously transferred the Ansible role to.
-
Select your Ansible role and click Update to import it to orcharhino.
-
-
Import Ansible variables into orcharhino.
-
Navigate to Configure > Ansible Roles.
-
Click Variables on your previously imported Ansible role.
-
Click Import from FQDN to open a drop down menu with a list of your orcharhino and any attached orcharhino proxies. Select the machine on which you previously transferred the Ansible role to.
-
Select all variables and click Update.
-
-
Assign your Ansible role to a host group.
-
Navigate to Configure > Host Groups.
-
Select a host group.
-
Add the imported Ansible role on the Ansible roles tab.
-
Click Submit to save your changes.
-
Deploying a Host
Use the previously created host group to deploy one or more hosts.
-
Navigate to Hosts > Create Host.
-
Select the previously created Host Group.
-
Click Submit to deploy a host.
orcharhino now starts provisioning and configuration your host. Here, configuration also includes installing and configuring your custom software using the previously imported Ansible role.
Testing Your Application
Test your deployed application in whichever way you see fit.
This guide is not meant to be a how to run your own XMPP server tutorial. Prosody is just an example for packaged software that is not part of the default Ubuntu 20.04 repositories.
Use an XMPP client to connect to your XMPP server.
-
Connect to your host using SSH:
$ ssh root@my-host.example.com -
Create an account in Prosody:
$ prosodyctl adduser alice@localhostEnter Alice’s password twice.
-
Connect to your client using SSH:
$ ssh root@my-client.example.comEnsure your client can connect to your deployed host.
-
Connect to your XMPP server using an XMPP client, for example Profanity:
$ profanityRun
/connect alice@localhost server 12.34.56.78 tls trustto connect to your XMPP server. Replace the IP of your managed host running Prosody accordingly.
Updating Your Application
Update your application on one or multiple hosts.
-
Synchronize your content to orcharhino.
Set up a sync plan to synchronize content on a regular basis or start a manual sync.
-
Publish your composite content view.
-
Navigate to Content > Content Views.
-
Select your composite content view.
-
Click Publish New Version.
-
-
Promote your composite content view.
-
Navigate to Content > Content Views.
-
Select your composite content view.
-
Click Promote to promote your composite content view to a new lifecycle environment.
-
-
Rerun the Ansible role.
-
Navigate to Hosts > All Hosts.
-
Select one or multiple hosts.
-
Click Run all Ansible roles from the actions drop down menu.
Alternatively, you can update the software package using remote execution.
-
Deploying Multiple Versions
Content management capabilities in orcharhino allow you to serve content to multiple hosts in different lifecycles. Perform the following steps to deploy a host with different content.
-
Synchronize your content to orcharhino.
Set up a sync plan to synchronize content on a regular basis or start a manual sync.
-
Publish your composite content view.
-
Navigate to Content > Content Views.
-
Select your composite content view.
-
Click Publish New Version.
-
-
Promote your composite content view.
-
Navigate to Content > Content Views.
-
Select your composite content view.
-
Click Promote to promote your composite content view to a new lifecycle environment.
-
-
Create an activation key for each of your used lifecycle environments.
-
Navigate to Content > Activation Keys.
-
Click Create Activation Key.
-
Enter a name and select a lifecycle environment and content view.
-
On the Subscriptions tab, add the previously created repositories.
-
-
Deploy a host.
-
Navigate to Hosts > Create Host.
-
Select your host group.
-
Select a different lifecycle environment.
Alternatively, you can create a host group with a different lifecycle environment.
Use nested host groups to differentiate between your lifecycle environments:
-
Create a host group with lifecycle environment Library.
-
Navigate to Configure > Host Groups.
-
Click Nest on your previously created host group.
-
Enter a name, for example
Ubuntu 20.04 Prosody Development. -
Specify the Lifecycle Environment, Content View, and Activation Key accordingly.
-
Once you have four host groups in total, you can serve managed hosts all currently available content using the Library lifecycle environment, as well as synchronized content in the three stages Development, Testing, and Production. Managing your content with orcharhino helps you deploy different versions of your internal application purely based on a host group. This means you can define the lifecycle environment of a managed host with a single setting.
-
-